
Introduction
Thank you for choosing the Steba KB M 19 Convection Oven. This compact and efficient appliance is designed for quick preparation of various dishes, offering a practical alternative to larger built-in ovens. Its energy-efficient design, double-glazed door, and precise temperature control ensure optimal cooking results. This manual provides essential information for safe operation, setup, maintenance, and troubleshooting to help you get the most out of your oven.
Important Safety Instructions
Please read all instructions carefully before using the appliance and retain them for future reference.
- Always ensure the appliance is placed on a stable, heat-resistant surface, away from flammable materials.
- Do not touch hot surfaces. Use oven mitts or gloves when handling hot items or parts.
- Ensure adequate ventilation around the oven. Maintain a minimum clearance of 10 cm (4 inches) from walls and other appliances.
- Do not immerse the appliance, cord, or plug in water or other liquids.
- Close supervision is necessary when any appliance is used by or near children.
- Unplug from the outlet when not in use and before cleaning. Allow to cool before putting on or taking off parts.
- Do not operate any appliance with a damaged cord or plug, or after the appliance malfunctions or has been damaged in any manner.
- Do not use accessories not recommended by the manufacturer, as this may cause hazards or injury.
- Do not place on or near a hot gas or electric burner, or in a heated oven.
- Extreme caution must be used when moving an appliance containing hot oil or other hot liquids.
- Do not use the appliance for anything other than its intended use.
- Do not cover the crumb tray or any part of the oven with metal foil. This will cause the oven to overheat.
- Always unplug the oven before cleaning or performing maintenance.
Product Overview
Familiarize yourself with the components of your Steba KB M 19 Convection Oven.

Figure 1: Front view of the Steba KB M 19 Convection Oven. This image shows the main body of the oven, including the glass door, handle, and control panel on the right side.

Figure 2: Dimensions of the Steba KB M 19 Convection Oven. The image indicates the oven's width (45 cm), depth (37 cm), and height (31 cm), along with its 19-liter capacity.
Control Panel

Figure 3: Detailed view of the control panel. From top to bottom, the dials control temperature, heating program, and timer. A red 'Power' indicator light is also visible.
- Temperature Dial: Adjusts cooking temperature from 90°C to 230°C.
- Program Dial: Selects heating mode (Off, Upper Heat, Lower Heat, Upper & Lower Heat, Convection).
- Timer Dial: Sets cooking time up to 90 minutes.
- Power Indicator Light: Illuminates when the oven is operating.
Accessories
- Non-stick Baking Tray: For baking and roasting.
- Grill Rack: For grilling and placing dishes.
- Crumb Tray: Collects crumbs and drips for easy cleaning.
- Tray Handle: For safe removal of hot trays and racks.
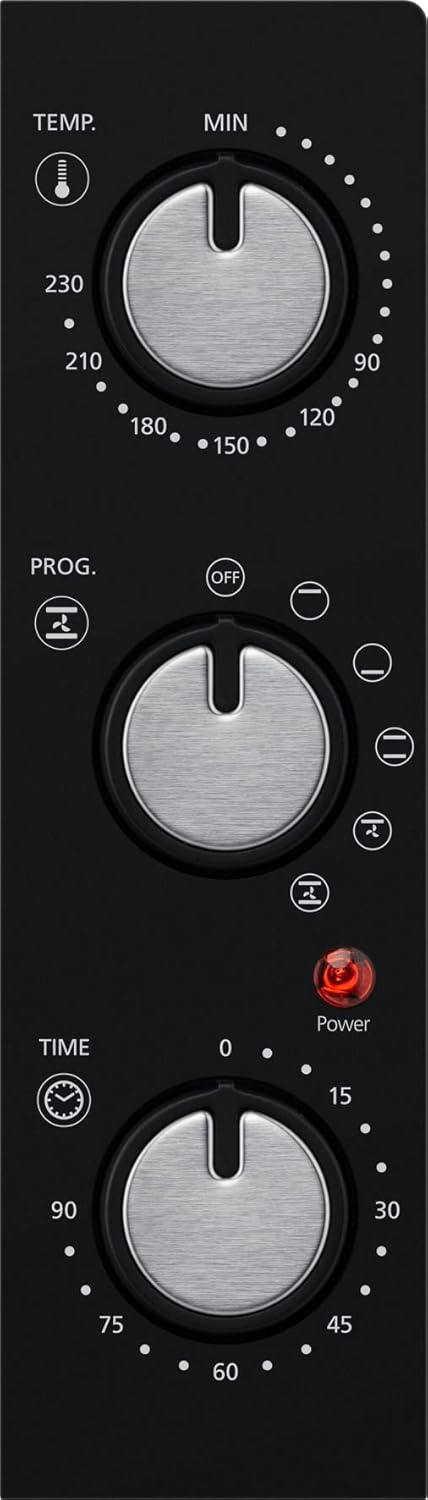
Figure 4: Non-stick baking tray. This tray is designed for easy cleaning and is suitable for various baking and roasting tasks.

Figure 5: Chrome-plated grill rack. This rack can be used for grilling or to support other oven-safe dishes.
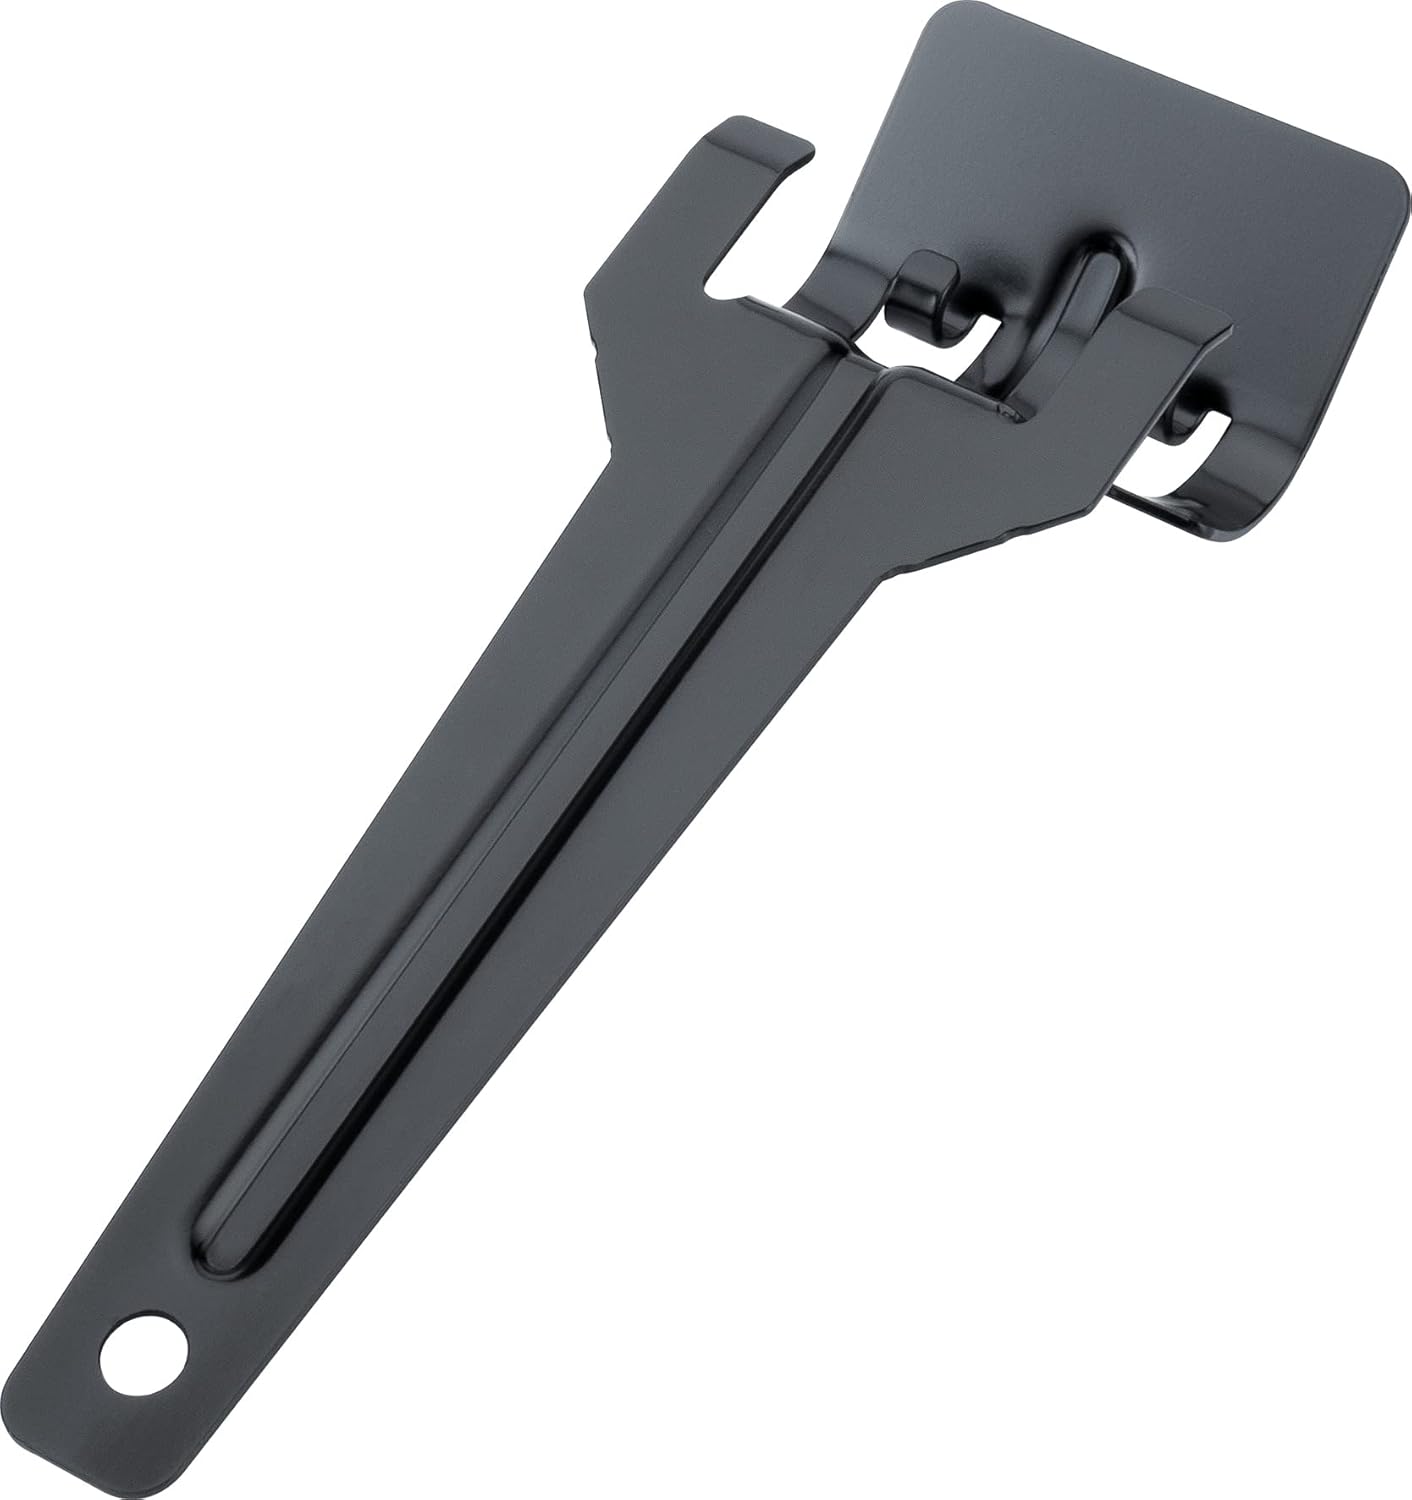
Figure 6: Tray handle. This tool is used to safely insert and remove the hot baking tray or grill rack from the oven.
Setup
- Unpacking: Carefully remove the oven and all accessories from the packaging. Retain packaging for future transport or storage if needed.
- Placement:
- Place the oven on a flat, stable, and heat-resistant surface.
- Ensure there is at least 10 cm (4 inches) of clearance on all sides (back, top, and sides) for proper ventilation. Do not place the oven directly against a wall or under cabinets that are not heat-resistant.
- Keep the oven away from water sources, flammable materials, and heat-sensitive objects.
- Initial Cleaning: Before first use, wipe the interior and exterior of the oven with a damp cloth. Wash the baking tray, grill rack, and tray handle in warm, soapy water, then rinse and dry thoroughly.
- First Use (Burn-off):
- Plug the oven into a grounded electrical outlet.
- Set the temperature dial to 230°C and the program dial to "Upper & Lower Heat" (or convection if available).
- Set the timer to 15 minutes. The oven will heat up, and a slight odor or smoke may be present. This is normal and will dissipate. Ensure the room is well-ventilated during this process.
- Once the timer finishes, allow the oven to cool completely before use.
Operating Instructions
Basic Operation
- Prepare Food: Place your food on the baking tray or grill rack.
- Insert Tray/Rack: Carefully slide the tray or rack into the desired shelf position inside the oven.
- Close Door: Ensure the oven door is securely closed.
- Set Temperature: Turn the Temperature Dial to your desired cooking temperature (e.g., 180°C for baking, 230°C for grilling).
- Select Heating Mode: Turn the Program Dial to select the appropriate heating function:
- Upper Heat: Ideal for browning the top of dishes.
- Lower Heat: Suitable for cooking the base of dishes, like pies.
- Upper & Lower Heat: Standard baking and roasting.
- Convection (Umluft): Circulates hot air for even cooking and faster results, often used for multiple items or larger dishes.
- Set Timer: Turn the Timer Dial to your desired cooking time (up to 90 minutes). The oven will begin heating, and the Power Indicator Light will illuminate. The oven will automatically switch off when the timer reaches zero.
- Monitor Cooking: You can observe the cooking process through the double-glazed door.
- Remove Food: Once cooking is complete and the timer has sounded, carefully open the oven door. Use the provided tray handle or oven mitts to safely remove the hot food.
- Cool Down: Allow the oven to cool down before cleaning.
Cooking Examples

Figure 7: Pizza cooking inside the oven. The oven is capable of cooking a standard-sized pizza on the grill rack.

Figure 8: Multiple mini pizzas cooking inside the oven. The convection function is ideal for cooking multiple items evenly.
- Pizza: Preheat oven to 200-220°C using Upper & Lower Heat or Convection. Place pizza on the grill rack or baking tray. Cook for 10-20 minutes depending on the pizza.
- Baked Goods: For cakes, muffins, or bread, use Upper & Lower Heat or Convection at the recommended temperature (usually 160-180°C).
- Roasting Vegetables/Meat: Use Upper & Lower Heat or Convection at 180-200°C. Ensure food is placed on the baking tray.
Maintenance and Cleaning
Regular cleaning ensures optimal performance and extends the life of your oven.
- Always Unplug: Before cleaning, always unplug the oven from the power outlet and allow it to cool completely.
- Exterior Cleaning: Wipe the exterior surfaces with a soft, damp cloth. Do not use abrasive cleaners or scouring pads, as they may damage the finish.
- Interior Cleaning:
- Remove the baking tray, grill rack, and crumb tray. Wash them in warm, soapy water. For stubborn stains, soak them before cleaning.
- Wipe the interior walls with a damp cloth and mild detergent. For baked-on food, a non-abrasive oven cleaner designed for conventional ovens can be used, following the product instructions carefully.
- Ensure all detergent residue is wiped away with a clean, damp cloth.
- Glass Door: Clean the glass door with a glass cleaner or a damp cloth. Avoid harsh chemicals that could damage the door seal.
- Crumb Tray: Regularly empty and clean the crumb tray to prevent grease buildup and potential fire hazards.
- Do Not Immerse: Never immerse the main oven unit in water or any other liquid.
Troubleshooting
If you encounter issues with your oven, refer to the following common problems and solutions:
| Problem | Possible Cause | Solution |
|---|---|---|
| Oven does not turn on. | Not plugged in; power outage; timer not set; faulty outlet. | Check power cord connection; verify power supply; ensure timer is set; test outlet with another appliance. |
| Food not cooking evenly. | Incorrect temperature/mode; overcrowding; improper rack position. | Adjust temperature/mode; avoid overcrowding; use convection for even cooking; try different rack positions. |
| Excessive smoke or odor during cooking. | Food spills; residue from previous cooking; first use burn-off. | Clean interior thoroughly; ensure crumb tray is clean; ventilate room during first use. |
| Oven door does not close properly. | Obstruction; damaged hinge/seal. | Check for food debris or objects blocking the door; contact customer support if damaged. |
If the problem persists after attempting these solutions, please contact Steba customer support.
Specifications
| Brand | Steba |
| Model Number | 045900 (KB M 19) |
| Volume Capacity | 19 Litres |
| Product Dimensions (L x W x H) | 45 x 37 x 31 cm |
| Item Weight | 7.7 kg |
| Voltage | 230 Volts |
| Special Features | Effective housing insulation, double glass door, continuous temperature adjustment, separately switchable upper and lower heat, convection (Umluft), timer. |
| Included Accessories | Non-stick baking tray, grill rack, crumb tray, tray handle. |
Warranty and Support
Steba products are manufactured to high-quality standards and come with a manufacturer's warranty. Please refer to the warranty card included with your purchase for specific terms and conditions, including the warranty period and coverage details. Keep your proof of purchase for warranty claims.
For technical support, spare parts, or warranty inquiries, please contact Steba customer service. Contact details can typically be found on the official Steba website or on the product packaging.
Online Resources: www.steba.com
