Introduction
This manual provides detailed instructions for the safe installation, operation, and maintenance of your ASD 6 Inch Commercial Canless LED Downlight. Please read this manual thoroughly before installation and retain it for future reference.
Safety Information
Always follow basic safety precautions when installing and maintaining electrical fixtures to reduce the risk of fire, electric shock, and personal injury.
- Turn off power at the circuit breaker before installation or servicing.
- Ensure all electrical connections comply with local codes and ordinances, as well as the National Electric Code (NEC).
- If you are not qualified to perform electrical installations, consult a licensed electrician.
- Do not modify the fixture in any way.
- Do not install in areas with excessive vibration or heat.
- This fixture is rated for 120-277V circuits.
- Suitable for Wet locations.
- IC Rated: Suitable for direct contact with insulation.
Product Overview
The ASD 6 Inch Commercial Canless LED Downlight is a versatile lighting solution featuring adjustable power and color temperature settings. Its canless design simplifies installation, making it suitable for various commercial and residential applications.

Image: The ASD 6 Inch Commercial Canless LED Downlight, showing the fixture and its packaging. This model is designed for easy installation without a traditional can housing.
Key Features:
- Power Adjustable: Selectable wattage options (e.g., 10W, 15W, 22W depending on size).
- Color Temperature Adjustable (CCT): 5 selectable options (2700K, 3000K, 3500K, 4000K, 5000K).
- Dimmable: Compatible with 0-10V dimmable drivers.
- IC Rated: Approved for direct contact with insulation.
- Wet Locations Rated: Suitable for damp and wet environments.
- Energy Efficient: Long lifespan of 50,000 hours.

Image: Visual representation of the key features: Color and Power Selectable, CRI90+ for rich and natural colors, IC Rated Canless Solution, and Wet Locations Rated.
Specifications

Image: Detailed product specification diagram showing dimensions (8-1/4" diameter, 4" height, 6-1/8" template size) and electrical ratings (120-277V, 0-10V dimming, Wet locations).
| Specification | Detail |
|---|---|
| Model Name | CDL7 A-CDL7-6DA22AC-8p |
| Size | 6 Inch |
| Wattage | Adjustable (10W, 15W, 22W) |
| Brightness | Up to 1850 Lumens (at 22W) |
| Color Temperature (CCT) | Selectable (2700K, 3000K, 3500K, 4000K, 5000K) |
| Voltage | 120-277V (AC) |
| Dimmability | 0-10V Dimmable |
| Material | Aluminum Housing, PC Lens |
| Product Dimensions | 8.25"L x 3.88"W x 8.25"H |
| Installation Template Size | 6-1/8" (156 mm) |
| Certifications | UL, Energy Star, IC Rated |
| Lifespan | 50,000 hours |
| Warranty | 5-year limited warranty |
Installation
Follow these steps for proper installation of your canless LED downlight. Ensure power is OFF at the circuit breaker before beginning.
Prepare the Opening:
Use the provided template (or measure 6-1/8" / 156 mm) to cut an appropriate sized hole in the ceiling. Ensure there are no obstructions within the ceiling space where the fixture will be installed.
Make Electrical Connections:
Connect the fixture's wires to the building's electrical wires using wire nuts (included). Connect Black to Black (Live), White to White (Neutral), and Green to Green (Ground). Secure the safety latch onto a structural part of the original fixture housing or ceiling joist above the ceiling.
Adjust Settings (Before Insertion):
Before inserting the fixture into the mounting surface opening, locate the simple switches on the fixture's junction box to choose your desired power (wattage) and color temperature (CCT) settings. Refer to the "Operating Instructions" section for details on these adjustments.
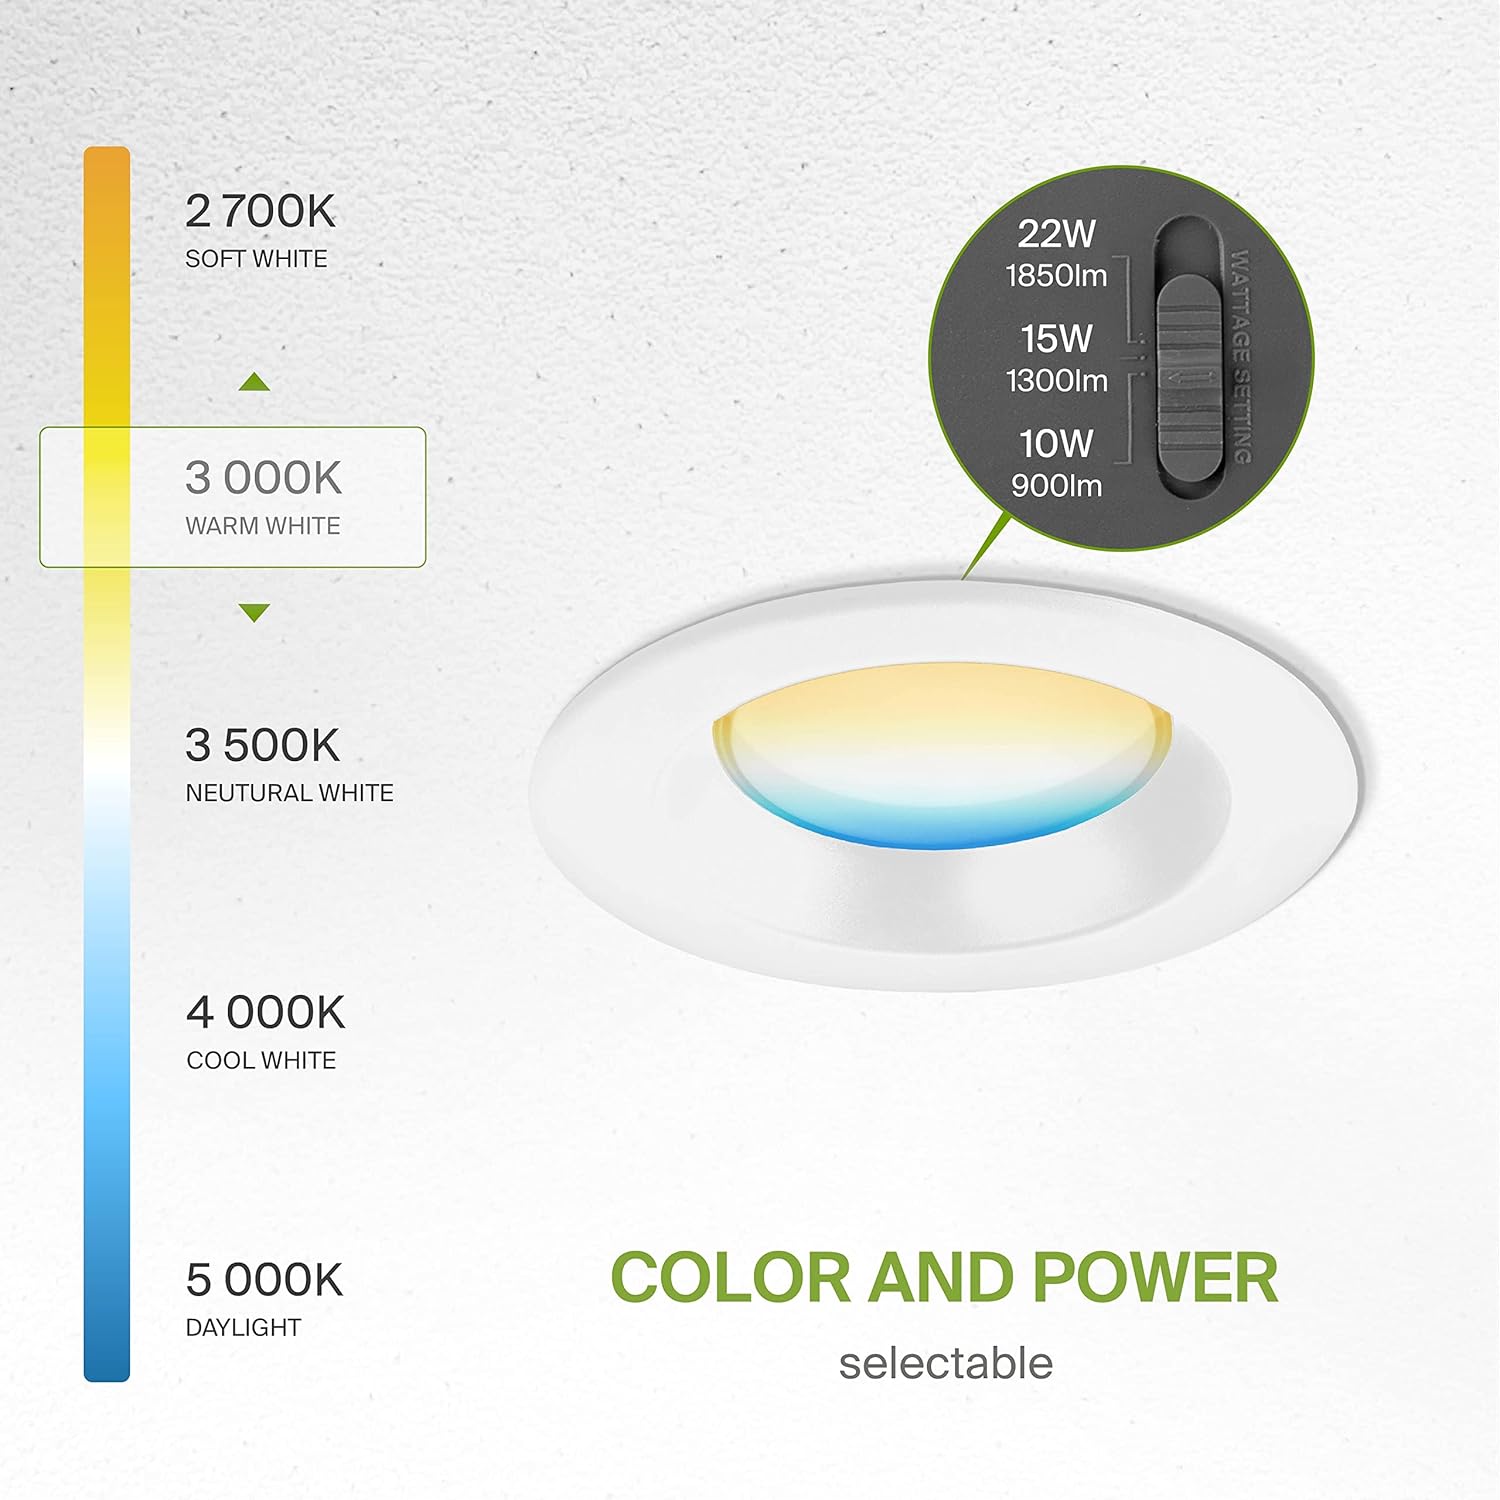
Image: Diagram illustrating the switches for adjusting color temperature (2700K to 5000K) and wattage (10W, 15W, 22W) on the fixture.
Insert and Secure Fixture:
Fold up the two spring mounting tabs on the fixture. Carefully insert the fixture into the prepared ceiling opening. As the fixture is placed into the mounting surface, the spring-loaded clips will release and secure the fixture firmly against the ceiling. Ensure the front trim is flush against the mounting surface for a clean finish.

Image: A three-step visual guide for installation, showing cutting the hole, connecting wires, and securing the fixture with spring clips.
Restore Power:
Once the fixture is securely installed, restore power at the circuit breaker.
Operating Instructions
Your ASD LED Downlight offers adjustable settings for both light output and color temperature to suit your preferences and application needs.
Adjusting Color Temperature (CCT):
The fixture has a switch to select one of five color temperatures:
- 2700K: Soft White (warmest light)
- 3000K: Warm White
- 3500K: Neutral White
- 4000K: Cool White
- 5000K: Daylight (coolest light)
To change the CCT, locate the switch on the fixture's junction box. Slide the switch to your desired color temperature. This adjustment should be made before final installation into the ceiling opening.
Adjusting Wattage (Power Output):
The fixture also features a switch to select one of three wattage settings, which directly affects the brightness (lumens) of the light:
- 10W: Lower brightness (e.g., 900lm)
- 15W: Medium brightness (e.g., 1300lm)
- 22W: Highest brightness (e.g., 1850lm)
Similar to CCT, the wattage switch is located on the fixture's junction box. Select your preferred power output before securing the fixture in the ceiling.
Dimming Functionality:
This downlight is designed to be dimmable with a 0-10V dimming system. Ensure your dimmer switch and wiring are compatible with 0-10V dimming protocols for proper operation. Standard residential dimmers (e.g., leading-edge or trailing-edge) are typically not compatible with 0-10V dimming fixtures.
Maintenance
The ASD LED Downlight requires minimal maintenance due to its long-lasting LED technology.
- Cleaning: Ensure power is off before cleaning. Wipe the fixture with a soft, damp cloth. Do not use abrasive cleaners or solvents, as they may damage the finish or electrical components.
- Inspection: Periodically inspect the fixture for any signs of damage or loose connections. If any issues are found, turn off power immediately and consult a qualified electrician.
- LED Lifespan: The integrated LED light source is designed for 50,000 hours of operation and is not user-replaceable.
Troubleshooting
If you experience issues with your downlight, refer to the following common problems and solutions:
| Problem | Possible Cause | Solution |
|---|---|---|
| Light does not turn on | No power to the fixture; Loose wiring connection; Faulty switch or circuit breaker. | Check circuit breaker and wall switch. Verify all wire connections are secure. Test the circuit with another device. |
| Light flickers or dims unexpectedly | Incompatible dimmer switch; Loose wiring; Voltage fluctuations. | Ensure you are using a 0-10V compatible dimmer. Check all wiring connections. Consult an electrician if voltage issues persist. |
| Incorrect color temperature or brightness | CCT or wattage switch set incorrectly. | Turn off power, remove fixture, and adjust the CCT/wattage switches on the junction box to your desired setting. Reinstall. |
| Humming noise from fixture | Incompatible dimmer; Loose components. | Verify dimmer compatibility. Ensure fixture is securely installed and no components are loose. |
If the problem persists after attempting these solutions, please contact customer support.
Warranty and Support
ASD provides a 5-year warranty for this product, guaranteeing top quality and safety. This warranty covers defects in materials and workmanship under normal use.
For warranty claims, technical assistance, or any questions regarding your ASD 6 Inch Commercial Canless LED Downlight, please contact our customer support team. Our team aims to respond to your concerns within 24 hours.
Please have your model number (A-CDL7-6DA22AC-8p) and purchase information ready when contacting support.
For more information, visit the official ASD Store: ASD Lighting Corporation Store


