1. Introduction
Thank you for choosing the Dalton 2000VA Uninterruptible Power Supply (UPS). This device is designed to provide reliable power backup and protection for your electronic equipment against power outages, surges, and fluctuations. Please read this manual thoroughly before installation and operation to ensure optimal performance and safety.
2. Important Safety Instructions
Always follow these basic safety precautions to reduce the risk of fire, electric shock, and injury:
- Do not open the UPS casing. There are no user-serviceable parts inside. Refer servicing to qualified service personnel.
- Do not use the UPS in environments with excessive dust, humidity, or extreme temperatures.
- Ensure the UPS is connected to a grounded power outlet.
- Do not connect non-computer related items like medical equipment, life support equipment, or household appliances to the UPS.
- Position the UPS in a well-ventilated area, away from direct sunlight or heat sources.
- In case of emergency, press the power button to turn off the UPS and disconnect it from the AC power source.
3. Package Contents
Verify that all items are present in your package:
- Dalton 2000VA UPS Unit
- Power Cord
- USB Communication Cable (if applicable)
- User Manual (this document)

Figure 3.1: Front view of the Dalton 2000VA UPS unit, showing the display screen and power button.
4. Setup and Installation
Follow these steps to set up your UPS:
- Unpacking: Carefully remove the UPS from its packaging. Inspect for any shipping damage.
- Placement: Place the UPS on a flat, stable surface in a cool, dry, and well-ventilated area. Ensure there is adequate space around the unit for airflow.
- Initial Charge: Before connecting any devices, plug the UPS power cord into a grounded wall outlet. Allow the unit to charge for at least 8 hours to ensure the battery is fully charged. The display will indicate charging status.
- Connecting Devices:
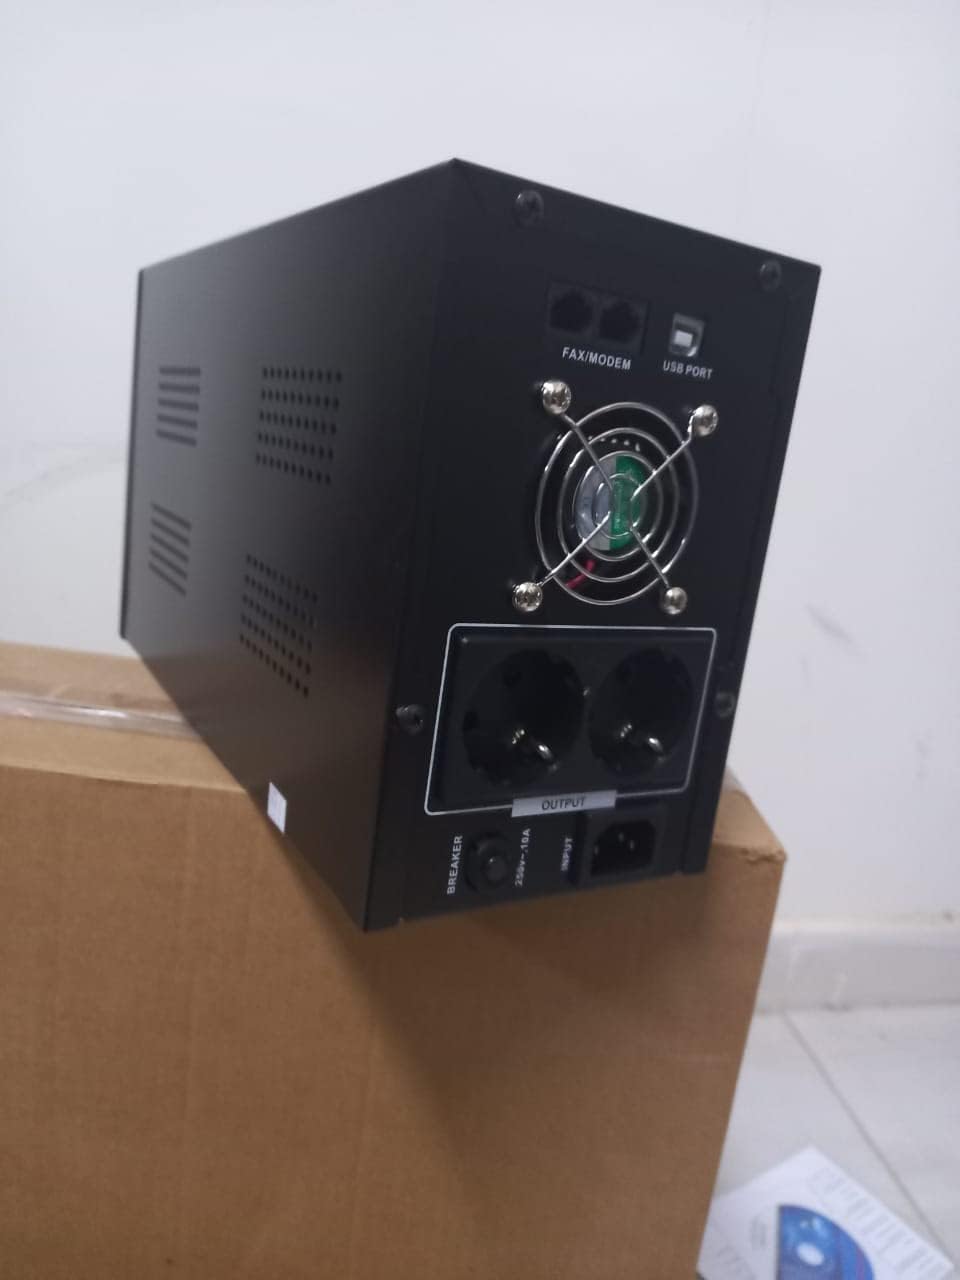
Figure 4.1: Rear view of the Dalton 2000VA UPS, highlighting the input power port, output sockets, and USB/Modem ports.
- Once the battery is charged, connect your computer, monitor, and other critical electronic devices to the UPS output sockets.
- Do not overload the UPS. Refer to the specifications section for maximum load capacity.
- If applicable, connect the USB communication cable from the UPS to your computer for monitoring software (software not included, check manufacturer's website).
5. Operating the UPS
5.1 Powering On/Off
- To Power On: After connecting to AC power and charging, press and hold the power button on the front panel for approximately 3 seconds until you hear a beep and the display illuminates.
- To Power Off: Press and hold the power button for approximately 3 seconds until you hear a beep and the display turns off. If the UPS is running on battery, it will shut down immediately. If connected to AC, it will switch to bypass mode before shutting down.
5.2 Understanding the Display
The front panel LCD display provides real-time status information:
- IN: Displays the input voltage from the utility power.
- OUT: Displays the output voltage provided by the UPS to connected devices.
- NORMAL: Indicates the UPS is operating on utility power.
- Bat: Shows the current battery charge level.
- Load: Indicates the percentage of the UPS's capacity being used by connected devices.
- Battery Mode Icon: Appears when the UPS is running on battery power during an outage.

Figure 5.1: Side view of the UPS, showing the illuminated display with power status indicators.
5.3 Battery Backup Function
In the event of a power outage, the UPS will automatically switch to battery power, providing continuous power to your connected devices. The duration of backup power depends on the load connected and the battery's charge level. The UPS will emit an audible alarm during battery operation.
When utility power returns, the UPS will automatically switch back to AC power and begin recharging its battery.
6. Maintenance
- Battery Care: To maximize battery life, ensure the UPS is always connected to an AC outlet to keep the battery charged. If the UPS is stored for an extended period, recharge it every three months for at least 8 hours.
- Cleaning: Disconnect the UPS from all power sources before cleaning. Use a soft, dry cloth to wipe the exterior. Do not use liquid or aerosol cleaners.
- Ventilation: Regularly check that the ventilation openings are not blocked by dust or debris to prevent overheating.
7. Troubleshooting
Refer to the table below for common issues and their solutions:
| Problem | Possible Cause | Solution |
|---|---|---|
| UPS does not turn on. | Battery not charged or power cord disconnected. | Ensure power cord is securely plugged in and allow battery to charge for 8 hours. |
| UPS beeps continuously in normal mode. | Overload condition. | Disconnect non-essential equipment until the alarm stops. Check total load. |
| Short backup time. | Battery not fully charged or battery nearing end of life. | Allow UPS to charge for 8 hours. If issue persists, battery may need replacement (contact service center). |
| UPS does not provide power during outage. | Battery discharged or internal fault. | Ensure UPS was fully charged. If problem persists, contact authorized service center. |
8. Technical Specifications
| Feature | Detail |
|---|---|
| Product Dimensions | 12.5 x 22.5 x 38 cm |
| Manufacturer | Dalton |
| Brand Name | Generic |
| Color | Black |
| Material | Metal |
| Current | 5 Ampere |
| Form Factor | Rack |
| Frequency Range | 50-60 Hz |
| Output Voltage | 220 Volts |
| Connector Type | AC |
9. Warranty and Support
Dalton provides an authorized maintenance center for all Uninterruptible Power Supply units. For warranty claims, technical support, or service inquiries, please contact your local Dalton authorized distributor or service center. Keep your purchase receipt as proof of purchase for warranty validation.
For further assistance, please visit the official Dalton website or contact customer support.


