

1. Introduction
Thank you for purchasing the Soundstream VM-430HB 4.3" 1-DIN Mechless Headunit. This manual provides essential information for the proper installation, operation, and maintenance of your new car stereo. Please read this manual thoroughly before use to ensure optimal performance and to prevent damage.
2. Important Safety Information
- Installation: Ensure professional installation or follow wiring diagrams carefully to avoid electrical shorts or damage. Disconnect the vehicle's battery before installation.
- Power Supply: This unit is designed for a 12V DC negative ground electrical system.
- Operation: Do not operate the unit in a manner that distracts you from driving. Always prioritize road safety.
- Cleaning: Use a soft, dry cloth for cleaning. Avoid abrasive cleaners or solvents.
- Temperature: Avoid exposing the unit to extreme temperatures or direct sunlight for extended periods.
3. Package Contents
Verify that all items are present in the package:
- Soundstream VM-430HB Headunit
- Wiring Harnesses (Power/Speaker, RCA)
- Mounting Sleeve
- Remote Control
- User Manual (this document)
4. Product Overview
4.1 Front Panel Controls

This image displays the front panel of the Soundstream VM-430HB headunit, featuring the 4.3-inch display, a central rotary control knob, USB and auxiliary input ports, and various function buttons for menu navigation and media control.
- 4.3" Display: Shows current source, track information, menu options, and video output.
- Rotary Control Knob: Adjusts volume, navigates menus, and confirms selections.
- USB Port: For connecting USB storage devices for media playback.
- Micro SD Card Slot: For playing media from Micro SD cards (located behind the panel or on the side).
- AUX Input: 3.5mm jack for connecting external audio devices.
- Menu/Mode Buttons: Access various settings and switch between input sources.
4.2 Rear Panel Connections
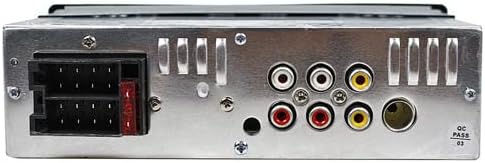
The rear view of the headunit shows the main power and speaker wiring harness connector on the left, along with multiple RCA output jacks for audio and video connections, and a fuse.
- Main Wiring Harness Connector: Connects to the vehicle's power, ground, and speaker wires.
- RCA Audio Outputs: For connecting external amplifiers (Front L/R, Rear L/R, Subwoofer).
- RCA Video Output: For connecting to an external monitor.
- RCA Video Input: For connecting a reverse camera or other video source.
- Antenna Input: For connecting the vehicle's radio antenna.
5. Installation Guide
Proper installation is crucial for the performance and longevity of your headunit. If you are unsure about any steps, consult a professional installer.
5.1 Mounting the Headunit
- Disconnect the negative terminal of the vehicle's battery.
- Remove the existing car stereo from the dashboard.
- Insert the provided mounting sleeve into the dashboard opening and bend the tabs to secure it.
- Slide the headunit into the mounting sleeve until it locks into place.
5.2 Wiring Connections
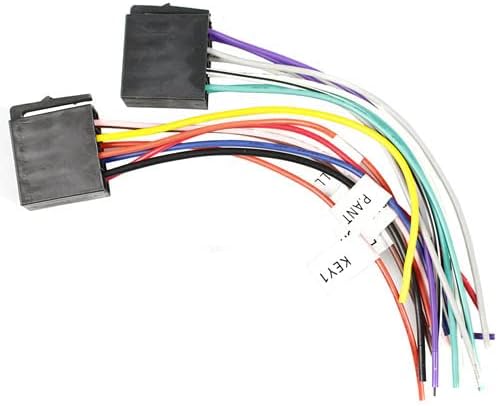
This image illustrates the two main wiring harnesses provided with the headunit. Each wire is color-coded and labeled for specific functions such as power, ground, speaker outputs, and accessory connections, facilitating correct installation.
- Power/Ground: Connect the yellow wire (constant 12V) to the vehicle's constant 12V supply, the red wire (accessory 12V) to the ignition switch, and the black wire to a good chassis ground.
- Speakers: Connect the speaker wires (e.g., white/white-black for front left, gray/gray-black for front right, green/green-black for rear left, purple/purple-black for rear right) to the corresponding vehicle speaker wires. Ensure correct polarity.
- Antenna: Connect the vehicle's antenna cable to the antenna input on the headunit.
- RCA Connections: If using external amplifiers or monitors, connect the appropriate RCA cables.
- Reverse Camera: Connect the reverse camera video output to the dedicated video input on the headunit. Connect the reverse trigger wire to the vehicle's reverse light circuit.
After all connections are made, reconnect the vehicle's battery and test the unit.
6. Basic Operation

The included infrared remote control features buttons for power, volume adjustment, source selection, track navigation, mute, equalizer settings, and other functions, allowing convenient operation from a distance.
6.1 Power On/Off
- Press the POWER button on the front panel or remote control to turn the unit on or off.
6.2 Volume Control
- Rotate the VOLUME knob on the front panel or use the VOL+ / VOL- buttons on the remote control to adjust the audio level.
6.3 Source Selection
- Press the MODE button on the front panel or remote control to cycle through available sources (Radio, USB, Micro SD, AUX, Bluetooth, PhoneLink).
7. Advanced Features
7.1 Bluetooth Connectivity

This image emphasizes the headunit's Bluetooth 4.0 capabilities for hands-free calling and audio streaming, as well as its versatile media playback options via USB, Micro SD, and auxiliary inputs.
- Pairing: Select the Bluetooth source. On your mobile device, search for available Bluetooth devices and select "VM-430HB". Enter "0000" if a PIN is required.
- Hands-Free Calling: Answer, reject, or end calls directly from the headunit's screen or remote control.
- Audio Streaming: Play music from your paired device wirelessly. Use the headunit controls for track navigation.
7.2 Android PhoneLink (2-Way Device Screen Mirroring)

This image highlights the 2-Way Android PhoneLink feature, enabling screen mirroring and control of compatible Android devices directly from the headunit's display.
- Connect your Android smartphone to the headunit via USB.
- Follow the on-screen prompts to enable screen mirroring.
- Control your phone's interface directly from the headunit's touchscreen.
7.3 Media Playback (USB/Micro SD/Aux)
- USB/Micro SD: Insert a USB drive or Micro SD card into the respective slot. The unit will automatically switch to the USB/SD source and begin playback.
- AUX Input: Connect an external audio device using a 3.5mm audio cable. Select the AUX source to listen to audio from the connected device.
7.4 RGB LED Illuminated Keys & Accents
- Access the system settings menu to customize the color of the illuminated keys and accents. Choose from 7 available RGB colors to match your vehicle's interior or personal preference.
8. Maintenance
- Cleaning the Display: Use a soft, lint-free cloth to gently wipe the display. For stubborn smudges, slightly dampen the cloth with water or a screen cleaner designed for electronics.
- General Cleaning: Wipe the unit's exterior with a dry, soft cloth. Avoid using harsh chemicals, solvents, or abrasive cleaners.
- Fuse Replacement: If the unit does not power on, check the fuse located on the rear panel. Replace it with a fuse of the same amperage rating (e.g., 10A).
9. Troubleshooting
Refer to the table below for common issues and their solutions.
| Problem | Possible Cause | Solution |
|---|---|---|
| No power | Blown fuse; incorrect wiring; loose connection | Check and replace fuse; verify power and ground connections; ensure all wires are securely connected. |
| No sound | Volume too low; mute activated; incorrect speaker wiring; amplifier issues | Increase volume; deactivate mute; check speaker connections and polarity; verify external amplifier is powered on. |
| Bluetooth not connecting | Device not in pairing mode; incorrect PIN; interference | Ensure Bluetooth is enabled on both devices and in pairing mode; re-enter PIN; move closer to the unit. |
| USB/SD not playing | Unsupported file format; corrupted media; improper connection | Ensure media files are in supported formats; try a different USB/SD card; ensure device is fully inserted. |
| Screen mirroring not working | Incompatible phone; incorrect USB connection; app not installed | Verify phone compatibility; ensure USB debugging is enabled on Android phone; check for required apps. |
10. Specifications
| Feature | Specification |
|---|---|
| Model Number | VM-430HB |
| Display Size | 4.3 inches |
| Chassis Type | 1-DIN ISO Mechless |
| Bluetooth Version | 4.0 |
| Connectivity | USB, Micro SD, Aux, Bluetooth, RCA |
| PhoneLink | 2-Way Android Device Screen Mirroring |
| Illumination | 7 Color RGB LED |
| Audio Output Mode | Stereo |
| Surround Sound Channel Configuration | 2.0 |
| Power Requirement | 12V DC Negative Ground |
11. Warranty and Customer Support
Soundstream products are designed for reliability and performance. For specific warranty details, please refer to the warranty card included with your product or visit the official Soundstream website. For technical assistance or customer support, please contact Soundstream customer service through their official channels.
Please retain your proof of purchase for warranty claims.


