
HUGMAPLE Mobile Drill R9 Plus
Contents
HUGMAPLE Professional Nail Drill Set Instruction Manual
Model: Mobile Drill R9 Plus
Product Overview
The HUGMAPLE Professional Nail Drill Set is a powerful and versatile electric nail file machine designed for both beginners and professional nail technicians. Operating at up to 30000rpm, it offers variable speed control, low noise, and low vibration. Featuring an HD LCD display, touch-sensitive buttons for battery and rotation direction (F/R), and a portable, rechargeable design with 8-10 hours of operating time. This kit includes various drill bits, sanding circles, and an AC power adapter, making it ideal for manicure, pedicure, acrylic, and polygel nail work.
Its smart design incorporates high-quality materials and manufacturing, ensuring a powerful yet easy-to-handle tool for shaping, filing, and removing gel nail polish efficiently.

Figure 1: HUGMAPLE Professional Nail Drill Set components.
Important Safety Information
Warning: Use protective eyewear when operating this nail drill to prevent eye injury from flying debris or dust. Keep hands and other body parts away from the rotating bit and motor to avoid burns. Always unplug the device when not in use and store it in a safe, dry place.
Package Contents and Components
Your HUGMAPLE Professional Nail Drill Set includes the following items:
- Main Control Unit (Mobile Drill R9 Plus)
- Nail Drill Handpiece
- Various Nail Drill Bits (Carbide, Ceramic, Diamond, etc.)
- Sanding Bands (36 pieces)
- Nail Dust Brush
- AC Power Adapter
- Nail Drill Handpiece Holder
- Pull-out Stand (integrated with main unit)
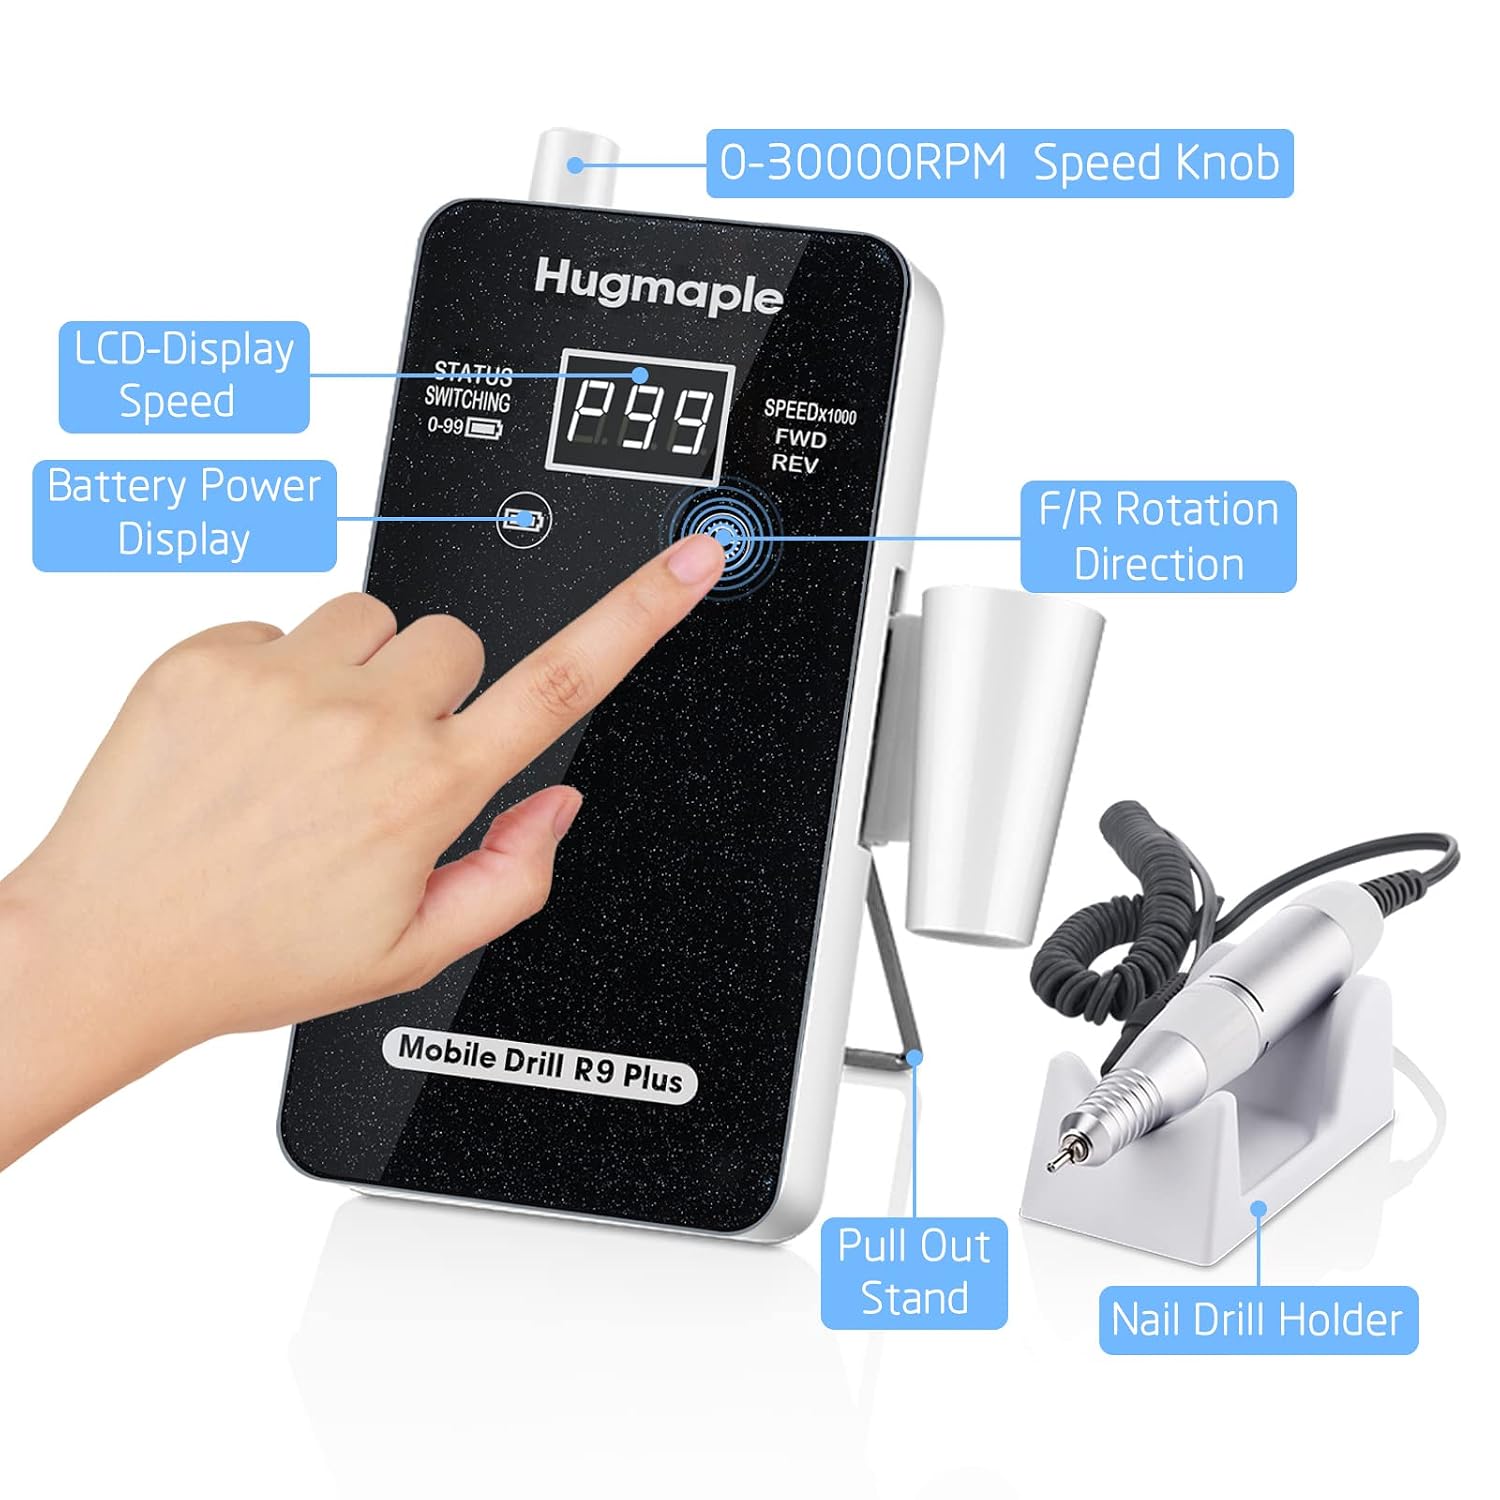
Figure 2: Labeled components of the nail drill set.


Figure 3: Examples of included drill bits and sanding bands.
Setup and Assembly
1. Charging the Device
Before first use, ensure the main control unit is fully charged. Connect the AC power adapter to the unit's power jack and plug it into a suitable power outlet. The battery icon on the HD LCD display will indicate charging status.
2. Connecting the Handpiece
Plug the handpiece cable into the designated port on the main control unit.
3. Inserting/Replacing Drill Bits
- Rotate the left side of the handpiece counter-clockwise to unlock the chuck.
- Carefully pull out any existing drill bit or the original part.
- Insert the desired nail drill bit fully into the chuck.
- Rotate the right side of the handpiece clockwise to lock the bit securely in place. Ensure the bit is firmly seated before operation.
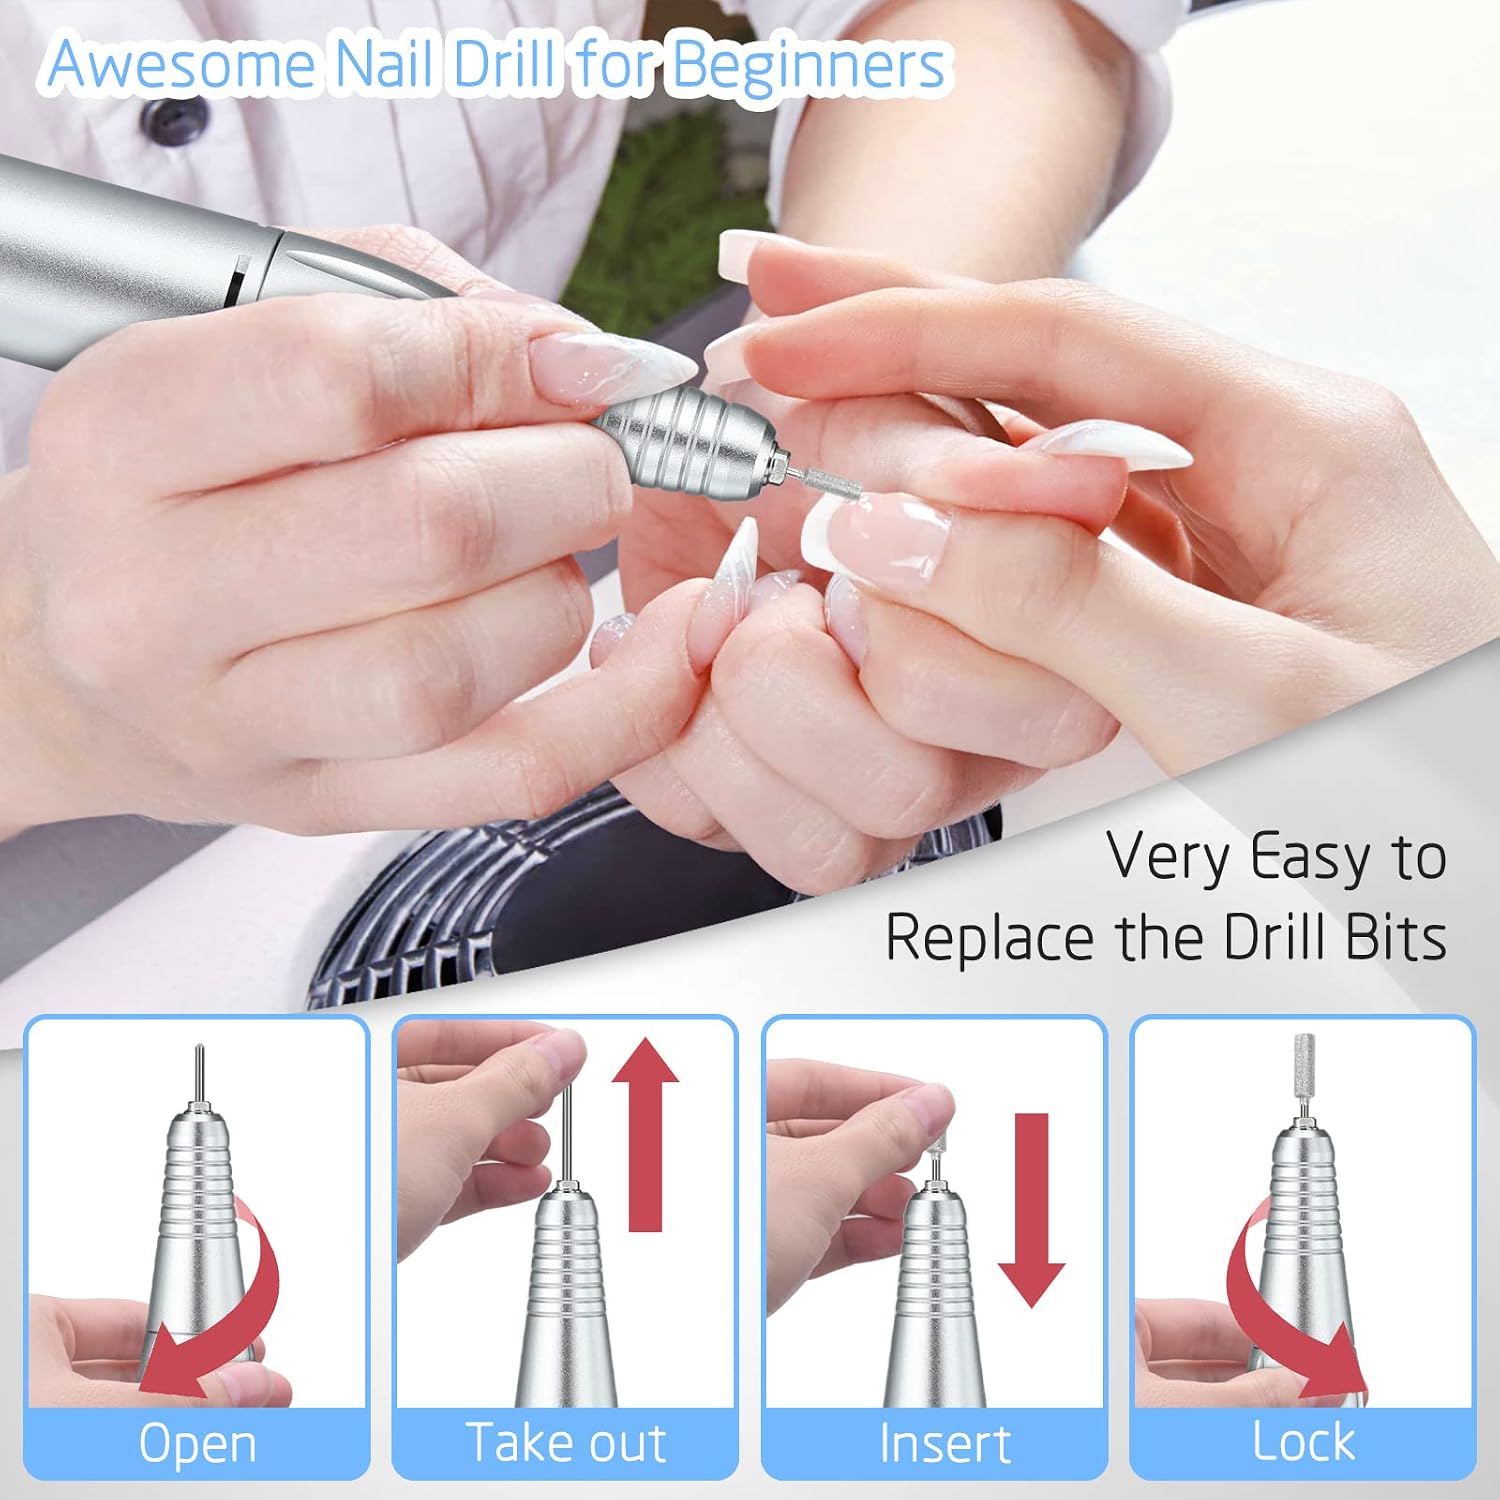
Figure 4: Steps for replacing drill bits.
Video 1: Official HUGMAPLE demonstration of drill bit insertion, speed adjustment, and rotation direction change.
Operating Instructions
1. Powering On and Speed Adjustment
Turn the white knob located on the top of the main control unit to power on the drill. Continue turning the knob to adjust the speed from 0 to 30 (representing 0-30000 RPM). The current speed setting will be displayed on the HD LCD screen.

Figure 5: High-speed capability and battery features.
2. Changing Rotation Direction (F/R)
The main control unit features two touch-sensitive buttons. The right button allows you to switch the rotation direction of the drill bit between Forward (F) and Reverse (R). This is useful for both left-handed and right-handed users, and for different nail procedures.
3. Battery Power Display
The left touch-sensitive button, indicated by a battery icon, will change the display to show a 'P' indicating the current battery power percentage.
4. General Usage Tips
- Always start with a low speed and gradually increase it as needed for the task and your comfort level.
- Apply light, even pressure. Do not press too hard, as this can cause heat buildup or damage to the nail.
- Keep the handpiece moving to avoid friction burns on the nail plate.
- For optimal results, use the appropriate drill bit for each specific task (e.g., cuticle work, surface filing, shaping, under-nail cleaning).

Figure 6: Nail drill in use for manicure.
Maintenance and Care
- Cleaning: After each use, gently wipe the handpiece and control unit with a soft, damp cloth. For drill bits, use a small brush (like the included nail dust brush) to remove debris. Bits can also be cleaned with an appropriate disinfectant solution. Ensure all parts are dry before storage.
- Storage: Store the nail drill set in a cool, dry place away from direct sunlight and moisture. Keep it out of reach of children. Utilize the handpiece holder and pull-out stand for convenient and safe storage.
- Battery Care: To prolong battery life, avoid completely draining the battery frequently. Recharge the unit when the battery indicator is low.
Troubleshooting
| Problem | Possible Cause | Solution |
|---|---|---|
| Drill not turning on | Low battery; Loose connection; Power adapter issue | Charge the unit fully; Check all cable connections; Try a different power outlet or adapter if available. |
| Drill stops or loses power during use | Low battery; Overheating; Excessive pressure | Recharge the unit; Allow the unit to cool down; Reduce pressure on the nail; Ensure proper ventilation. |
| Excessive vibration or noise | Drill bit not inserted correctly; Damaged drill bit; Handpiece issue | Re-insert the drill bit securely; Replace the drill bit; Contact customer support if the issue persists. |
| Drill bit not spinning | Chuck not locked; Handpiece connection issue | Ensure the chuck is fully locked after inserting the bit; Check handpiece cable connection. |
Technical Specifications
- Brand: HUGMAPLE
- Model: Mobile Drill R9 Plus
- Material: Aluminum
- Max RPM: 30000rpm
- Power Source: Battery Powered (2 Lithium Polymer batteries included)
- Operating Time: 8 - 10 hours (on full charge)
- Item Weight: 0.68 Kilograms (approx. 1.5 Pounds)
- Package Dimensions: 7.28 x 5.24 x 3.35 inches
- Voltage: 230 Volts (AC)
Documents and downloads
Ask a question about this manual
Ask about setup, troubleshooting, compatibility, parts, safety, or missing instructions. Manuals+ will review the question and use this page’s manual context to help answer it.