1. Introduction
This manual provides detailed instructions for the proper installation, operation, and maintenance of your DROK Class AB Amplifier 2.1 Channel Audio Amplifier Board. This amplifier is designed to deliver 2x80W stereo output and 1x120W pure bass output, operating within a DC 9-18V power supply range. Please read this manual thoroughly before using the product to ensure optimal performance and safety.
2. Safety Information
- Ensure the power supply voltage is within the specified range of DC 9-18V. Exceeding this range may damage the device.
- Observe correct polarity when connecting the power supply to prevent reverse-connect damage. The board includes input anti reverse-connect protection, but caution is still advised.
- Avoid short-circuiting the output terminals. The amplifier features output short circuit protection.
- Do not operate the amplifier in excessively hot or humid environments. The device has over temperature protection (OTP).
- Keep the device away from water and other liquids.
- Do not attempt to disassemble or modify the amplifier board. Unauthorized modifications void the warranty and can lead to malfunction or injury.
- Ensure proper ventilation around the heatsink during operation to prevent overheating.
3. Product Features
- Working Voltage: DC 9-18V
- Output Power: Max 2x80W Stereo (18V/4Ω), 1x120W Pure Bass (18V/2Ω)
- Channels: 2.1 Channels (Stereo + Subwoofer)
- Recommended Speakers: 2/4/6/8Ω
- Input Methods: 3.5mm Audio Input or 3P_2.54mm Terminal Input
- Protection Features: Input Anti Reverse-Connect Protection, Output Short Circuit Protection, Over Current Protection (OCP), Over Temperature Protection (OTP).
- Audio Quality: Designed to eliminate background noise for clear sound.
- Components: Features four 3300UF professional audio filter capacitors, a vehicle-level amplifier chip, gold-plated audio input terminal, and a pure black sealing potentiometer.
4. Specifications
| Parameter | Value |
|---|---|
| Working Voltage | DC 9 - 18V |
| Maximum Output Power (Stereo) | 2x80W (18V/4Ω) |
| Maximum Output Power (Pure Bass) | 1x120W (18V/2Ω) |
| Recommended Speaker Impedance | 2/4/6/8Ω |
| Input Method | 3.5mm Audio Input or 3P_2.54mm Terminal Input |
| Protection Features | Input Anti Reverse-Connect, Output Short Circuit, Over Current (OCP), Over Temperature (OTP) |
| PCB Size (Length*Width) | 72.36mm * 66.65mm |
| Overall Size (Radiator Included) | 72.36mm * 96mm * 27mm |
| Potentiometer Rotating Handle Opening | 7mm |
| Installing Hole Spacing | 25.4mm * 48.26mm (compatible for Bluetooth module spacing) |
| Installing Hole Size | M3 |
| Item Model Number | 200540 |
5. Component Identification
Refer to the images below for identification of the amplifier board's components and connection points.

Figure 5.1: Overall view of the DROK Class AB Amplifier board, showing the main components, heatsink, and the included connection cable.
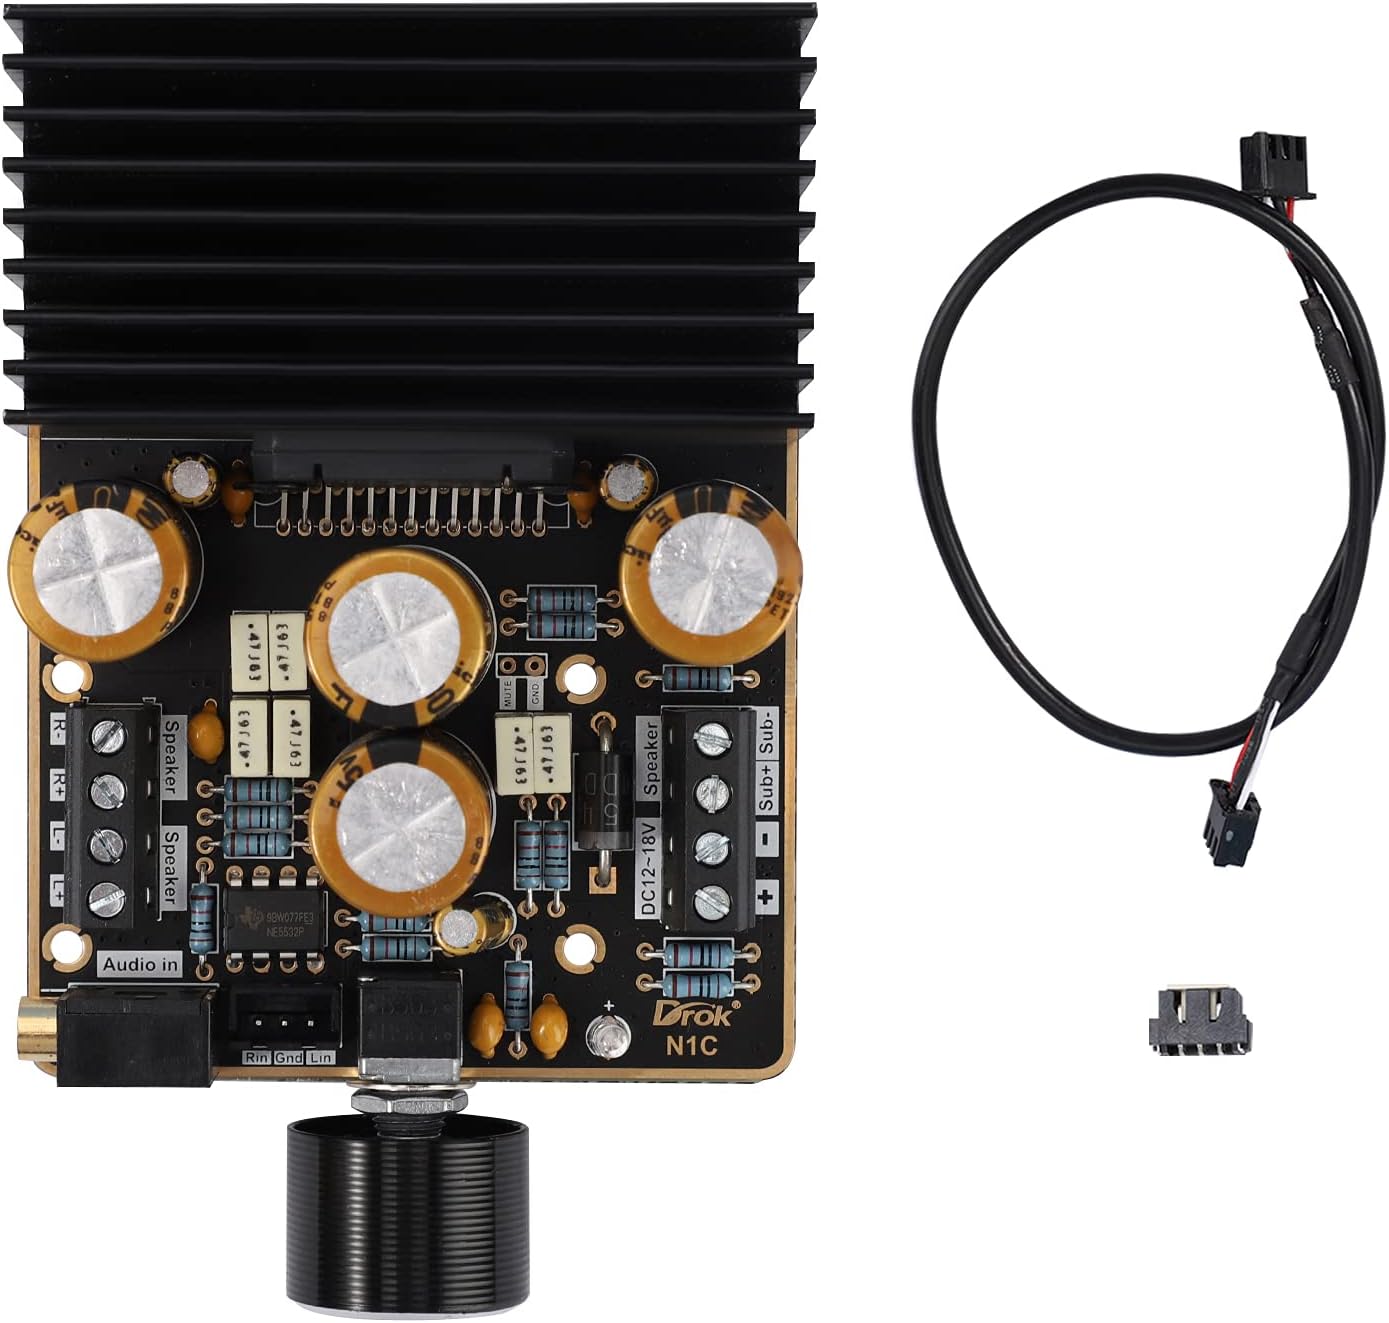
Figure 5.2: Detailed view of the amplifier board, highlighting the 3.5mm audio input, 3P_2.54mm terminal input, speaker output terminals (L/R), and subwoofer output terminals.

Figure 5.3: Side view with dimensions of the amplifier board, including the heatsink, showing its length, width, and height.

Figure 5.4: Top-down view of the amplifier board with detailed measurements for PCB dimensions and mounting hole spacing.
6. Setup Instructions
- Power Supply Connection: Connect a DC 9-18V power supply to the "DC12-18V" terminals on the board. Ensure correct polarity: '+' to positive, '-' to negative.
- Speaker Connections:
- Connect your stereo speakers (Left and Right) to the "Speaker" terminals. Ensure correct polarity for each speaker.
- Connect your subwoofer to the "Sub+ Sub-" terminals.
- Recommended speaker impedance is 2/4/6/8Ω.
- Audio Input Connection: Choose one of the following methods:
- 3.5mm Audio Input: Connect your audio source (e.g., smartphone, MP3 player, computer) to the 3.5mm audio jack on the board.
- 3P_2.54mm Terminal Input: Alternatively, use the 3P_2.54mm terminal for audio input, connecting Left, Right, and Ground signals from your source.
- Initial Power On: After all connections are secure, apply power to the amplifier. A green LED may illuminate, indicating power.
Video 6.1: An instructional video demonstrating the connection process for the amplifier board. This video shows how to connect power, audio input, and speakers to the DROK Class AB Amplifier. If the video does not load, please ensure your browser supports HLS streaming.
7. Operating Instructions
- Volume Control: The amplifier features a single potentiometer for volume control. Rotate the knob clockwise to increase volume and counter-clockwise to decrease volume.
- Audio Playback: Start playing audio from your connected source. Adjust the volume to your desired listening level.
- Sound Balance: The amplifier provides a balanced mix for stereo and subwoofer outputs. There are no independent controls for subwoofer or stereo channels on this board.
8. Maintenance
- Cleaning: Use a soft, dry cloth to clean the amplifier board. Do not use liquid cleaners or solvents.
- Ventilation: Ensure the heatsink remains free of dust and obstructions to maintain proper cooling. Periodically check for dust buildup and gently remove it with compressed air if necessary.
- Connections: Periodically check all connections (power, audio, speakers) to ensure they are secure and free from corrosion.
- Storage: If storing the amplifier for an extended period, disconnect it from the power supply and store it in a dry, dust-free environment.
9. Troubleshooting
| Problem | Possible Cause | Solution |
|---|---|---|
| No sound output |
|
|
| Distorted sound |
|
|
| Amplifier gets hot |
|
|
10. Warranty and Support
DROK provides a 1-year long-term warranty guarantee from the date of purchase for this product. This warranty covers manufacturing defects and malfunctions under normal use.
For technical support, warranty claims, or any questions regarding your DROK Class AB Amplifier, please contact DROK customer service through the retailer where the product was purchased or visit the official DROK website for contact information.
Please retain your proof of purchase for warranty validation.