1. Introduction
Welcome to your iHome Compact Alarm Clock. This manual provides comprehensive instructions for setting up, operating, and maintaining your device. For optimal performance, please read this manual thoroughly.
Key Features
- Large 1.4-inch backlit LCD display for clear visibility.
- Compact design, ideal for nightstands or desks.
- Built-in USB port for charging mobile devices.
- Displays temperature and humidity (Fahrenheit/Celsius).
- Loud and distinctive alarm sound.
2. Package Contents
What's in the Box
- iHome Compact Alarm Clock
- AC Power Adapter
- User Manual (this document)
3. Product Overview
Controls and Display
Familiarize yourself with the buttons and display elements of your iHome Compact Alarm Clock.
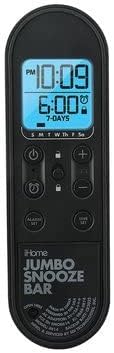
Image Description: This image displays the control panel of the iHome Compact Alarm Clock. It features a large digital display showing the current time (e.g., 10:09 PM) and the alarm time (e.g., 6:00 AM, 7-DAYS). Below the display are various control buttons: a Power button (circle with vertical line), a Lock button (padlock icon), Plus (+) and Minus (-) buttons for adjustments, an Alarm Set button (bell icon), and a Time Set button (clock icon). The bottom part of the panel has 'iHome JUMBO SNOOZE BAR' printed on it, indicating a large area for the snooze function.
Display Elements
- Current Time: Displays the hour and minute.
- PM Indicator: Lights up when the time is PM.
- Alarm Time: Shows the set alarm time.
- Alarm Indicator: A bell icon indicates the alarm is active.
- Day Indicators: S M T W Th F Sa for active alarm days.
- Temperature/Humidity: Displays current environmental readings.
Control Buttons
- ⏻ (Power Button): Turns the unit on or off.
- 🔒 (Lock Button): Locks/unlocks controls to prevent accidental changes.
- + / - Buttons: Adjusts time, alarm, or settings.
- ⏰ (Alarm Set Button): Enters alarm setting mode.
- ⏱ (Time Set Button): Enters time setting mode.
- JUMBO SNOOZE BAR: Activates snooze function when alarm sounds.
4. Setup
Powering Your Clock
- Connect the AC power adapter to the DC jack on the back of the clock.
- Plug the adapter into a standard wall outlet.
- The display will light up, indicating the clock is powered.
Initial Time Setting
- Press and hold the ⏱ (Time Set) button until the time display flashes.
- Use the + or - buttons to adjust the hour. Pay attention to the PM indicator.
- Press the ⏱ (Time Set) button again to confirm the hour and move to minutes.
- Use the + or - buttons to adjust the minutes.
- Press the ⏱ (Time Set) button one last time to save the time and exit setting mode.
5. Operating Instructions
Setting the Alarm
- Press and hold the ⏰ (Alarm Set) button until the alarm time display flashes.
- Use the + or - buttons to adjust the alarm hour. Observe the PM indicator.
- Press the ⏰ (Alarm Set) button again to confirm the hour and move to minutes.
- Use the + or - buttons to adjust the alarm minutes.
- Press the ⏰ (Alarm Set) button again to select the alarm days (e.g., 7-DAYS, weekdays, weekends). Use + or - to cycle through options.
- Press the ⏰ (Alarm Set) button one last time to save the alarm settings and exit. The alarm icon will appear on the display.
Snooze Function
When the alarm sounds, press the JUMBO SNOOZE BAR to temporarily silence the alarm. The alarm will sound again after a few minutes (default snooze duration).
Disabling the Alarm
To turn off the alarm completely, press the ⏰ (Alarm Set) button once when the alarm is not sounding. The alarm icon will disappear from the display.
Using the USB Charging Port
Connect your USB charging cable (not included) to the USB port located on the back or side of the clock. Plug the other end into your device (e.g., smartphone, tablet) to begin charging. The clock must be powered on for the USB port to function.
Temperature and Humidity Display
The clock automatically displays the current room temperature and humidity. The unit of temperature (Fahrenheit or Celsius) can typically be switched by a dedicated button or a combination of buttons (refer to specific model instructions if not immediately apparent).
6. Maintenance
Cleaning
To clean your clock, use a soft, dry cloth. Do not use liquid cleaners or abrasive materials, as they may damage the finish or electronic components.
Battery Backup
While the clock is primarily powered by AC, some models may include a battery compartment for backup power during outages. If your model supports this, insert the recommended batteries (e.g., 2 x AAA, not included) into the compartment, observing polarity. This will preserve time settings during a power interruption.
7. Troubleshooting
Common Issues and Solutions
| Problem | Solution |
|---|---|
| Clock display is blank. | Ensure the AC power adapter is securely connected to the clock and a working wall outlet. Check if the power button is pressed. |
| Alarm does not sound. | Verify the alarm is set and the alarm icon is visible on the display. Check the alarm volume setting if available. |
| USB port is not charging devices. | Ensure the clock is powered on. Try a different USB cable or device to rule out cable/device issues. |
| Buttons are unresponsive. | Check if the Lock button (padlock icon) is active. Press it to unlock the controls. |
8. Specifications
Product Specifications
| Feature | Detail |
|---|---|
| Brand | iHome |
| Model | Compact Alarm Clock |
| Display Type | Digital, Backlit LCD |
| Power Source | Corded Electric (Battery Powered for backup, if applicable) |
| Special Features | Alarm, USB Charging Port, Temperature/Humidity Display |
| Product Dimensions | 3.5"W x 3.5"H |
| Material | Acrylonitrile Butadiene Styrene |
| UPC | 656942513698 |
| ASIN | B09MMFCP5R |
9. Warranty and Support
Warranty Information
This iHome Compact Alarm Clock comes with a 90-day limited warranty. Please retain your proof of purchase for warranty claims.
Customer Support
For technical assistance or further inquiries, please visit the official iHome website or contact their customer support.


