1. Introduction
This manual provides essential information for the safe and efficient operation of your Mitsubishi WD720U-G DLP Projector. Please read this manual thoroughly before using the projector and retain it for future reference. This document covers setup, operation, maintenance, troubleshooting, and detailed specifications.
2. Safety Information
Observe the following safety precautions to prevent damage to the projector and ensure user safety:
- Do not block ventilation openings. Ensure adequate space around the projector for proper airflow.
- Avoid looking directly into the projector lens when the lamp is on, as it can cause eye damage.
- Do not place the projector on an unstable cart, stand, or table.
- Disconnect the power cord from the wall outlet if the projector will not be used for an extended period.
- Refer all servicing to qualified service personnel.
3. Package Contents
Verify that all the following items are included in your package:
- Mitsubishi WD720U-G DLP Projector
- AC Power Cable
- Lens Cap
- VGA (D-sub) Cable
- User Manual CD
4. Product Overview
The Mitsubishi WD720U-G is a high-brightness DLP projector designed for various applications, featuring 3D readiness and multiple connectivity options.
4.1 Top View
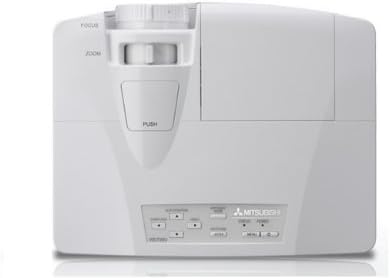
This image displays the top of the Mitsubishi WD720U-G projector. Visible features include the focus and zoom adjustment rings located near the lens, and a control panel with various buttons for menu navigation and settings adjustments.
4.2 Rear View (Input/Output Terminals)
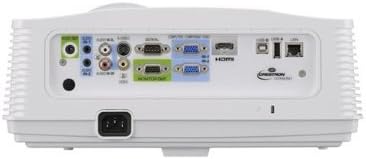
This image illustrates the rear panel of the Mitsubishi WD720U-G projector, highlighting its comprehensive array of input and output terminals. These include multiple RGB (VGA) ports, audio input/output jacks, RCA video and S-Video inputs, an HDMI port, and a network port, among others.
5. Setup
5.1 Placement
Position the projector on a stable, flat surface or mount it securely. Ensure the projector is within the optimal projection distance for your screen size (viewable size: 40"- 300"). Avoid placing it in direct sunlight or near heat sources.
5.2 Connecting Devices
Connect your source devices (e.g., computer, Blu-ray player) to the appropriate input terminals on the projector's rear panel:
- RGB: Mini D-sub 15pin x2 (for computer connections)
- Audio: Stereo mini jack (φ3.5mm) x 2 (one for PC1, another for PC2)
- Video: RCA x 1 + S-VIDEO x 1 (for standard video sources)
- Digital: HDMI x 1 (for high-definition digital sources)
- Video Audio: RCA jack (L/R) x 1
5.3 Power On/Off
Connect the AC power cable to the projector and a power outlet. Press the power button on the projector or remote control to turn the unit on. To turn off, press the power button again and confirm the shutdown when prompted.
6. Operating the Projector
6.1 Basic Operation
After powering on, adjust the focus and zoom using the rings on the projector lens until the image is clear and fills your screen. Use the control panel buttons or remote control to navigate the on-screen menu.
6.2 Adjusting Settings
Access the projector's menu to adjust various settings:
- Brightness: The projector offers 4300 ANSI Lumens. Adjust as needed for ambient light conditions.
- Contrast: The contrast ratio is 3000:1 (On/Off). Fine-tune for optimal image depth.
- Resolution: Native resolution is 1280 x 800. The projector supports a maximum resolution of 1600 x 1200.
- Color: The 5-Segment (R,G,B,W,Y) color wheel provides vibrant colors. Adjust color settings in the menu if necessary.
6.3 Video Compatibility
The projector supports a wide range of video formats:
- NTSC/NTSC 4.43/PAL (including PAL-M, N)/SECAM/PAL-60
- Component Video: 480i/p(525i/p), 576i/p(625i/p), 720p(750p), 1080i/p(1125i/p 60Hz), 1080i/p(1125i/p 50Hz)
6.4 3D Ready Feature
This projector is 3D-Ready. To utilize 3D functionality, compatible 3D content, 3D glasses, and a 3D-compatible source device are required.
7. Maintenance
7.1 Cleaning
Regularly clean the projector lens with a soft, lint-free cloth specifically designed for optical surfaces. Use a soft brush or compressed air to remove dust from the ventilation grilles. Do not use abrasive cleaners or solvents.
7.2 Lamp Replacement
The projector lamp has a finite lifespan. When the lamp indicator lights up or the image brightness significantly decreases, the lamp may need replacement. Refer to the detailed instructions in the User Manual CD for safe lamp replacement procedures.
8. Troubleshooting
If you encounter issues with your projector, refer to the following common problems and solutions:
- No Image: Ensure all cables are securely connected, the correct input source is selected, and the projector is powered on.
- Blurry Image: Adjust the focus and zoom rings on the lens. Ensure the projection surface is flat and the projector is stable.
- Image Distorted: Check the projector's keystone correction settings in the menu. Ensure the projector is perpendicular to the screen.
- No Sound: Verify audio cables are connected correctly and the volume is not muted on both the projector and the source device.
- Overheating Warning: Ensure ventilation openings are clear and the projector is in a well-ventilated area. Turn off the projector and allow it to cool down.
9. Specifications
| Feature | Specification |
|---|---|
| Brand | MITSUBISHI |
| Model | WD720U-G |
| Imaging Technology | DLP 0.65" |
| Brightness | 4300 ANSI Lumens |
| Native Resolution | 1280 x 800 |
| Maximum Resolution | 1600 x 1200 |
| Viewable Size | 40" - 300" |
| Contrast Ratio | 3000:1 (On/Off) |
| Color Wheel | 5-Segment (R,G,B,W,Y) |
| Special Feature | 3D-Ready |
| Speaker Type | Stereo |
| Connectivity Technology | HDMI, VGA |
| Input Terminals | RGB (Mini D-sub 15pin x2), Audio (Stereo mini jack φ3.5mm x2), Video (RCA x1, S-VIDEO x1), Digital (HDMI x1), Video Audio (RCA L/R x1) |
| Video Compatibility | NTSC/NTSC 4.43/PAL/SECAM/PAL-60, Component Video (480i/p, 576i/p, 720p, 1080i/p) |
| Item Weight | 9 pounds |
| Product Dimensions | 13.6 x 10.6 x 5.3 inches |
| Recommended Uses | Home Cinema |
10. Warranty and Support
This product is offered as an Amazon Renewed item. It has been professionally inspected and tested to work and look like new. Renewed products are eligible for replacement or refund under the Amazon Renewed Guarantee if you are not satisfied with your purchase. For further support or inquiries, please refer to the documentation provided with your renewed product or contact Amazon Renewed customer service.


