Introduction
Thank you for choosing the COOLIFE PH700A Trail Camera. This manual provides essential information for setting up, operating, and maintaining your camera. Please read it thoroughly before use to ensure optimal performance and longevity of your device. This camera is designed for wildlife monitoring, hunting, home security, and farm surveillance, offering high-definition imaging and robust outdoor performance.
Product Features
- High Definition Imaging: Captures 28 MP still images and advanced 1520P HD videos with clear audio, providing a vivid and smooth playback experience.
- No-Glow Night Vision: Equipped with 27 x 940 nm IR LEDs for discreet night recording up to 20 meters (65 feet) without startling animals. This technology significantly reduces the risk of camera theft.
- User-Friendly Design: Features a 2.4-inch color LCD screen for easy setup and immediate playback. Includes a 32 GB memory card for convenience.
- Durable and Weatherproof: IP66 rated for high resistance against water and dust, making it suitable for harsh environments and temperatures ranging from -20°C to 60°C (-4°F to 140°F).
- Fast Trigger Speed: Detects motion and triggers recording in just 0.2 seconds, ensuring you capture fast-moving subjects.
- Versatile Functions: Includes features such as trigger delay, target recording time, time-lapse, endless recording, audio recording, and password protection. Allows setting of time, date, serial number, and temperature detection stamps on recordings.
Package Contents
Verify that all items are present in your package:
- COOLIFE PH700A Trail Camera
- 32GB SD Memory Card
- Mounting Strap
- USB Cable
- AV Cable
- Mounting Bracket and Screws
- User Manual

Image: Contents of the COOLIFE PH700A Trail Camera package.
Setup
1. Battery Installation
The camera requires 8 AA batteries (not included). Ensure correct polarity when inserting the batteries into the compartment located at the bottom of the camera. Using high-quality alkaline or rechargeable batteries is recommended for optimal performance and battery life.
2. SD Card Installation
Insert the included 32GB SD card into the SD card slot with the metal contacts facing down. Push until it clicks into place. To remove, push the card in again until it springs out. Ensure the camera is powered off before inserting or removing the SD card.
3. Mounting the Camera
The camera can be mounted using the provided strap or the mounting bracket and screws. Choose a location that offers a clear view of the area you wish to monitor, free from obstructions. Ensure the camera is securely fastened to prevent movement from wind or wildlife.

Image: The trail camera mounted on a tree, showcasing its waterproof design.
Operating Instructions
1. Powering On/Off
To power on the camera, slide the power switch to the 'ON' position. The LCD screen will illuminate. To power off, slide the switch to 'OFF'.
2. Menu Navigation
Use the navigation buttons (Up, Down, Left, Right, OK) on the control panel to navigate through the camera's menu. The 'OK' button confirms selections, and the 'MENU' button typically accesses or exits the menu.
3. Recording Modes
The camera supports several recording modes:
- Photo Mode: Captures still images when triggered.
- Video Mode: Records video clips when triggered.
- Photo + Video Mode: Captures a still image followed by a video clip when triggered.
4. Adjusting Settings
Access the menu to customize settings such as:
- Photo/Video Resolution: Select desired image and video quality.
- Trigger Speed: Adjust the delay before recording starts after motion detection.
- PIR Sensitivity: Set the sensitivity of the Passive Infrared (PIR) sensor for motion detection (Low, Medium, High).
- Time Lapse: Configure the camera to take photos at set intervals regardless of motion.
- Recording Length: Define the duration of video clips.
- Date/Time Stamp: Enable or disable the display of date, time, and other information on recordings.
- Password Protection: Set a password to prevent unauthorized access.
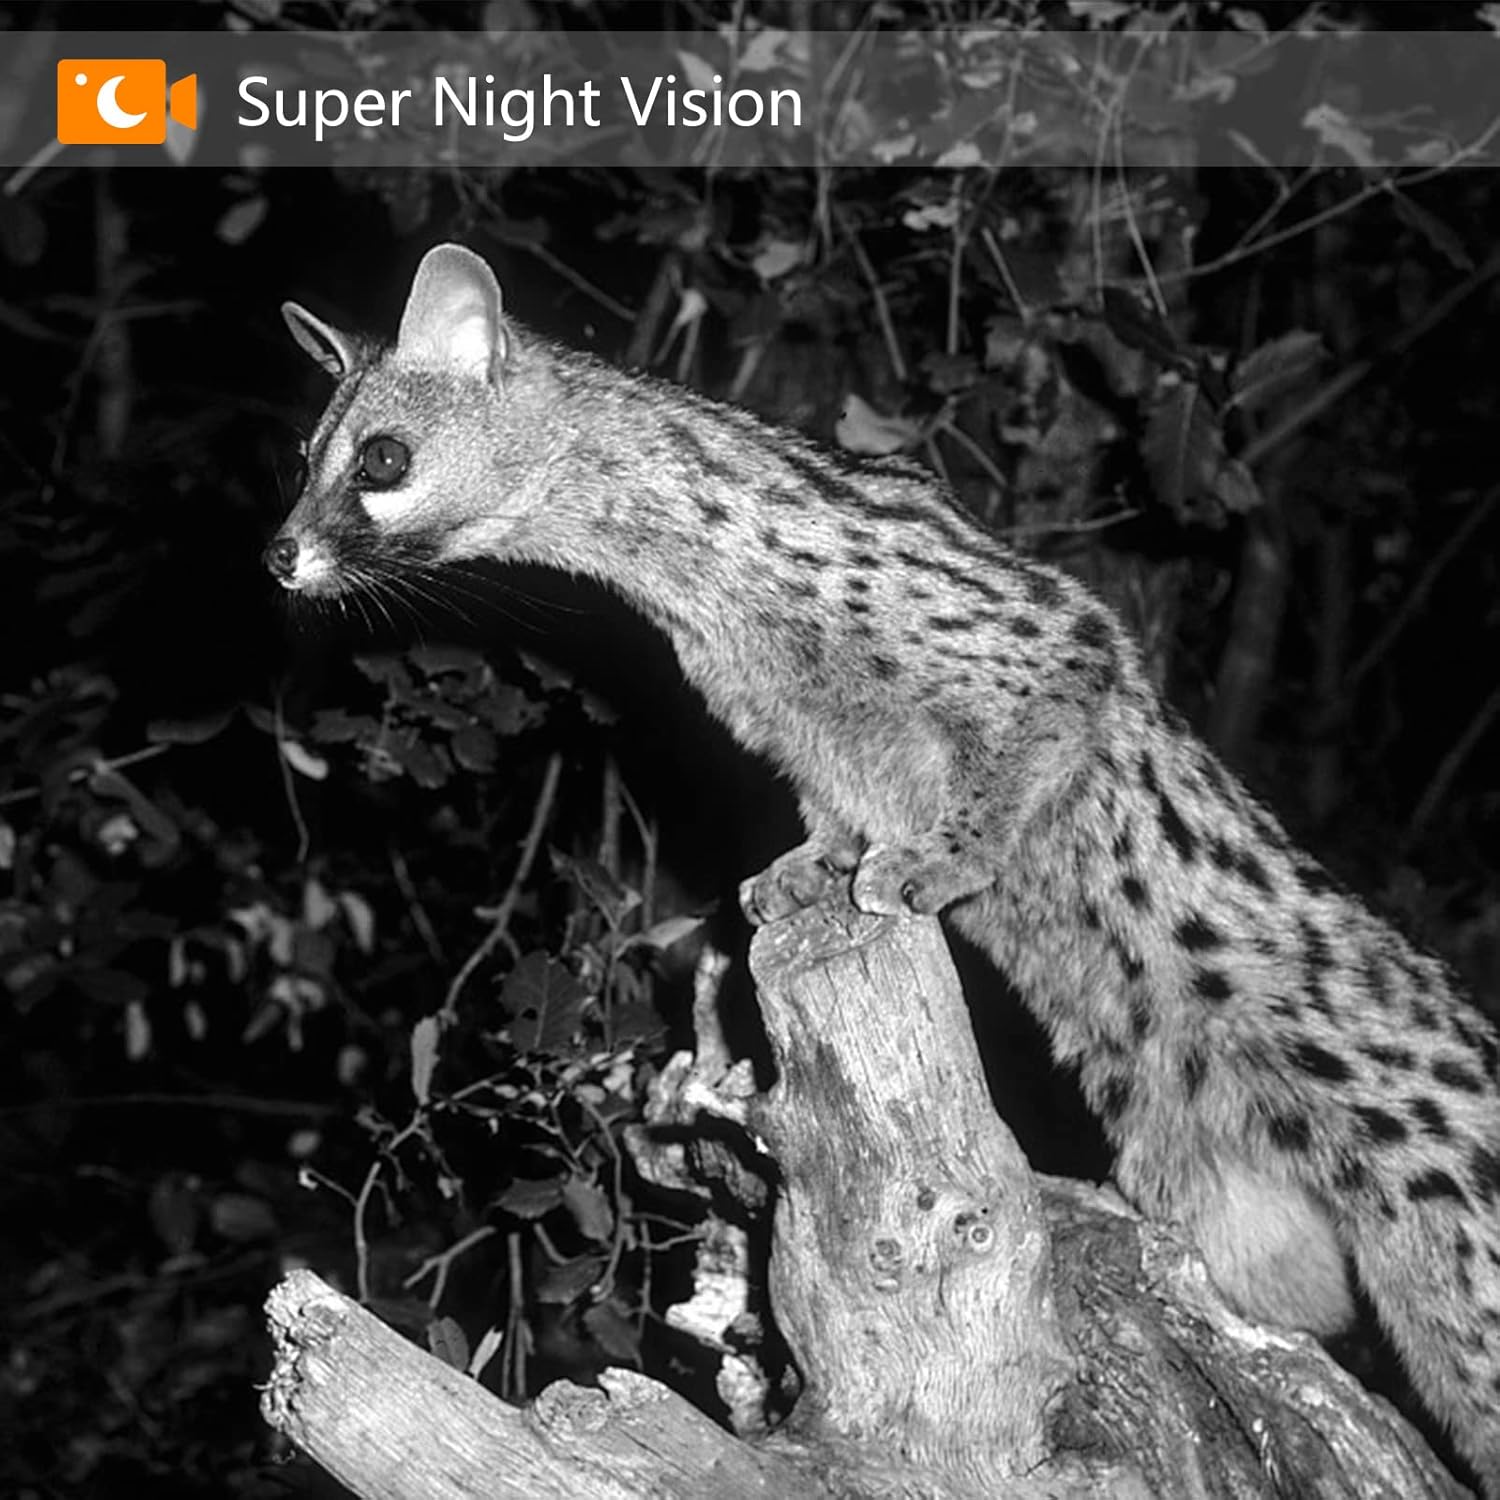
Image: The camera's fast 0.2-second trigger speed captures a cheetah in full stride.

Image: A fox captured at night, showcasing the camera's Super Night Vision.
Maintenance
1. Cleaning
Regularly clean the camera lens and PIR sensor window with a soft, dry cloth to ensure clear images and proper motion detection. Avoid using abrasive cleaners or solvents. Keep the battery compartment clean and dry.
2. Storage
When not in use for extended periods, remove the batteries to prevent leakage. Store the camera in a cool, dry place away from direct sunlight and extreme temperatures.
Troubleshooting
- Camera not powering on: Check battery installation and ensure batteries are fully charged.
- Poor image/video quality: Clean the camera lens. Ensure sufficient lighting for daytime shots and proper IR illumination for night shots. Check resolution settings.
- No recordings: Verify the SD card is inserted correctly and has sufficient free space. Check PIR sensitivity settings and ensure the camera is in an active recording mode.
- False triggers: Reduce PIR sensitivity. Ensure the camera is not pointed at heat sources or moving branches that could cause false detections.
- Short battery life: Use high-quality alkaline or rechargeable batteries. Reduce the number of recordings or video length if possible.
Specifications
| Feature | Specification |
|---|---|
| Model Name | PH700A |
| Image Resolution | 28 Megapixels |
| Video Recording Resolution | 1520P HD (Effective 1080 Pixels) |
| Trigger Speed | 0.2 seconds |
| Night Vision Range | Up to 20 meters (65 feet) |
| IR LEDs | 27 x 940 nm No-Glow LEDs |
| Water Resistance | IP66 Waterproof |
| Operating Temperature | -20°C to 60°C (-4°F to 140°F) |
| Display | 2.4-inch Color LCD |
| Power Source | 8 x AA Batteries (not included) or 6V External Power Supply (not included) |
| Material | Plastic |
| Dimensions (LxWxH) | 9.7 x 6.5 x 13.5 cm |
| Weight | 246 grams |
Safety Information
- Do not expose the camera to extreme temperatures or humidity beyond its specified operating range.
- Keep the camera away from strong magnetic fields.
- Do not attempt to disassemble or modify the camera, as this will void the warranty and may cause damage.
- Dispose of batteries responsibly according to local regulations.
- Ensure the camera is securely mounted to prevent it from falling and causing injury or damage.
Warranty and Support
For warranty information or technical support, please refer to the contact details provided with your purchase or visit the official Coolife website. Keep your proof of purchase for any warranty claims.


