1. Safety Instructions
Always observe basic safety precautions to reduce the risk of fire, electric shock, and personal injury when operating this power tool. Read all instructions carefully before use.
General Power Tool Safety
- Work Area Safety: Keep the work area clean and well-lit. Cluttered or dark areas invite accidents. Do not operate power tools in explosive atmospheres, such as in the presence of flammable liquids, gases, or dust.
- Electrical Safety: Power tool plugs must match the outlet. Never modify the plug in any way. Avoid body contact with earthed or grounded surfaces.
- Personal Safety: Always wear eye protection (safety goggles). Use hearing protection when operating for extended periods. Wear a dust mask if operation creates dust. Dress properly; do not wear loose clothing or jewelry. Keep hair, clothing, and gloves away from moving parts.
- Tool Use and Care: Do not force the power tool. Use the correct power tool for your application. Disconnect the plug from the power source before making any adjustments, changing accessories, or storing power tools.
Miter Saw Specific Safety
- Always secure the workpiece firmly before cutting.
- Ensure the blade guard is functioning correctly and in place before operation.
- Never reach into the blade area when the saw is connected to power.
- Allow the blade to reach full speed before beginning a cut.
- Support long workpieces to prevent tipping and loss of control.
- Regularly check the blade for sharpness and damage. Replace dull or damaged blades immediately.
2. Product Overview
The Powerplus POWX075700 is a 1500W miter saw designed for precise cutting of various materials, including fiberboard, hard, and soft wood. It features a 210mm blade and offers both straight and miter cutting capabilities.
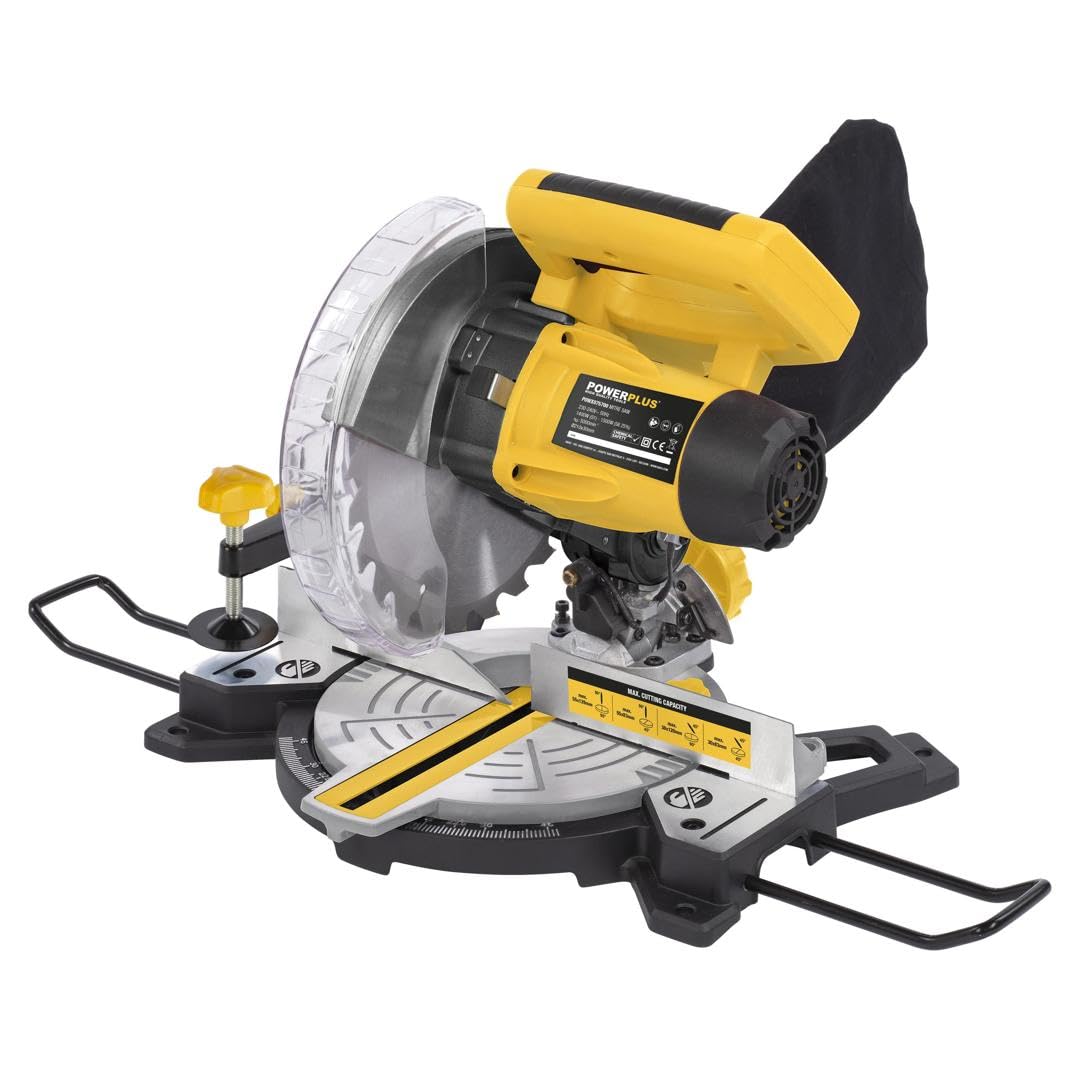
Figure 2.1: Overall view of the Powerplus POWX075700 miter saw, illustrating its maximum cutting performance for various angles and dimensions. Both straight and miter cuts are possible with this tool.

Figure 2.2: The miter saw showing its approximate dimensions (408mm width, 405mm height) and highlighting additional support features like the parallel stop and workpiece fixation for enhanced stability during operation.
3. Setup
3.1 Unpacking and Inspection
- Carefully remove the miter saw and all accessories from the packaging.
- Inspect the tool for any damage that may have occurred during shipping. Do not operate if damaged.
- Ensure all components listed in the manual are present. The saw blade for fiberboard, hard, and soft wood is included.
3.2 Blade Installation/Replacement
- Disconnect Power: Always unplug the saw from the power source before installing or replacing the blade.
- Raise Blade Guard: Lift the lower blade guard to expose the blade arbor.
- Loosen Arbor Nut: Use the provided wrench to loosen the arbor nut while holding the arbor lock button.
- Remove Old Blade: Carefully remove the outer flange and the old blade.
- Install New Blade: Place the new 210mm blade onto the arbor, ensuring the teeth are pointing in the correct direction (usually indicated by an arrow on the blade and saw). Reinstall the outer flange and arbor nut.
- Tighten Nut: Tighten the arbor nut securely while pressing the arbor lock button. Do not overtighten.

Figure 3.1: The miter saw in operation, demonstrating the dust collection bag and indicating the included blade type (Ø210 - 24T) suitable for fiberboard, hard, and soft wood.
3.3 Mounting the Saw
For stable and safe operation, it is recommended to mount the miter saw to a workbench or a dedicated miter saw stand using appropriate bolts and nuts (not included). Ensure the mounting surface is level and sturdy.
3.4 Adjusting Miter and Bevel Angles
- Miter Angle: Loosen the miter lock knob, adjust the turntable to the desired angle (up to 45 degrees), and then tighten the knob.
- Bevel Angle: Loosen the bevel lock lever, tilt the saw head to the desired bevel angle, and then secure the lever.
3.5 Laser Guide Adjustment
The saw is equipped with an integrated laser for precise cutting line indication. If the laser line does not align with the blade's cutting path, refer to the detailed instructions in the full manual for calibration. Typically, this involves adjusting screws near the laser module.

Figure 3.2: Close-up view of the miter saw highlighting the integrated laser, which enables precise work by indicating the cutting line on the workpiece.
4. Operating Instructions
4.1 Power Connection
Connect the saw's power cord to a suitable electrical outlet. Ensure the voltage matches the tool's requirements (230V, 50Hz).
4.2 Starting and Stopping the Saw
- To Start: Press the ON/OFF switch. The blade will begin to rotate.
- To Stop: Release the ON/OFF switch. The blade will slow down and stop.

Figure 4.1: An operator using the 1500W miter saw, demonstrating its fast and constant speed (Max. 5000 min⁻¹) for stable sawing across various materials.
4.3 Making a Cut
- Secure Workpiece: Place the workpiece firmly against the fence and secure it with the clamp.
- Align Cut: Use the laser guide to align the blade with your desired cut line.
- Start Saw: Press the ON/OFF switch and allow the blade to reach full speed.
- Lower Blade: Slowly and steadily lower the saw head through the workpiece. Do not force the cut.
- Complete Cut: Once the cut is complete, release the ON/OFF switch and allow the blade to stop before raising the saw head.
4.4 Dust Collection
The saw is equipped with a dust bag to collect sawdust. Empty the dust bag regularly to maintain efficient dust collection and prevent blockages. For improved dust extraction, connect a suitable workshop vacuum cleaner to the dust port.
5. Maintenance
Regular maintenance ensures the longevity and safe operation of your miter saw. Always disconnect the saw from the power supply before performing any maintenance.
5.1 Cleaning
- After each use, clean the saw of sawdust and debris using a brush or compressed air.
- Wipe down external surfaces with a damp cloth. Do not use harsh chemicals or solvents.
- Ensure the blade guard mechanism is free of debris and moves smoothly.
5.2 Blade Care
- Inspect the saw blade regularly for dullness, cracks, or missing teeth. Replace damaged blades immediately.
- Keep blades clean and free of resin buildup, which can affect cutting performance.
5.3 Storage
Store the miter saw in a clean, dry, and secure location, out of reach of children. Protect it from moisture and extreme temperatures.
6. Troubleshooting
| Problem | Possible Cause | Solution |
|---|---|---|
| Saw does not start | No power supply; Faulty switch; Motor issue | Check power connection and circuit breaker; Contact service center if switch or motor is faulty. |
| Poor cut quality (rough, splintering) | Dull or incorrect blade; Workpiece not secured; Too fast feed rate | Replace blade or use appropriate blade for material; Secure workpiece firmly; Reduce feed rate. |
| Excessive vibration | Loose blade; Damaged blade; Unstable mounting | Check and tighten blade arbor nut; Replace damaged blade; Ensure saw is securely mounted. |
| Laser guide not visible or misaligned | Dirty laser lens; Miscalibration | Clean laser lens; Refer to manual for laser calibration instructions. |
7. Specifications
| Feature | Detail |
|---|---|
| Model Number | POWX075700 |
| Power | 1500 Watts |
| Blade Length | 210 Millimeters |
| Number of Teeth (Blade) | 48 |
| Max. Rotational Speed | 5000 min⁻¹ |
| Max. Cutting Angle | 45 Degrees |
| Power Source | Corded Electric |
| Special Feature | Brushless Motor |
| Recommended Surface | Wood and Metal |
| Product Dimensions (L x W x H) | 5 x 5 x 5 cm; 1 Kilogram |
| Sound Level | 113 Decibels |
8. Warranty & Support
Warranty information for the Powerplus POWX075700 miter saw is typically provided with the product at the time of purchase. Please refer to the warranty card or documentation included in your product packaging for specific terms and conditions.
For technical support, spare parts, or service inquiries, please contact your retailer or the Powerplus customer service department. Contact details can usually be found on the Powerplus official website or in your product documentation.
Manufacturer: Varo y Kreator


