
ORIENTEK FX39
Komshine FX39 Automatic Intelligent Optical Fusion Splicer User Manual
Model: FX39 | Brand: Komshine
1. Introduction
The Komshine FX39 Automatic Intelligent Optical Fusion Splicer is a precision instrument designed for splicing optical fibers. It features advanced technology for fast and accurate fiber alignment and fusion, making it suitable for various fiber optic installation and maintenance tasks. This manual provides essential information for the safe and efficient operation of the device.

Figure 1.1: Complete Komshine FX39 Fusion Splicer Kit including the splicer, cleaver, strippers, and carry case.
2. Safety Information
Always adhere to the following safety guidelines to prevent injury and damage to the equipment:
- Ensure the work area is clean, dry, and well-lit.
- Do not operate the splicer in explosive atmospheres or near flammable liquids/gases.
- Wear appropriate personal protective equipment (PPE), including safety glasses, when handling optical fibers and operating the splicer.
- Avoid direct exposure to the arc discharge during splicing, as it emits intense light and heat.
- Handle optical fibers with extreme care. Fiber shards are very sharp and can cause serious injury.
- Only use the provided power adapter and battery pack.
- Do not attempt to disassemble or repair the splicer yourself. Refer to qualified service personnel.
- Keep the splicer and accessories out of reach of children.
3. What's in the Box
The Komshine FX39 Fusion Splicer package typically includes the following components:
- Komshine FX39 Fusion Splicer Unit
- TAWAA FC-30 Fiber Cleaver
- Durable Carry Case
- Cleaning Tools (e.g., brush, alcohol dispenser)
- Charger/Power Adapter
- Cleaning Wipes
- Fiber Strippers (e.g., CFS-3 Fiber Optic Stripper)
- Tawaa Catalog (Product documentation)
- Lithium-Ion Battery Pack (7800mAh)

Figure 3.1: Visual representation of the main components included in the product package.
4. Setup
4.1 Charging the Battery
Before initial use, ensure the 7800mAh Li-battery is fully charged. Connect the charger to the splicer and a power outlet. The charging indicator will show the battery status. A full charge supports approximately 400 cycles of splicing and heating.

Figure 4.1: The Komshine FX39 splicer shown with its removable battery pack, highlighting the power source.
4.2 Preparing the Splicer
- Open the splicer lid and ensure the V-grooves and electrodes are clean.
- Power on the splicer using the designated power button.
- Allow the splicer to self-calibrate and perform initial checks.
5. Operating Instructions
5.1 Fiber Preparation
- Using the fiber strippers, remove the protective coating from the fiber end to the required length (typically 30-40mm).
- Clean the stripped fiber thoroughly with a lint-free wipe moistened with isopropyl alcohol.
- Place the cleaned fiber into the TAWAA FC-30 Fiber Cleaver. Ensure the fiber is positioned correctly according to the cleaver's instructions for a precise 90-degree cleave.
- Perform the cleave. Inspect the cleaved end for imperfections using the splicer's display or a separate fiber inspection microscope. A good cleave is crucial for low-loss splices.

Figure 5.1: The TAWAA FC-30 Fiber Cleaver, an essential tool for preparing fiber ends for splicing.
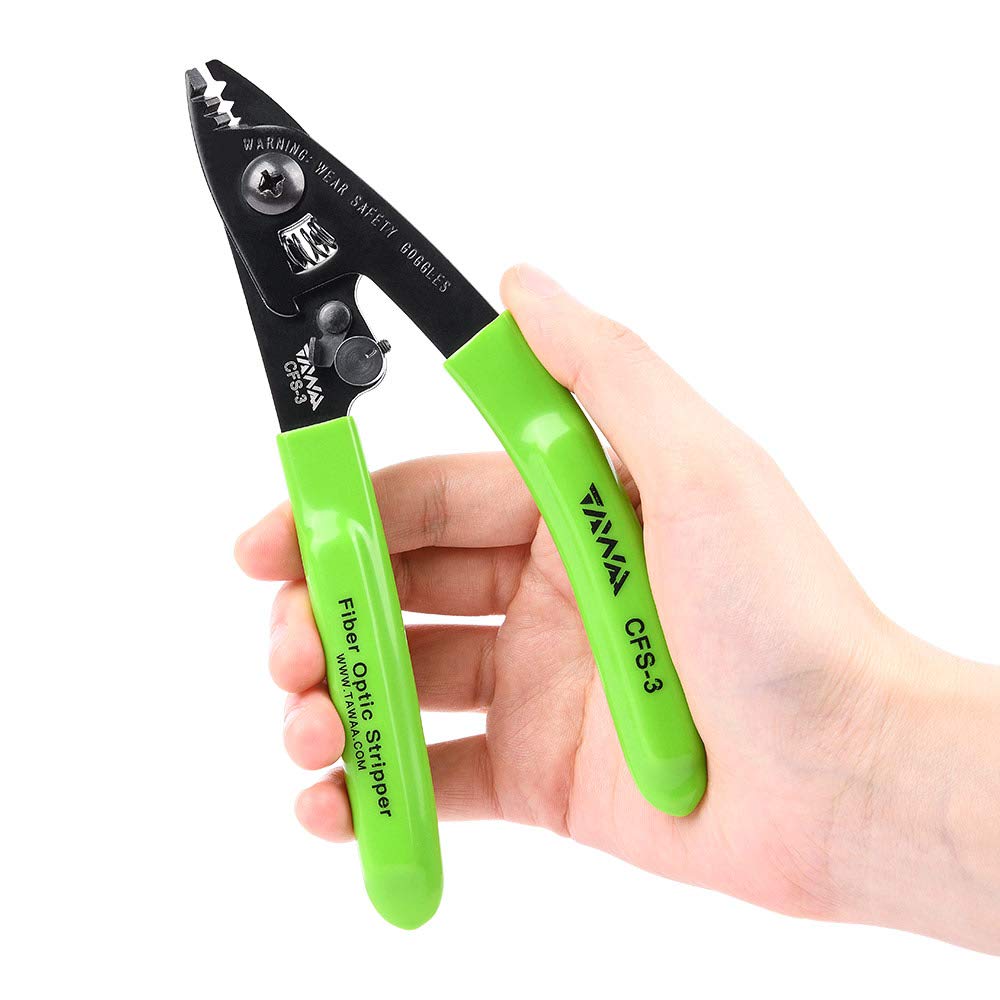
Figure 5.2: A fiber optic stripper, used for removing the outer protective layers of the fiber cable.
5.2 Splicing Process
- Carefully place the prepared fibers into the V-grooves of the splicer. Ensure the fiber ends are positioned correctly and gently close the fiber clamps. The FX39 features a three-in-one fixture supporting jumper, bare fiber, and flat fiber.
- The splicer will automatically align the fibers using its six motors (pushing, adjustable core, and focus motors for each side). The 4.3-inch LCD screen will display the fiber alignment and estimated loss.
- Initiate the splicing process. The FX39 performs 6-second fast splicing. The arc discharge will fuse the two fiber ends together.
- After splicing, the splicer will display the splice loss estimate. If the loss is acceptable, proceed to heating.

Figure 5.3: The Komshine FX39 splicer's 4.3-inch LCD screen displaying fiber alignment and splice parameters.

Figure 5.4: A detailed view of the fiber placement area within the Komshine FX39 splicer, showing the V-grooves and clamps.
5.3 Heat Shrink Protection
- Slide a heat shrink protection sleeve over the spliced area.
- Place the fiber with the sleeve into the heating oven.
- Initiate the heating process. The FX39 features 16-second rapid heating.
- Once heating is complete, carefully remove the fiber and allow the sleeve to cool and harden before handling.
5.4 Data Storage and Management
The splicer can store up to 10,000 sets of splicing results and 2,000 sets of images. Data can be downloaded and software updated via the USB interface.
5.5 Official Product Video
For a visual guide on the Komshine FX39 Fusion Splicer's features and operation, please watch the official product video below:
Video 5.1: An overview of the Komshine FX39 Fusion Splicer, demonstrating its key features and operational aspects, including the six motors, high-speed processing chip, fast splicing, replaceable SOC holder, and its anti-vibration, dustproof, and rainproof capabilities.
6. Maintenance
Regular maintenance ensures optimal performance and longevity of your splicer:
- Cleaning: Regularly clean the V-grooves, fiber clamps, and objective lenses with a lint-free swab and isopropyl alcohol. Dust and debris can significantly affect splice quality.
- Electrode Replacement: The electrodes have a service life of approximately 5,000 splices. Replace them when the splicer indicates or when splice quality degrades. Refer to the electrode replacement procedure in the detailed manual.
- Battery Care: Store the battery in a cool, dry place. Avoid extreme temperatures. If storing for extended periods, charge the battery to about 50% capacity.
- Software Updates: Check the manufacturer's website for any available software updates to ensure your splicer has the latest features and performance enhancements.
7. Troubleshooting
| Problem | Possible Cause | Solution |
|---|---|---|
| High Splice Loss | Dirty V-grooves/lenses, poor fiber cleave, worn electrodes. | Clean V-grooves and lenses. Re-cleave fiber. Replace electrodes if necessary. |
| Fiber Not Aligning | Dirty V-grooves, fiber not seated correctly, motor issue. | Clean V-grooves. Re-seat fiber. If problem persists, contact support. |
| Splicer Not Powering On | Battery depleted, faulty battery, charger issue. | Charge battery. Check battery connection. Test with charger directly. |
| Heating Oven Malfunction | Heating element failure, sensor error. | Restart splicer. If error persists, contact technical support. |
For issues not listed here or if solutions do not resolve the problem, please contact Komshine technical support.
8. Specifications
- Model: FX39
- Splicing Time: 6 seconds (typical)
- Heating Time: 16 seconds (typical)
- Electrode Life: Up to 5,000 splices
- Display: 4.3-inch LCD color display
- Battery Capacity: 7800mAh (approx. 400 splice & heat cycles)
- Data Storage: 10,000 splice results, 2,000 images
- Motor System: 6 motors (pushing, adjustable core, focus)
- Protection: Anti-vibration, dustproof, rainproof (as per video)
- Interface: USB
9. Warranty and Support
The Komshine FX39 Fusion Splicer comes with a standard manufacturer's warranty. Please refer to the warranty card included in your package for specific terms and conditions. For technical support, service, or warranty claims, please contact your authorized Komshine dealer or visit the official Komshine website for contact information.
Additional protection plans may be available for purchase. Please check with your retailer for details.
Related documentsFX39


Ask a question about this manual
Ask about setup, troubleshooting, compatibility, parts, safety, or missing instructions. Manuals+ will review the question and use this page’s manual context to help answer it.