
Douk Audio H2
Douk Audio H2 HiFi Vacuum Tube Headphone Amplifier User Manual
Model: H2
1. Introduction
Thank you for purchasing the Douk Audio H2 HiFi Vacuum Tube Headphone Amplifier. This manual provides essential information for the safe and efficient operation of your device. Please read it thoroughly before use and retain it for future reference.
The Douk Audio H2 is designed to deliver a high-fidelity audio experience with its balanced XLR input and classic vacuum tube sound. It features powerful amplification, independent L/R balance adjustment, and adjustable gain settings to optimize performance for various headphones and audio sources.
2. Safety Instructions
- Do not expose this device to rain, moisture, or extreme temperatures.
- Ensure proper ventilation around the amplifier to prevent overheating.
- Do not open the casing. Refer all servicing to qualified personnel.
- Use only the provided DC 12V power adapter. Using an incorrect adapter may damage the device and void the warranty.
- Avoid placing the amplifier near strong magnetic fields.
- Always turn off the amplifier and disconnect the power before cleaning or moving it.
- Keep out of reach of children.
3. Package Contents
Verify that all items are present in the package:
- 1x Douk Audio H2 Headphone Amplifier
- 2x 6N3 Vacuum Tubes
- 1x DC 12V Power Adapter
- 1x 6.35mm to 3.5mm Headphone Adapter
- 1x User Manual (this document)

Image: Contents of the Douk Audio H2 package, showing the amplifier, two 6N3 vacuum tubes, a DC 12V power adapter, and a 6.35mm to 3.5mm headphone adapter.
4. Product Overview
4.1 Front Panel

Image: Detailed diagram of the H2 amplifier's front panel, highlighting the 6.35mm and Balanced XLR headphone outputs, the LED display showing input and volume, and the multi-function volume/mode knob.
- 6.35mm Headphone Output: Standard single-ended headphone jack.
- Balanced XLR Headphone Output: For balanced headphones, offering superior audio quality.
- LED Display: Shows current input channel, volume level, gain setting, and channel balance.
- Power Switch / Volume Knob / Filter Selector / Input Channel Select: Multi-function knob for power, volume adjustment, and navigating settings.
4.2 Rear Panel
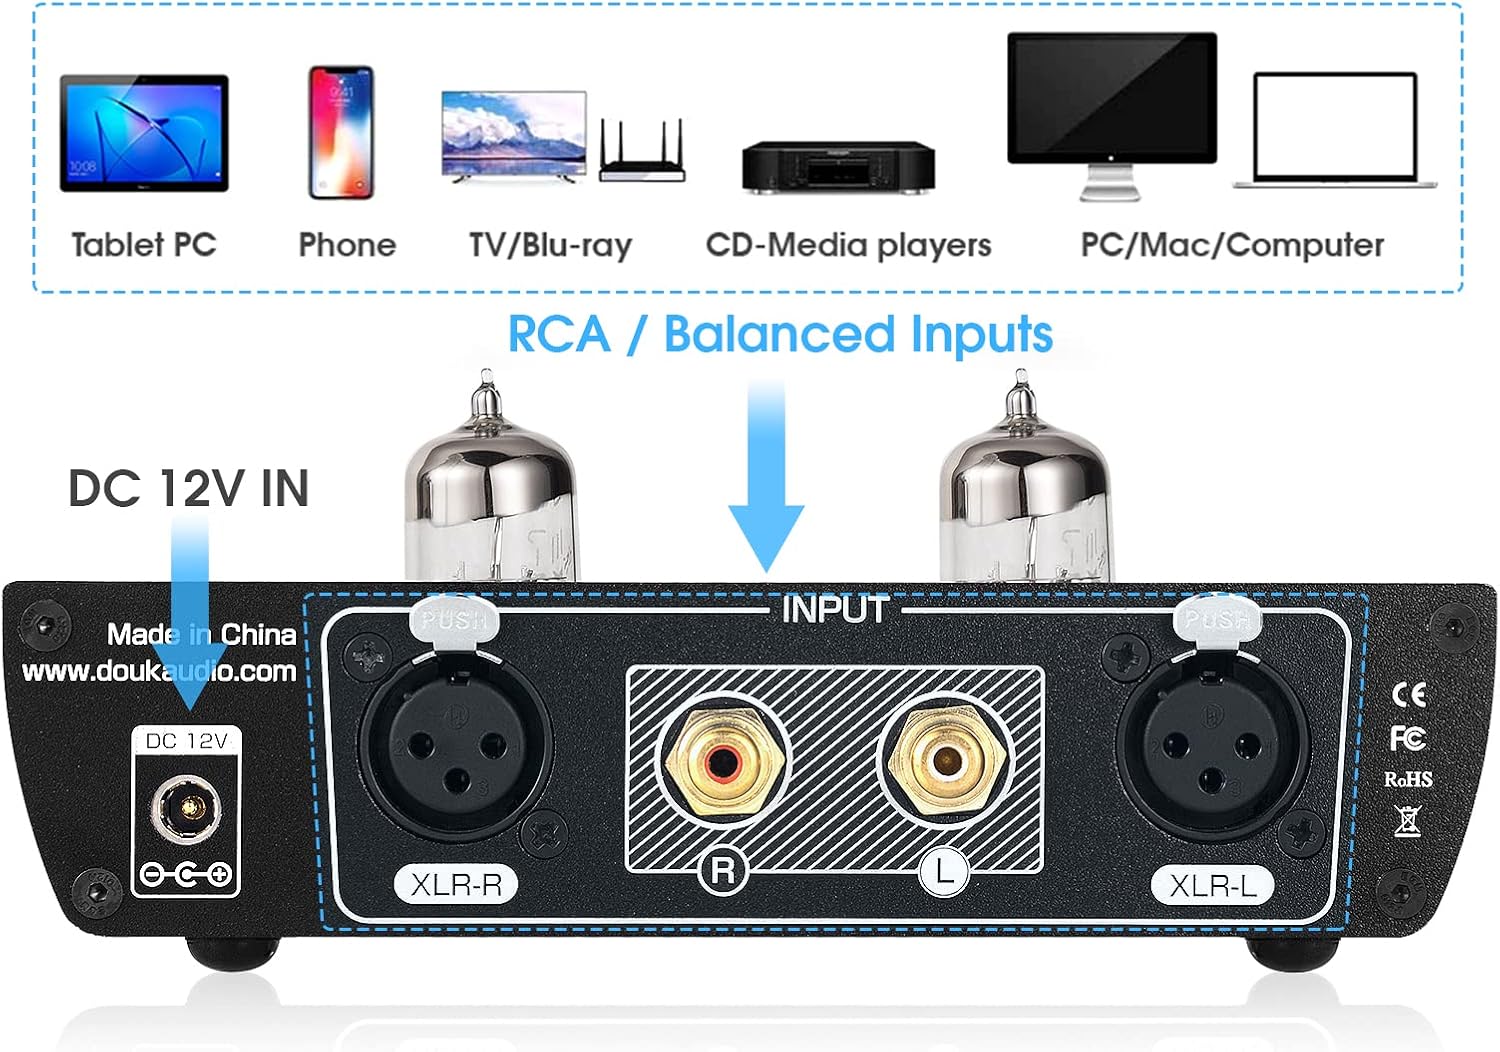
Image: Detailed diagram of the H2 amplifier's rear panel, indicating the RCA (L/R) inputs, Balanced XLR (L/R) inputs, and the DC 12V power input.
- RCA Inputs (L/R): For connecting audio sources via RCA cables.
- Balanced XLR Inputs (L/R): For connecting audio sources via balanced XLR cables.
- DC 12V IN: Power input for the provided DC 12V adapter.
4.3 Key Features
- High-Fidelity Balanced XLR Connectivity: Real balanced XLR input for high-quality audio reproduction with excellent sound separation and resolution.
- Classic Tube Sound: Features a pluggable 6N3 vacuum tube for a warm, sweet, and dynamic sound signature.
- Powerful and Efficient Circuit Design: Dual TPA6120 headphone amp chips provide ample power for headphones from 16 to 600 ohms.
- Adjustable Settings: Independent L/R balance adjustment and adjustable gain settings (low/medium/high) for optimal performance.
- Sophisticated Aesthetics: Black aluminum alloy chassis with vintage tube lighting and an LED display for real-time status feedback.
5. Setup
- Tube Installation: Carefully insert the two 6N3 vacuum tubes into their sockets on the top of the amplifier. Ensure they are seated firmly but do not force them.
- Connect Audio Source:
- For Balanced Input: Connect your audio source (e.g., DAC, CD player with XLR output) to the XLR-L and XLR-R inputs on the rear panel using XLR cables.
- For RCA Input: Connect your audio source (e.g., computer, DAC, CD player with RCA output) to the RCA L and R inputs on the rear panel using RCA cables.

Image: The Douk Audio H2 amplifier with RCA cables connected to the input, demonstrating a typical audio source connection. A close-up of an illuminated vacuum tube is also shown.
- Connect Headphones: Plug your headphones into either the 6.35mm or Balanced XLR headphone output on the front panel. If your headphones have a 3.5mm jack, use the provided 6.35mm to 3.5mm adapter.
- Connect Power: Connect the DC 12V power adapter to the 'DC 12V IN' port on the rear panel, then plug the adapter into a power outlet.
6. Operating Instructions
- Power On/Off: Press the multi-function knob (volume knob) once to turn the amplifier on or off. The LED display will illuminate upon power-on.
- Volume Adjustment: Rotate the multi-function knob clockwise to increase volume and counter-clockwise to decrease volume. The volume level will be displayed on the LED screen.
- Input Selection: Double-press the multi-function knob to enter the menu. Rotate the knob to select between 'BAL Input' (Balanced XLR) and 'RCA Input'. Press the knob again to confirm your selection.
- Gain Selection: In the menu, navigate to 'Gain Select'. Rotate the knob to choose between 'Low', 'Medium', and 'High' gain settings. Select the appropriate gain based on your headphones' impedance and sensitivity. Lower impedance/higher sensitivity headphones generally require lower gain.
- Channel Balance Adjustment: In the menu, navigate to 'Channel Bal'. Rotate the knob to adjust the left/right channel balance (up to 2.5dB either way) to compensate for any hearing imbalances or source issues.

Image: A musician using the Douk Audio H2 amplifier with headphones and a microphone. The image highlights the amplifier's LED display showing various settings like 'BAL Input', 'Volume 64', 'Gain Select Medium', and 'Channel Bal L 0.5dB R'.
7. Maintenance
- Cleaning: Use a soft, dry cloth to clean the exterior of the amplifier. Do not use liquid cleaners or solvents.
- Tube Replacement: The 6N3 vacuum tubes have a finite lifespan. If you notice a degradation in sound quality or if a tube fails, they can be replaced. Ensure the amplifier is powered off and unplugged before attempting to replace tubes. Gently pull the old tubes straight up from their sockets and carefully insert new ones, aligning the pins correctly. Compatible tube models include 6A8Q / 2C51 / 5670 / 5185 / 6385 / 6185 / WE396 (US), 6N3 (Soviet Union), 6H3N / 6H3II (Soviet Union), ECF82 (Germany), 6CC42 (Czech).
- Storage: If storing the amplifier for an extended period, disconnect it from power and store it in a cool, dry place away from direct sunlight.
8. Troubleshooting
| Problem | Possible Cause | Solution |
|---|---|---|
| No sound output |
|
|
| Distorted sound |
|
|
| Humming or buzzing noise |
|
|
9. Specifications
- Model: H2
- Input: Balanced XLR, RCA
- Output: 6.35mm Headphone, Balanced XLR Headphone
- Tubes: 6N3 (pluggable)
- Headphone Impedance: 16-600 ohms
- Power Supply: DC 12V (included adapter)
- Dimensions (L x W x H): Approximately 155mm x 128mm x 45mm (6.10in x 5.04in x 1.77in)
- Net Weight: Approximately 658g (1.45lb)
- Package Weight: Approximately 900g (1.98lb)
Image: Diagram showing the physical dimensions (length, width, height) and weight specifications of the Douk Audio H2 amplifier and its package.
10. Warranty and Support
Douk Audio is committed to customer satisfaction. Your Douk Audio H2 amplifier comes with a standard manufacturer's warranty. Please refer to the warranty card included in your package or visit the official Douk Audio website for detailed warranty terms and conditions.
For technical support, troubleshooting assistance, or any inquiries regarding your product, please contact Douk Audio customer service through the retailer where you purchased the product or visit the official Douk Audio website for contact information.
Official Douk Audio Website: www.doukaudio.com
Related documentsH2


Ask a question about this manual
Ask about setup, troubleshooting, compatibility, parts, safety, or missing instructions. Manuals+ will review the question and use this page’s manual context to help answer it.