1. Introduction
Thank you for choosing the FOXSUR 12V/24V 10A Smart Battery Charger. This fully automatic, 7-stage battery charger and maintainer is designed to efficiently charge and maintain various types of 12V and 24V batteries, including Wet, GEL, SLA, LiFePO4, Lead-Acid, and AGM batteries. It features microprocessor control for optimal charging, an intelligent digital display for real-time status, and multiple protection functions to ensure safe operation. This manual provides detailed instructions for the proper use, maintenance, and troubleshooting of your battery charger.
2. Safety Information
Please read and understand all safety instructions before operating the charger. Failure to follow these instructions may result in electric shock, fire, or serious injury.
- Electrical Safety:
- Ensure the charger is connected to a grounded outlet.
- Do not expose the charger to rain or wet conditions.
- Never operate the charger if the power cord or clamps are damaged.
- Always disconnect the power source before connecting or disconnecting the battery clamps.
- Battery Safety:
- Wear eye protection and gloves when working with batteries.
- Batteries can produce explosive gases; ensure adequate ventilation.
- Do not charge frozen batteries.
- Do not charge lithium batteries (Li-ion, Li-Po) other than LiFePO4. This charger is specifically designed for LiFePO4 and lead-acid based batteries.
- Ensure correct polarity: Red clamp to positive (+), Black clamp to negative (-).
- General Precautions:
- Keep out of reach of children.
- Do not disassemble the charger. Refer all servicing to qualified personnel.
- Avoid placing the charger on flammable surfaces during operation.
3. Product Overview
The FOXSUR Smart Battery Charger is equipped with advanced features for efficient and safe battery charging and maintenance.

Figure 3.1: Front view of the FOXSUR Smart Battery Charger, showing the main unit, red and black battery clamps, and the AC power plug. The LCD display is visible on the charger's face.
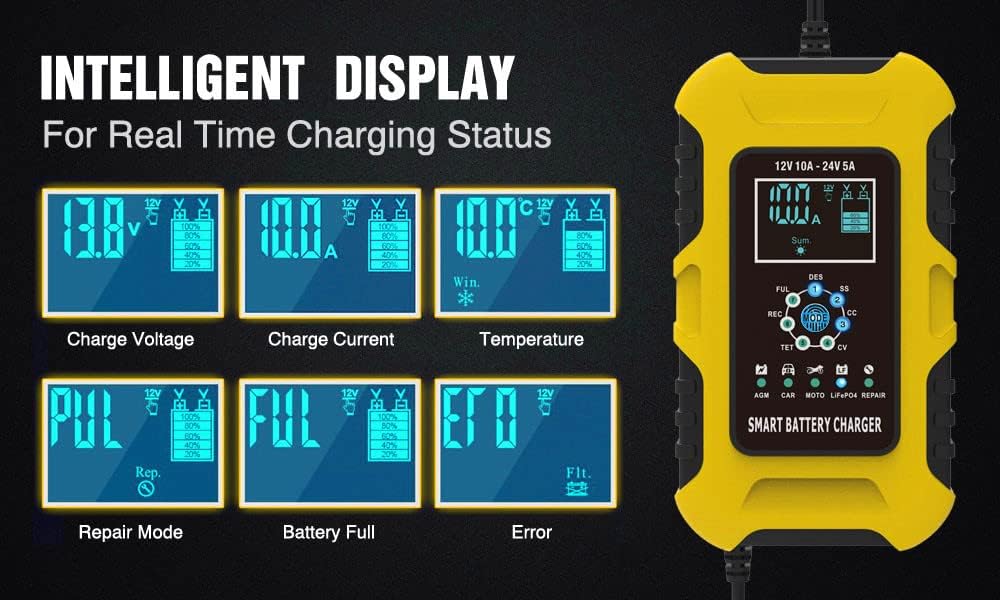
Figure 3.2: Detailed view of the intelligent LCD display, illustrating various real-time charging statuses such as charge voltage, charge current, internal temperature, battery full indicator, repair mode, and error messages.
Key Features:
- Microprocessor Control (CPU): Automatically adjusts charging current and maintains battery health.
- 7-Stage Charging: Optimized charging process for various battery types, including desulfation and maintenance.
- Intelligent Digital Display: LCD screen shows voltage, current, temperature, charging status, and battery condition.
- Wide Compatibility: Suitable for 12V/24V Calcium, GEL, AGM, LiFePO4, Wet, SLA, EFB, and Lead-Acid batteries.
- Multiple Protections: Includes reverse polarity, output short, overcharging, overvoltage, over-temperature, and over-current protection.
- Pulse Repair Function: Helps to restore drained and sulfated batteries, extending battery life.
Package Contents:
- 1 x FOXSUR Car Battery Charger
- 1 x User Manual (This document)

Figure 3.3: Illustration of the package contents, including the charger unit with its dimensions (approximately 17cm length, 10cm width, 6.5cm height), battery clamps (60cm cable), and AC power cord (110cm cable), along with the user manual.
4. Setup
Before connecting the charger, ensure the area is well-ventilated and the battery terminals are clean.
- Prepare the Battery: If the battery is in a vehicle, ensure the vehicle's ignition is off and all accessories are turned off. For marine applications, ensure the vessel is securely moored.
- Connect Battery Clamps:
- Connect the RED (+) positive clamp to the positive terminal of the battery.
- Connect the BLACK (-) negative clamp to the negative terminal of the battery.
- For vehicle batteries: If connecting to a vehicle, connect the black clamp to the vehicle chassis away from the battery and fuel line, if the battery is not grounded to the chassis. Consult your vehicle's manual for specific grounding instructions.
- Connect to Power Outlet: Plug the charger's AC power cord into a standard 100-240V AC, 50-60Hz electrical outlet. The charger will automatically detect the battery voltage (12V or 24V).
- Select Charging Mode: After connecting to power, the charger will display the current battery status. Press the MODE button to cycle through the available charging modes (AGM, CAR, MOTO, LiFePO4, REPAIR). Select the appropriate mode for your battery type. Note: The mode button will be locked if not pressed before connecting to the battery.

Figure 4.1: Overview of the multiple charging modes: AGM for AGM batteries, CAR for GEL, SLA, WET, DEEP CYCLE, EFB, Calcium batteries, MOTO for motorcycle batteries, LiFePO4 for LiFePO4 batteries, and REPAIR mode for advanced battery recovery.
5. Operating Instructions
Once connected and the mode is selected, the charger will begin its automatic 7-stage charging process.
5.1 Charging Process (7 Stages)

Figure 5.1: Visual representation of the 7-stage charging process, including desulfation, soft start, bulk charge, absorption, battery test, recondition, and float/maintenance stages. The charger automatically progresses through these stages.
- Desulfation (DES): Uses high-frequency pulse to break down lead sulfate crystals.
- Soft Start (SS): Gently introduces current to the battery.
- Bulk Charge (CC): Charges the battery at maximum current until it reaches approximately 80% capacity.
- Absorption (CV): Charges at a constant voltage, gradually reducing current as the battery approaches full charge.
- Battery Test (TET): Tests the battery's ability to hold charge.
- Recondition (REC): Applies a controlled overcharge to recondition deeply discharged batteries.
- Float (FUL): Maintains the battery at full charge with a small, constant voltage.
5.2 Intelligent Digital Display
The LCD screen provides real-time information about the charging process:
- Voltage (V): Displays the current battery voltage.
- Current (A): Shows the charging current.
- Temperature (°C): Indicates the internal temperature of the charger.
- Charging Status: Icons and text indicate the current charging stage (e.g., FUL for full, REC for recondition).
- Battery Status: Battery level indicator.
- Error Messages: Displays error codes or warnings if issues occur.
5.3 Disconnecting the Charger
Once charging is complete (indicated by "FUL" on the display), follow these steps to disconnect:
- Disconnect from Power: Unplug the charger's AC power cord from the electrical outlet first.
- Disconnect Battery Clamps:
- Remove the BLACK (-) negative clamp from the battery terminal (or vehicle chassis).
- Remove the RED (+) positive clamp from the battery terminal.
6. Maintenance
Proper maintenance ensures the longevity and optimal performance of your FOXSUR battery charger.
- Cleaning:
- Before cleaning, ensure the charger is unplugged from the power outlet and disconnected from the battery.
- Wipe the exterior of the charger with a soft, damp cloth. Do not use harsh chemicals or abrasive cleaners.
- Keep the cooling fan vents clear of dust and debris to ensure proper airflow.
- Storage:
- Store the charger in a cool, dry place when not in use.
- Keep cables neatly coiled to prevent damage.
- Battery Maintenance:
- Regularly check battery terminals for corrosion and clean them as needed.
- Ensure battery fluid levels are adequate for non-sealed batteries.
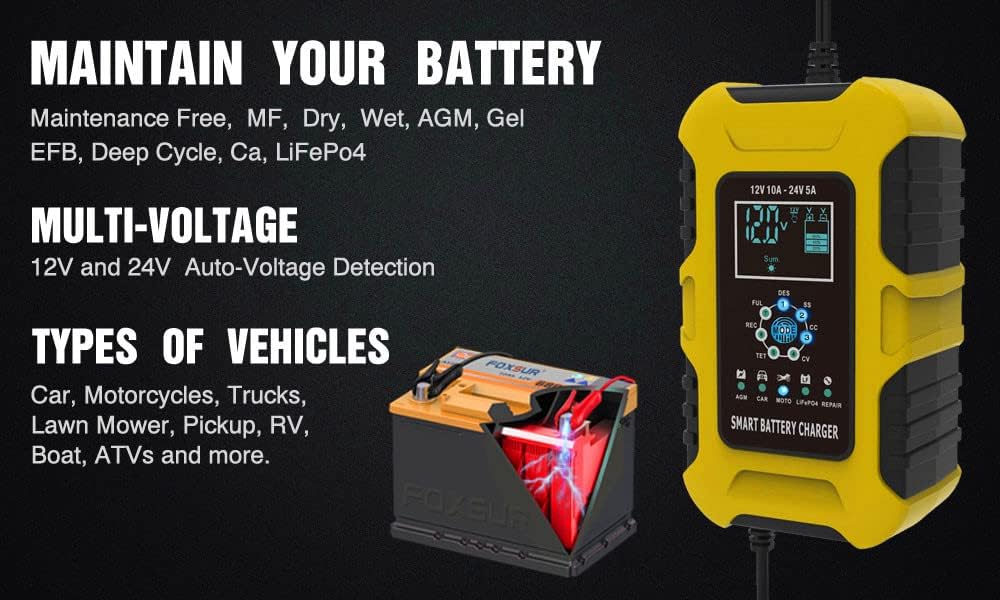
Figure 6.1: The charger's ability to maintain various battery types (Maintenance Free, MF, Dry, Wet, AGM, Gel, EFB, Deep Cycle, Ca, LiFePO4) and its multi-voltage auto-detection (12V and 24V). It is suitable for a wide range of vehicles including cars, motorcycles, trucks, lawn mowers, pickups, RVs, boats, and ATVs.
7. Troubleshooting
If you encounter issues with your charger, refer to the following common problems and solutions:
| Problem | Possible Cause | Solution |
|---|---|---|
| Charger not turning on/no display. | No power from outlet; loose connection; charger fault. | Check power outlet with another device. Ensure AC plug is fully inserted. Check battery clamp connections. |
| "Error" displayed on screen. | Reverse polarity; short circuit; battery fault. | Check battery clamp polarity (Red to +, Black to -). Inspect cables for damage or short circuits. Battery may be severely damaged or dead. |
| Charger not charging or charging slowly. | Incorrect mode selected; battery severely discharged; battery sulfation. | Ensure correct charging mode is selected for your battery type. For deeply discharged batteries, the charger may take time to initiate. Try "REPAIR" mode if sulfation is suspected. |
| Charger gets hot. | Normal operation during bulk charge; poor ventilation. | Some heat is normal. Ensure charger is in a well-ventilated area and cooling fan is not obstructed. If excessively hot, disconnect and allow to cool. |
| Cannot activate a completely dead battery. | Battery voltage too low for charger to detect. | This charger has a minimum start voltage of 8.0V. Batteries below this voltage may not be detected or charged. The charger cannot repair severely damaged or completely dead batteries to 100% new condition. |

Figure 7.1: The charger's comprehensive protection features, including over-current, overcharge, overheat, short circuit, reverse polarity, fire materials, cooling system, and high voltage protection, ensuring safe operation.
8. Specifications
| Parameter | Value |
|---|---|
| Input Voltage | 100-240V AC, 50-60Hz |
| Rated Output | 12V 10A, 24V 5A |
| Minimum Start Voltage | 8.0V |
| Battery Range | 6-180Ah |
| Thermal Protection | 65°C +/- 5°C |
| Cooling | Fan cooling |
| Types of Batteries | Most types of 12V/24V batteries, including Calcium, Gel, AGM, SLA, Wet, EFB, Lead Acid, LiFePO4 |
| Product Dimensions | 6.69 x 4.33 x 2.56 inches (17 x 11 x 6.5 cm) |
| Item Weight | 1.28 pounds (0.58 kg) |
9. Warranty and Support
For warranty information and technical support, please refer to the contact details provided with your purchase or visit the official FOXSUR website. Keep your purchase receipt as proof of purchase for warranty claims.
This product is designed for reliability and performance. If you experience any issues not covered in this manual, please contact customer support for assistance.


