
1. Introduction
This manual provides detailed instructions for the installation, operation, and maintenance of your Tissting XM-18SD Egg Incubator Controller. This intelligent controller is designed to manage temperature and humidity for various types of eggs, including chicken, goose, and duck, ensuring optimal incubation conditions. Please read this manual thoroughly before use to ensure proper function and safety.
2. Safety Information
- Ensure the power supply voltage matches the controller's requirements (110V).
- Do not expose the controller to water or excessive humidity.
- Always disconnect power before performing any wiring or maintenance.
- This product is intended for household use only and is not suitable for industrial applications.
- Keep out of reach of children.
3. Package Contents
Verify that all items listed below are included in your package:
- 1 x XM-18SD Incubator Controller
- 1 x Temperature Sensor
- 1 x Humidity Sensor
- 1 x User Manual (this document)

Image 3.1: Temperature and Humidity Probes. The temperature probe (top) is a digital sensor for precise temperature collection. The humidity probe (bottom) is a precision sensor for stable humidity measurement.
4. Setup and Wiring
Before operating the controller, ensure all connections are made correctly as shown in the wiring diagram and video below. Incorrect wiring can damage the device or lead to improper operation.
4.1 Wiring Diagram
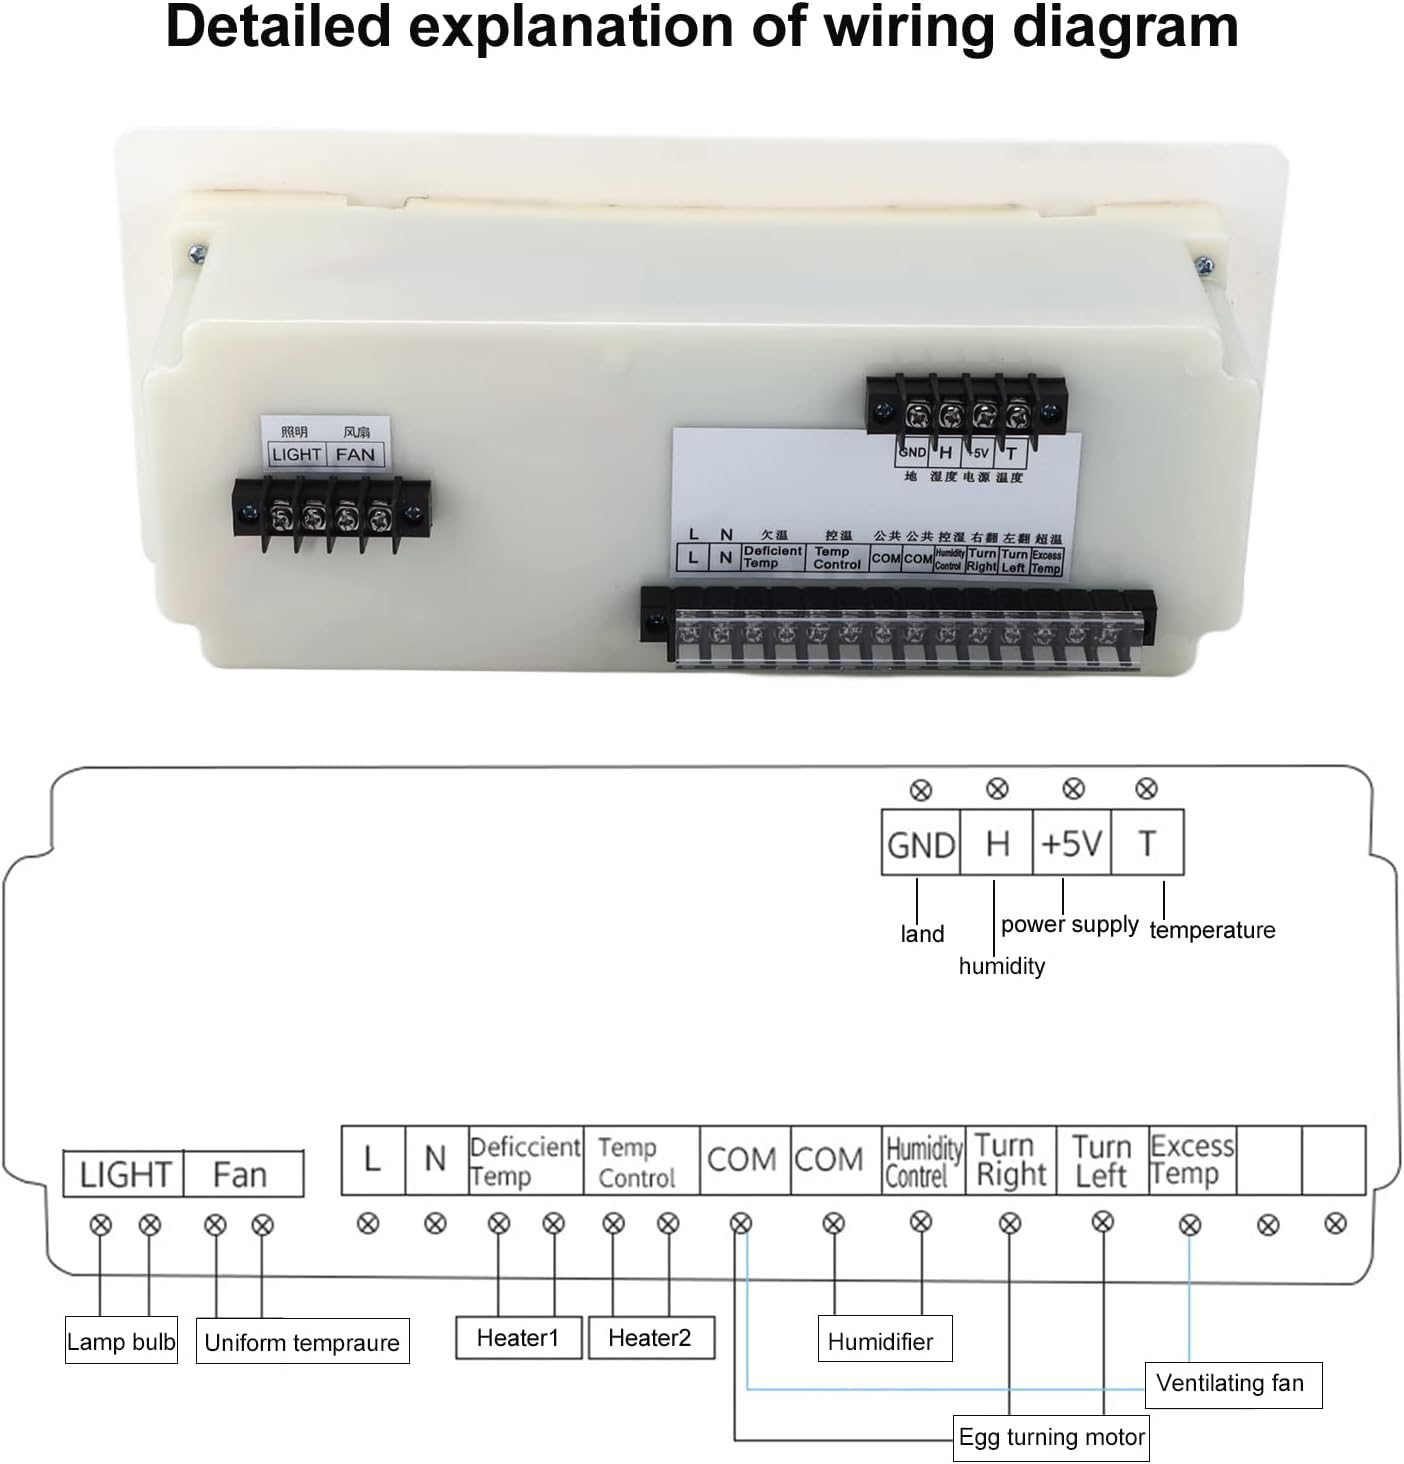
Image 4.1: Detailed wiring diagram for the XM-18SD Incubator Controller. This diagram illustrates the connections for power, sensors, and output channels including main heating, auxiliary heating, exhaust, egg turning (left/right), humidification, lighting, and fan.
Refer to the diagram for connecting the power cable, temperature sensor, humidity sensor, and various output devices (heaters, fan, humidifier, egg turning motor, etc.).
4.2 Connection Procedure
- Power Cable: Connect the main power cable to terminals 13 and 14 (L and N, 220V).
- Humidity Sensor: Connect the humidity sensor to terminals 1, 2, 3, and 4 (+5V, H, GND, GND).
- Temperature Sensor: Connect the temperature sensor to terminals 5 and 6 (COM, T).
- Output Connections: Connect your heating elements (main and auxiliary), fan, humidifier, egg turning motor, and lighting to their respective terminals as indicated on the diagram (e.g., HEAT1, HEAT2, FAN, WET, LEFT, RIGHT, LIGHT).
Video 4.1: This video demonstrates the correct procedure for connecting the power cable, humidity sensor, and temperature sensor to the XM-18SD Incubator Controller. Follow these steps carefully before initial use.
5. Operating Instructions
The XM-18SD controller features a large color screen display and intuitive controls for easy operation.
5.1 Control Panel Overview

Image 5.1: Overview of the XM-18SD Incubator Controller's display and buttons. This image highlights the various indicators for running status, temperature, humidity, incubation days, and specific animal modes (chicken, duck, goose, pigeon). It also labels the control buttons: Set/Enter, Plus, Reduce, and Mode/Day/Time.
The display shows real-time temperature, humidity, and incubation days. Indicators for heating, humidification, fan, and egg turning are also present. The right side features control buttons:
- Set/Enter: Used to enter setting mode and confirm selections.
- Plus (▲): Increases values or navigates up in menus.
- Reduce (▼): Decreases values or navigates down in menus.
- Mode/Day/Time: Switches between operating modes or adjusts day/time settings.
- Egg Turning: Manually initiates egg turning.
- Cancel Alarm: Dismisses active alarms.
5.2 Initial Power-On and Display
Once powered on, the controller will display current temperature and humidity readings. The top row shows the current temperature and humidity, while the bottom row shows the set temperature and humidity. The incubation days are also displayed.

Image 5.2: The main display of the XM-18SD Incubator Controller showing temperature, humidity, and incubation days. Various icons indicate active functions like heating, cooling, humidification, and fan operation.
5.3 Setting Parameters
The controller offers 5 modes: Automatic Incubation, Custom Mode, Manual Egg Turning, Manual Alarm Release, and Factory Restoration.

Image 5.3: Diagram illustrating the five main operational modes of the XM-18SD Incubator Controller: Automatic Incubation settings, Custom settings, Manual egg turning settings, Manual alarm release, and Factory restoration functions.
- Accessing Settings: Press and hold the "Set/Enter" button to enter the parameter setting mode. Use the "Plus" and "Reduce" buttons to navigate through parameters and adjust values. Press "Set/Enter" again to confirm each setting.
- Temperature Setting: Adjust the desired incubation temperature. The temperature control accuracy is ±0.1°C.
- Humidity Setting: Adjust the desired incubation humidity. The humidity control accuracy is ±3%RH.
- Egg Turning Cycle/Time: Set the interval (0-999 minutes, factory default 90 minutes) and duration (0-999 seconds, factory default 180 seconds) for automatic egg turning.
- Ventilation Cycle/Time: Set the interval (0-999 minutes, factory default 120 minutes) and duration (0-999 seconds, factory default 15 seconds) for ventilation.
- Manual Egg Turning: Press the "Egg Turning" button to manually initiate an egg turning cycle.
- Manual Alarm Release: If an alarm sounds, press the "Cancel Alarm" button to dismiss it.
- Mode Selection: Use the "Mode/Day/Time" button to switch between automatic incubation modes for different poultry types (chicken, duck, goose, pigeon) or to enter custom mode.
- Factory Restoration: Consult the full manual for instructions on restoring factory default settings if needed.
6. Maintenance
- Cleaning: Regularly clean the controller's exterior with a soft, dry cloth. Do not use abrasive cleaners or solvents.
- Sensor Care: Keep the temperature and humidity sensors clean and free from debris to ensure accurate readings. Avoid physical damage to the sensors.
- Storage: When not in use, store the controller in a cool, dry place away from direct sunlight and extreme temperatures.
7. Troubleshooting
| Problem | Possible Cause | Solution |
|---|---|---|
| Controller does not power on. | No power supply; loose power connection. | Check power outlet and ensure power cable is securely connected to terminals 13 and 14. |
| Incorrect temperature/humidity readings. | Sensor not connected properly; faulty sensor; sensor dirty. | Verify sensor connections. Clean sensors. If problem persists, sensor may need replacement. |
| Heating/Humidification not activating. | Set parameters are incorrect; output device not connected; faulty output device. | Check temperature/humidity settings. Ensure heating/humidification devices are correctly wired and functional. |
| Alarm sounds frequently. | Temperature/humidity outside set range; alarm thresholds too narrow. | Adjust set temperature/humidity or alarm thresholds. Ensure incubator environment is stable. Press "Cancel Alarm" to dismiss. |
8. Specifications
| Feature | Specification |
|---|---|
| Model | XM-18SD |
| Material | ABS Heavy-Duty Flame-Retardant Plastic Shell |
| Product Panel Size | Approx. 29.1 x 12.1 cm / 11.5 x 4.8 in |
| Temperature Display Range | 0-40.5°C |
| Temperature Control Accuracy | ±0.1°C |
| Humidity Display Range | 0-99%RH |
| Humidity Control Accuracy | ±3%RH |
| Number of Output Channels | 8 Channels (Main Heating, Auxiliary Heating, Exhaust, Left Turn, Right Turn, Humidification, Lighting, Fan) |
| Output Current | Main and Auxiliary Heating 30A, Other Outputs 10A |
| Egg Turning Record | Up to 999 Times |
| Egg Turning Cycle | 0-999 Minutes (Factory Setting: 90 Minutes) |
| Egg Turning Time | 0-999 Seconds (Factory Setting: 180 Seconds) |
| Ventilation Cycle | 0-999 Minutes (Factory Setting: 120 Minutes) |
| Ventilation Time | 0-999 Seconds (Factory Setting: 15 Seconds) |

Image 8.1: Front panel of the XM-18SD Incubator Controller, illustrating its dimensions of approximately 29.1x12.1cm (11.5x4.8in).
9. Warranty and Support
For warranty information and technical support, please refer to the product packaging or contact your retailer. Keep your purchase receipt as proof of purchase.