
1. Introduction
This manual provides detailed instructions for the safe and effective operation of your POCOCO DJ Disco Stage Party Light. This versatile lighting unit features a combination of laser and LED effects, sound activation, and multiple operating modes, suitable for various indoor and outdoor entertainment settings. It is powered by a built-in rechargeable battery or via USB.

Figure 1.1: POCOCO Disco Light highlighting its battery and USB power capabilities, along with key features such as 60 patterns, remote control, sound control, built-in battery, USB charging, and timer function.
2. Safety Information
Please read all safety warnings and instructions carefully before using this product. Failure to follow these instructions may result in electric shock, fire, or serious injury.
- This product contains a laser. DO NOT LOOK DIRECTLY INTO THE LASER APERTURE. Direct exposure to the laser beam may cause eye damage.
- Keep the device away from water, moisture, and high humidity.
- Do not operate the device if it has been damaged or dropped.
- Ensure proper ventilation. Do not block ventilation openings.
- Use only the provided USB cable and a compatible 5V power adapter for charging.
- Keep out of reach of children. This is not a toy.
- Do not attempt to disassemble or modify the device. Refer all servicing to qualified personnel.
- Avoid exposing the device to extreme temperatures or direct sunlight for prolonged periods.
3. Package Contents
Verify that all items listed below are included in your package:
- POCOCO DJ Disco Stage Party Light (DQ-R50)
- Remote Control
- USB Charging Cable
- Mounting Bracket
- Mounting Screws (2)
- User Manual (this document)

Figure 3.1: The POCOCO Disco Light unit and its accompanying remote control.
4. Product Overview
Familiarize yourself with the components of your POCOCO Disco Stage Party Light and its remote control.
4.1 Device Components

Figure 4.1: Labeled diagram of the POCOCO Disco Light, indicating the LED light, remote sensor, play mode indicator, red laser light, green laser light, cooling fan, sound active sensor, DC 5V power input, and power switch.
- LED Light: Projects various patterns and colors.
- Remote Sensor (IR): Receives signals from the remote control.
- Play Mode Indicator: Shows the current operating mode.
- Red Laser Light: Projects red laser patterns.
- Green Laser Light: Projects green laser patterns.
- Cooling Fan: Dissipates heat during operation.
- Sound Active Sensor (MIC): Detects ambient sound for sound-activated mode.
- Power Input (DC 5V): Connects to the USB charging cable.
- Power Switch (ON/OFF): Turns the device on or off.
4.2 Remote Control Functions
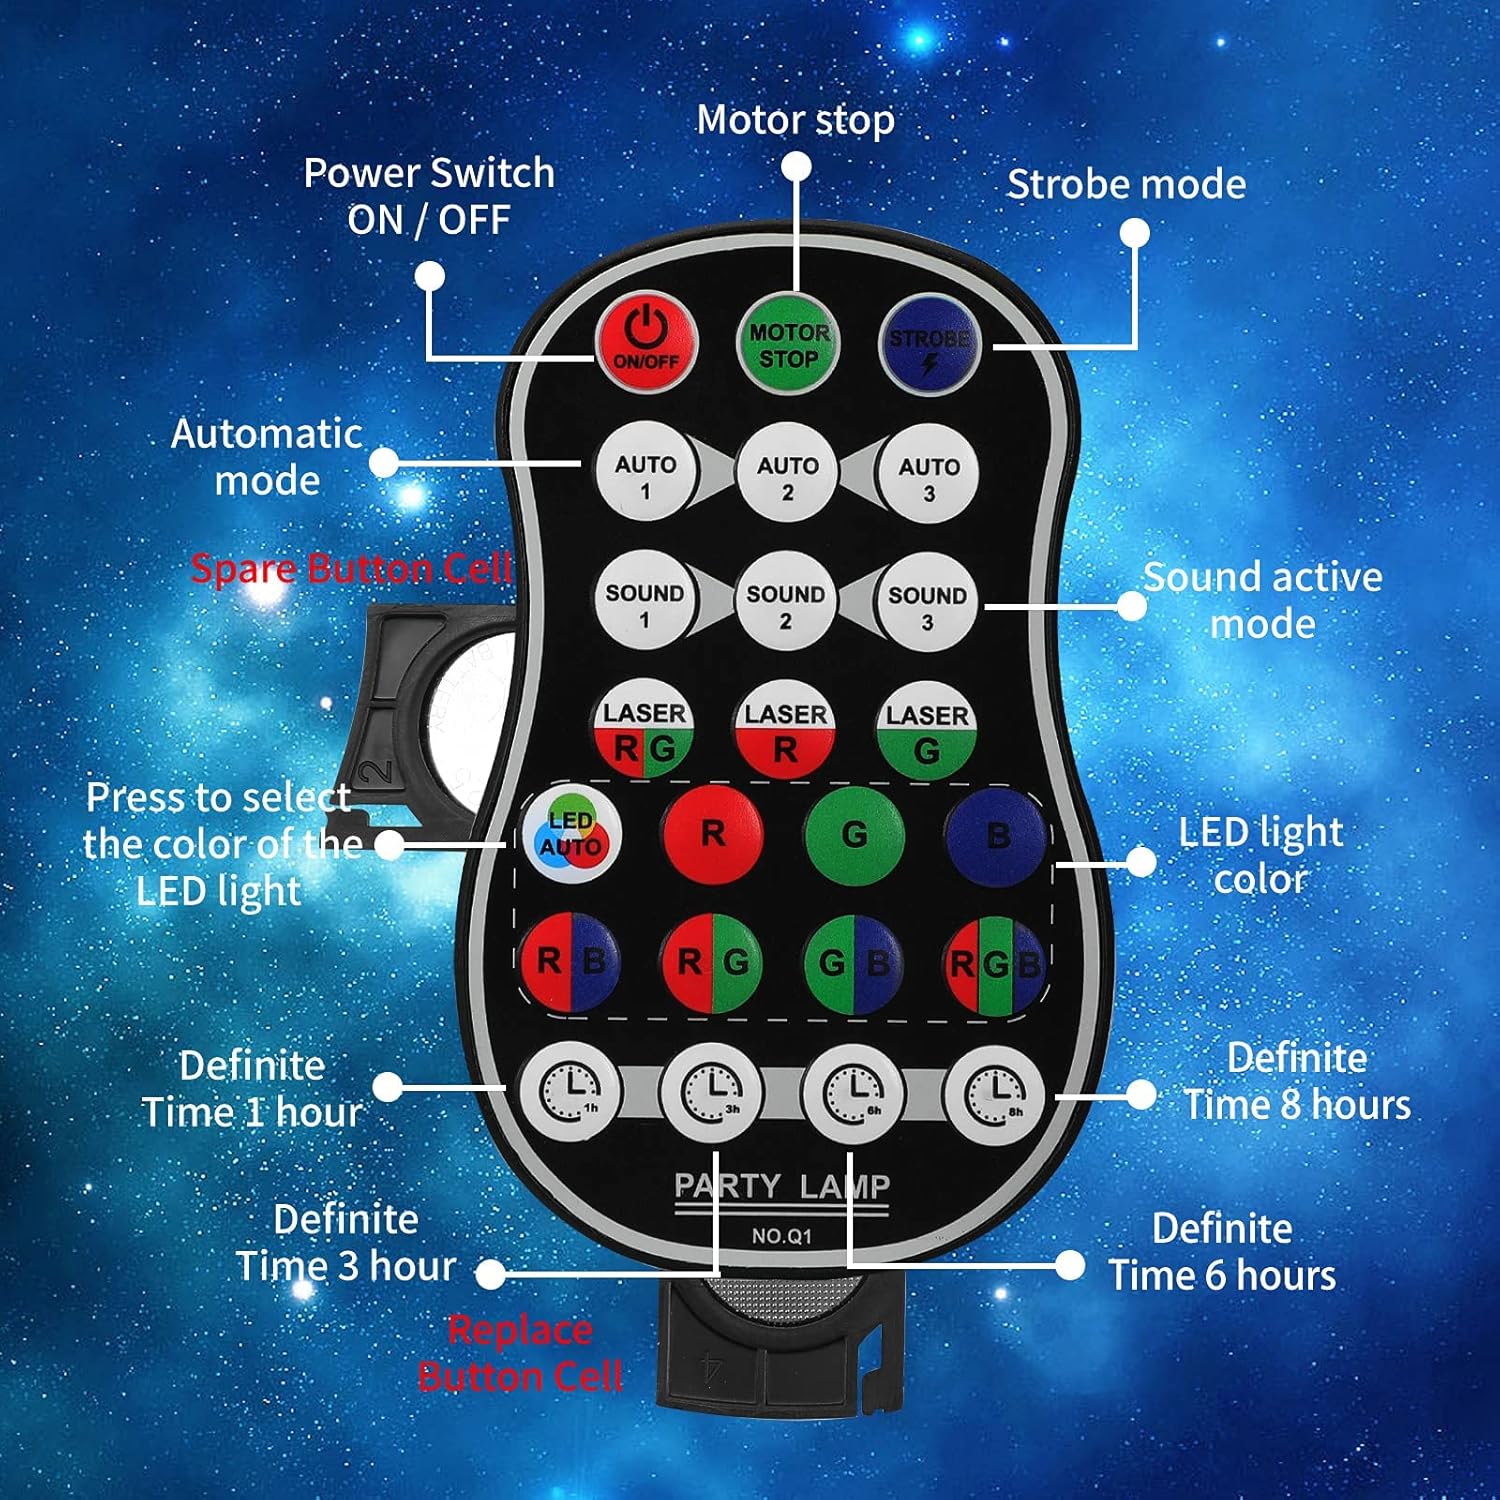
Figure 4.2: Labeled diagram of the remote control, showing buttons for Power ON/OFF, Motor Stop, Strobe Mode, Automatic Modes (Auto 1, 2, 3), Sound Active Modes (Sound 1, 2, 3), Laser Color Selection (RG, R, G), LED Light Color Selection (LED Auto, R, G, B, RB, RG, GB, RGB), and Definite Time settings (1h, 3h, 6h, 8h).
- ON/OFF: Power switch.
- MOTOR STOP: Stops the motor movement of patterns.
- STROBE: Activates strobe effect.
- AUTO 1/2/3: Selects different automatic light color and pattern change modes.
- SOUND 1/2/3: Activates sound-controlled modes with varying sensitivities.
- LASER RG/R/G: Selects laser color combinations (Red & Green, Red only, Green only).
- LED AUTO/R/G/B/RB/RG/GB/RGB: Selects LED light colors or automatic color cycling.
- 1h/3h/6h/8h: Sets a timer for automatic shutdown after the selected duration.
5. Setup
5.1 Charging the Device
The device comes with a built-in 3000 mAh battery, providing up to 5 hours of operation on a full charge.
- Connect the small end of the provided USB charging cable to the DC 5V power input port on the back of the light.
- Connect the standard USB end of the cable to a USB power adapter (not included), a computer USB port, or a power bank.
- The charging indicator light will illuminate during charging and turn off when fully charged.
5.2 Mounting Options
The POCOCO Disco Light is designed for flexible placement, including on a table, on the ground, or mounted on a ceiling or wall.
- Table/Ground Placement: Simply place the unit on a flat, stable surface. Adjust the angle of the light using the integrated bracket.
- Ceiling/Wall Mounting: Use the provided mounting bracket and screws. Secure the bracket to the desired surface, then attach the light unit to the bracket. The bracket allows for 180-degree manual rotation to adjust the projection angle.
6. Operating Instructions
After setup, use the remote control to operate the light.
- Power On/Off: Press the ON/OFF button on the remote control or use the physical switch on the device.
- Select Operating Mode:
- Auto Mode: Press AUTO 1, AUTO 2, or AUTO 3 for automatic color and pattern changes, creating a relaxed atmosphere.
- Strobe Mode: Press the STROBE button for rapid flashing effects.
- Sound Control Mode: Press SOUND 1, SOUND 2, or SOUND 3. The lights will change colors and patterns according to the rhythm of surrounding music or sounds.
- Adjust Laser Colors: Use the LASER RG, LASER R, or LASER G buttons to select desired laser colors.
- Adjust LED Colors: Use the LED AUTO, R, G, B, RB, RG, GB, or RGB buttons to select specific LED colors or automatic cycling.
- Stop Motor Movement: Press the MOTOR STOP button to pause the pattern movement while keeping the lights on.
- Set Timer: Press 1h, 3h, 6h, or 8h to set the light to automatically turn off after the specified time.
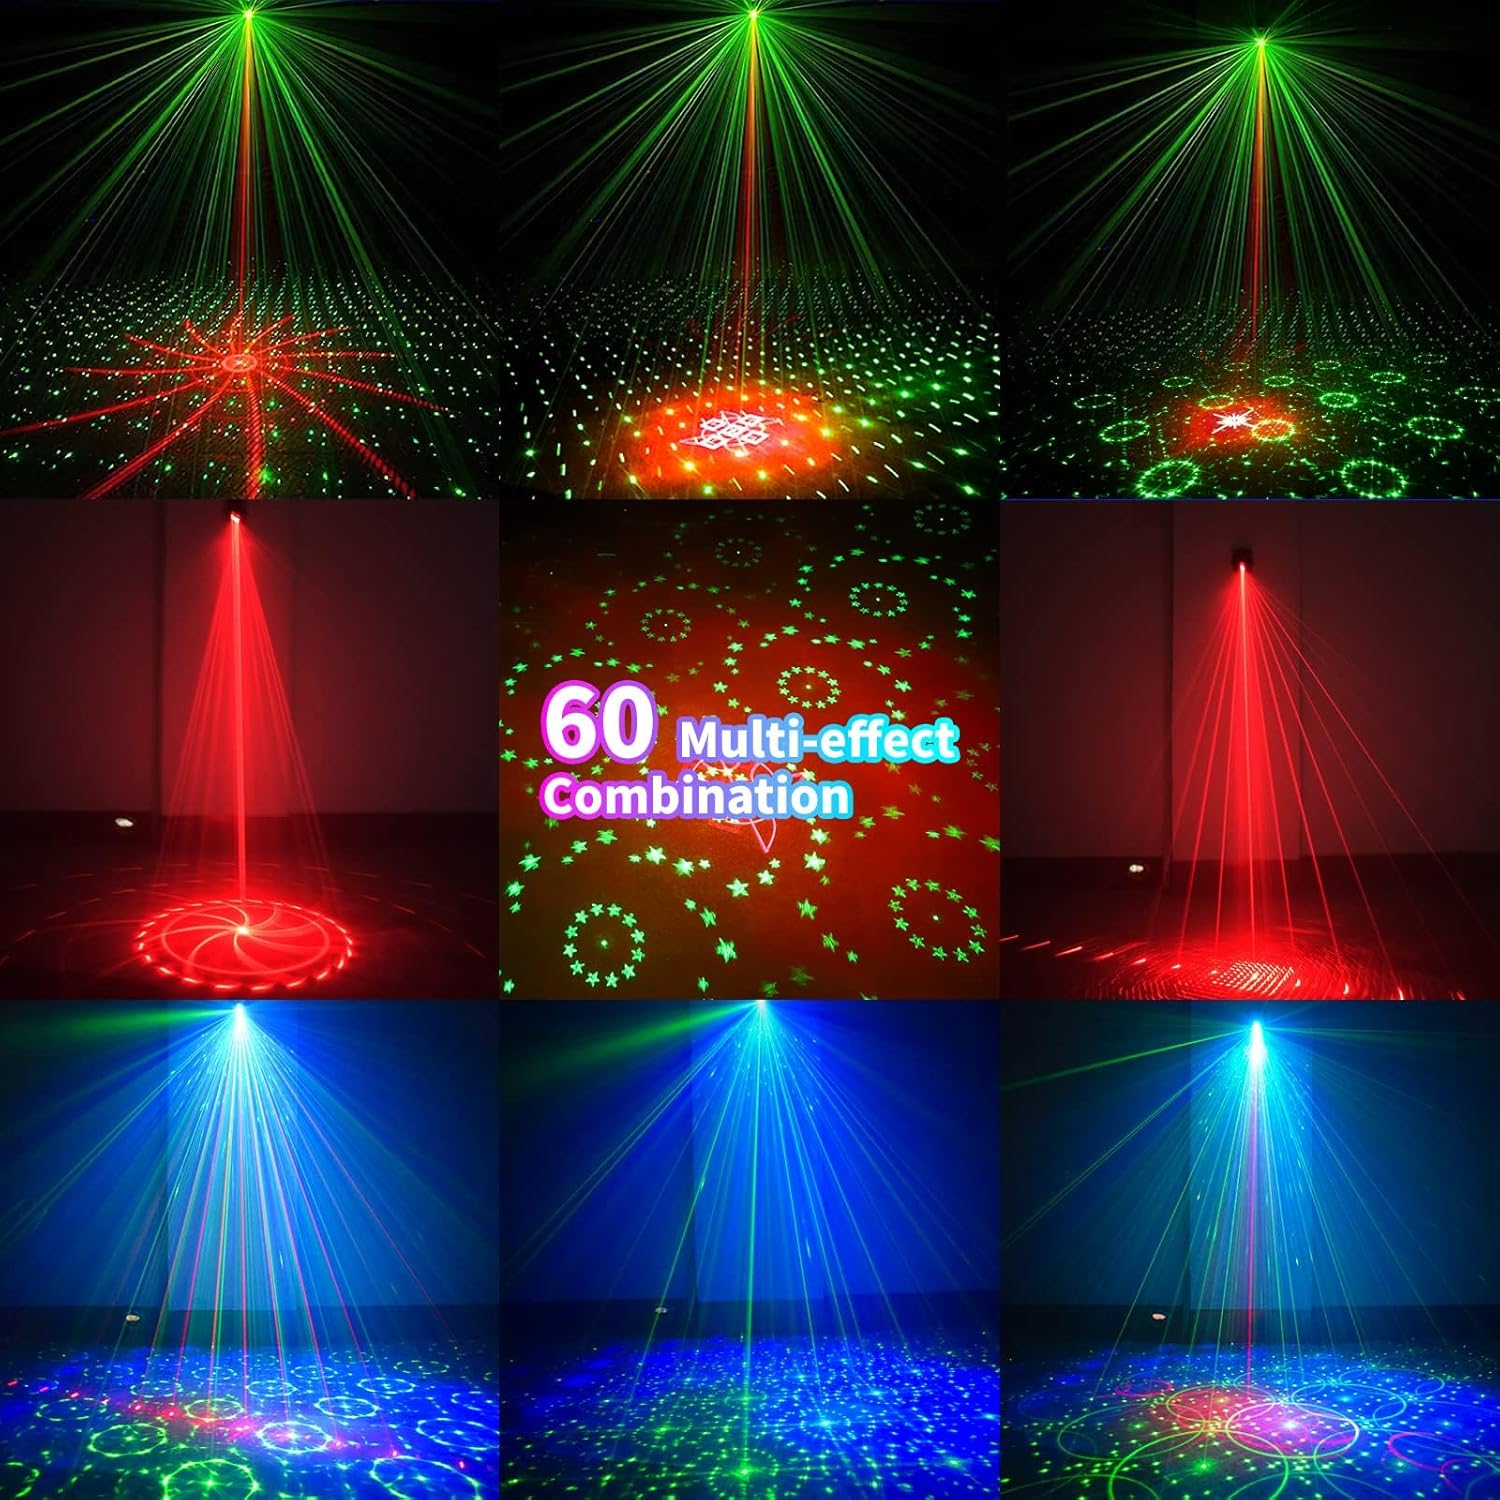
Figure 6.1: Examples of the 60 multi-effect combinations produced by the POCOCO Disco Light, showcasing various laser and LED patterns in different colors.
7. Maintenance
Proper maintenance ensures the longevity and optimal performance of your device.
- Cleaning: Use a soft, dry cloth to clean the exterior of the device. Do not use abrasive cleaners or solvents. Ensure the laser aperture and LED lens are free of dust and smudges for clear projection.
- Storage: When not in use for extended periods, store the device in a cool, dry place, away from direct sunlight and extreme temperatures.
- Battery Care: To maintain battery health, charge the device fully before long-term storage and recharge it every 3-6 months if not in regular use.
8. Troubleshooting
If you encounter issues with your POCOCO Disco Light, refer to the following common problems and solutions:
| Problem | Possible Cause | Solution |
|---|---|---|
| Device does not turn on. | Battery is depleted. Power switch is off. Remote control battery is dead. | Charge the device using the USB cable. Ensure the physical power switch is in the ON position. Replace the battery in the remote control. |
| No laser or LED projection. | Lens is obstructed. Incorrect mode selected. | Clean the lens and aperture. Ensure a projection mode (Auto, Sound, Strobe) is active. |
| Sound control not working. | Microphone is obstructed. Ambient sound is too low. Incorrect sound mode selected. | Ensure the microphone opening is clear. Increase the volume of the music or sound source. Try different SOUND modes (SOUND 1, 2, 3). |
| Remote control not responding. | Remote battery is dead. Obstruction between remote and sensor. Remote is too far from the device. | Replace the remote control battery. Ensure a clear line of sight to the IR sensor on the device. Move closer to the device. |
| Patterns are static (not moving). | MOTOR STOP button pressed. | Press the MOTOR STOP button again to resume movement. |
If the problem persists after trying these solutions, please contact POCOCO customer support.
9. Specifications
| Feature | Specification |
|---|---|
| Model Number | DQ-R50 |
| Dimensions (L x W x H) | 2.91" x 2.79" x 2.83" (7.39 cm x 7.09 cm x 7.19 cm) |
| Item Weight | 13.1 ounces (371 grams) |
| Power Source | Battery Powered (Built-in Lithium Ion) / USB Powered |
| Battery Capacity | 3000 mAh |
| Operating Voltage | 5 Volts |
| Light Source Type | Light Emitting Diode (LED) / Laser |
| Material | Aluminum Alloy |
| Control Method | Remote Control / Sound Activated |
| Color | Black |
| UPC | 704078007977 |
10. Warranty and Support
For warranty information and customer support, please refer to the documentation provided at the time of purchase or contact the seller directly. You can also visit the official POCOCO store for more information: