1. Important Safety Information
Please read and understand all safety warnings before installation and operation.
- Always maintain proper clearance from combustible materials.
- Use only approved fuel types.
- Keep children and pets away from the fire pit when in use.
- Always extinguish the fire before leaving or going to sleep.
- Allow the fire pit to cool completely before covering or storing.
- Never leave the fire pit unattended while in use.
2. Product Overview
The Skyflame 36x36 Square Stainless Steel DIY Drop-in Fire Pit System is designed for creating a custom outdoor fire feature. This assembly set includes a durable fire pit burner pan, a fire burner ring, and a protective lid, all constructed from high-quality #304 stainless steel for maximum rust and heat resistance.
Key Features:
- Durable Construction: All components are made of #304 stainless steel, ensuring excellent rust resistance, heat resistance, and long-term durability.
- Easy Installation: Features a 1/2 inch male gas inlet in the bottom center of the pan for straightforward connection. An extra mounting plate is included for an optional igniter (igniter not included).
- Efficient Drainage: Built-in weep holes in the pan prevent water accumulation, protecting the internal components.
- High Heat Output: The 36" square burning area with a 30" fire pit burner ring is rated up to 435,000 BTUs.
- Versatile Fuel Compatibility: Suitable for both propane and natural gas. An air mixer is required if using liquid propane.
- Complete Set: Includes the fire pit pan (with a 1 1/4" top flange), H-shaped burner, burner cover, and mounting plate. The protective burner cover helps extend the burner's life by shielding it from weather.
- Customizable Aesthetics: Designed to be filled with lava rocks or fire glass (not included) to create a realistic and visually appealing fire.

Figure 1: Key features of the Skyflame Fire Pit Pan, highlighting gas holes for smooth flow, drainage holes to prevent water accumulation, the 1/2 inch gas inlet for easy connection, and the durable stainless steel material.
3. Package Contents
- 36" x 36" Square Stainless Steel Fire Pit Burner Pan (with 1 1/4" top flange)
- 30" H-shaped Fire Pit Burner Ring
- Protective Burner Cover
- Mounting Plate for Optional Igniter
4. Specifications
| Attribute | Value |
|---|---|
| Material | Stainless Steel |
| Product Dimensions | 36"D x 36"W x 2"H |
| Shape | Square |
| Fuel Type | Liquefied Petroleum Gas, Natural Gas |
| Item Weight | 48.9 pounds |
| Max BTU's | Up to 435,000 |
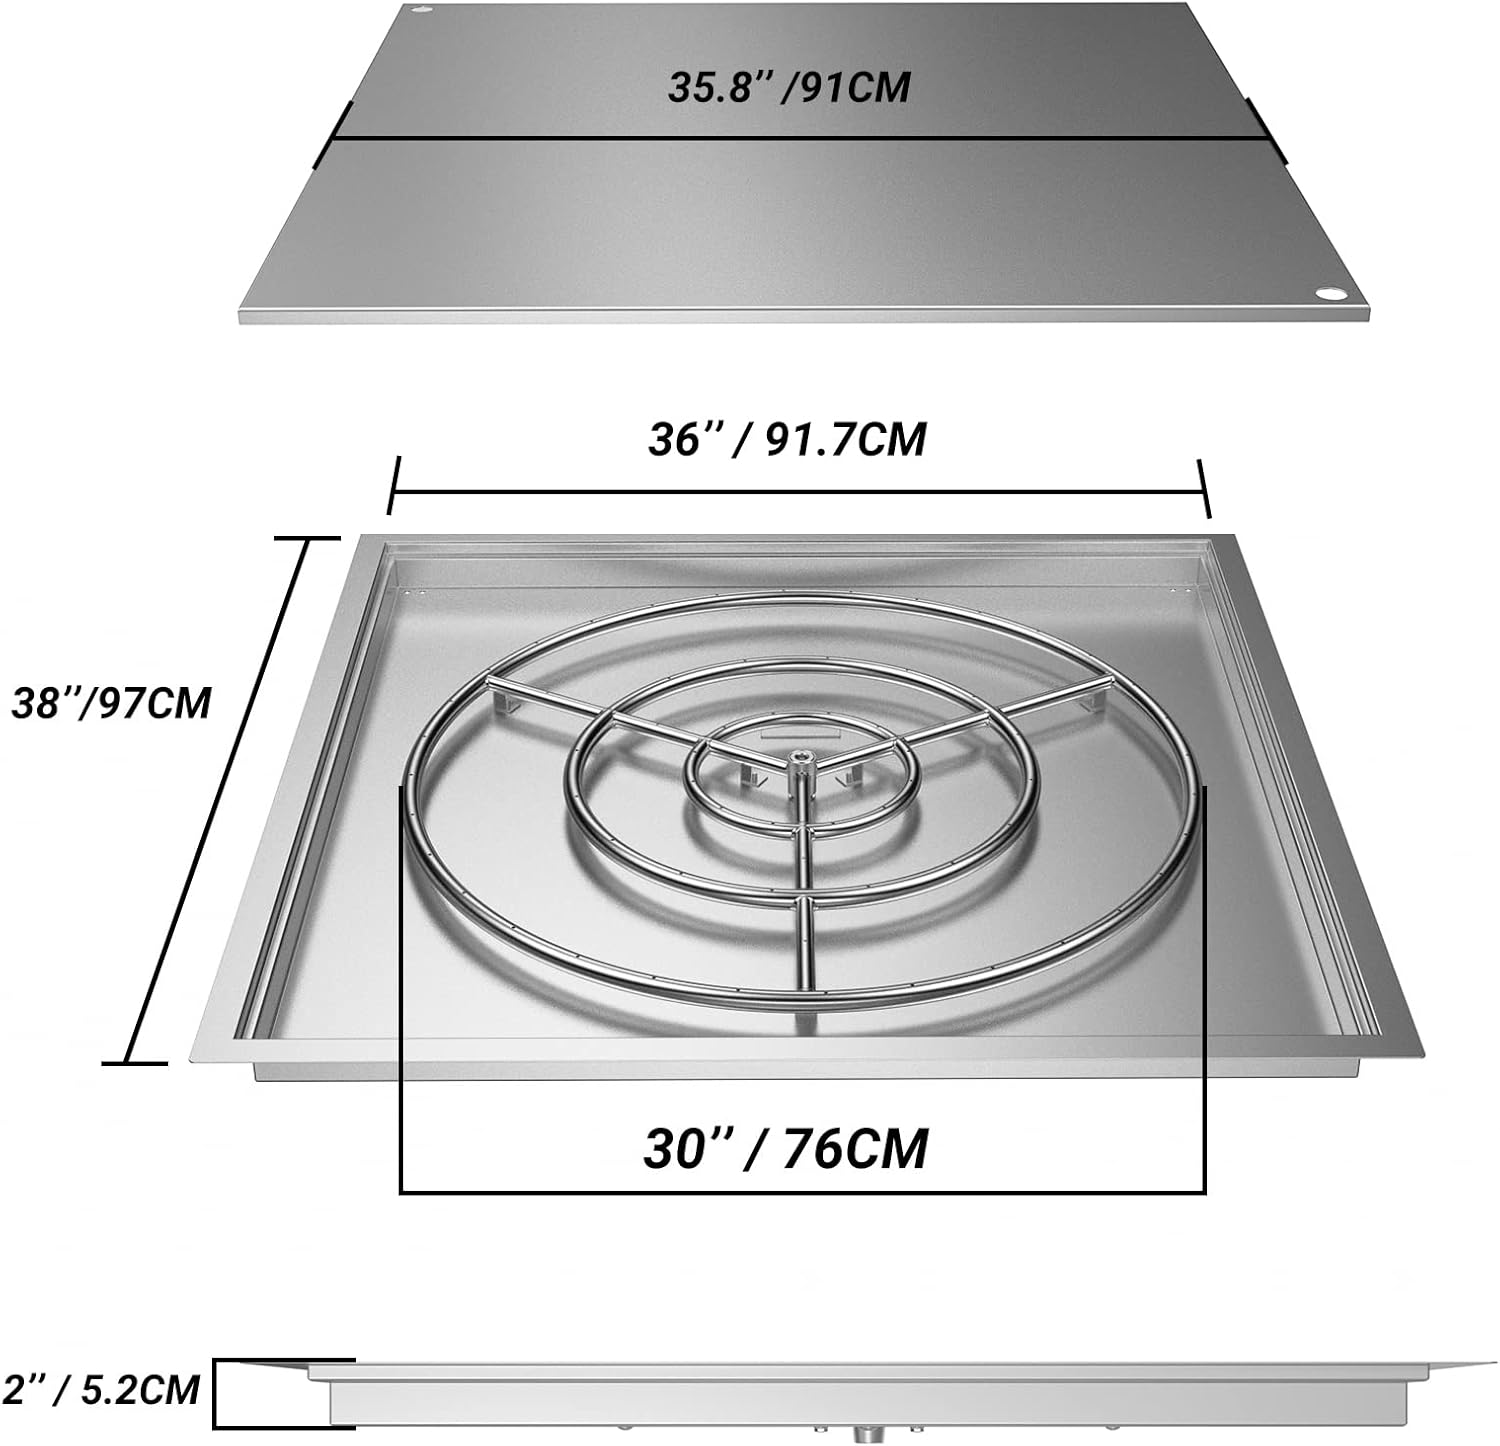
Figure 2: Detailed dimensions of the Skyflame 36x36 Square Fire Pit System components.
5. Setup and Installation
5.1 Pre-Installation Checklist
- Ensure your fire pit enclosure is properly constructed and can safely accommodate the 36"x36" pan.
- Verify you have all necessary gas supply components (gas line, regulator, air mixer for LP if needed, igniter if desired).
- Confirm proper ventilation for the fire pit enclosure.
5.2 Component Assembly
- Connect Gas Inlet: Attach your gas supply line to the 1/2 inch male gas inlet located at the bottom center of the fire pit pan. Ensure all connections are tight and sealed using appropriate thread sealant for gas lines.
- Install Optional Igniter: If using an igniter (not included), secure it to the provided mounting plate. Then, attach the mounting plate to the designated area on the fire pit pan using screws. Connect the igniter wires as per the igniter's instructions.
- Place Burner Ring: Position the 30" H-shaped burner ring inside the 36"x36" fire pit pan. Ensure it is centered and stable.
- Integrate into Enclosure: Carefully lower the assembled fire pit pan into your custom fire pit enclosure. Ensure it sits securely on the enclosure's ledge or support structure.
- Add Fire Media: Distribute approximately 130 lbs of lava rocks or fire glass (not included) evenly over the burner ring within the pan. Ensure the burner holes are not completely blocked to allow for proper gas flow and flame distribution.
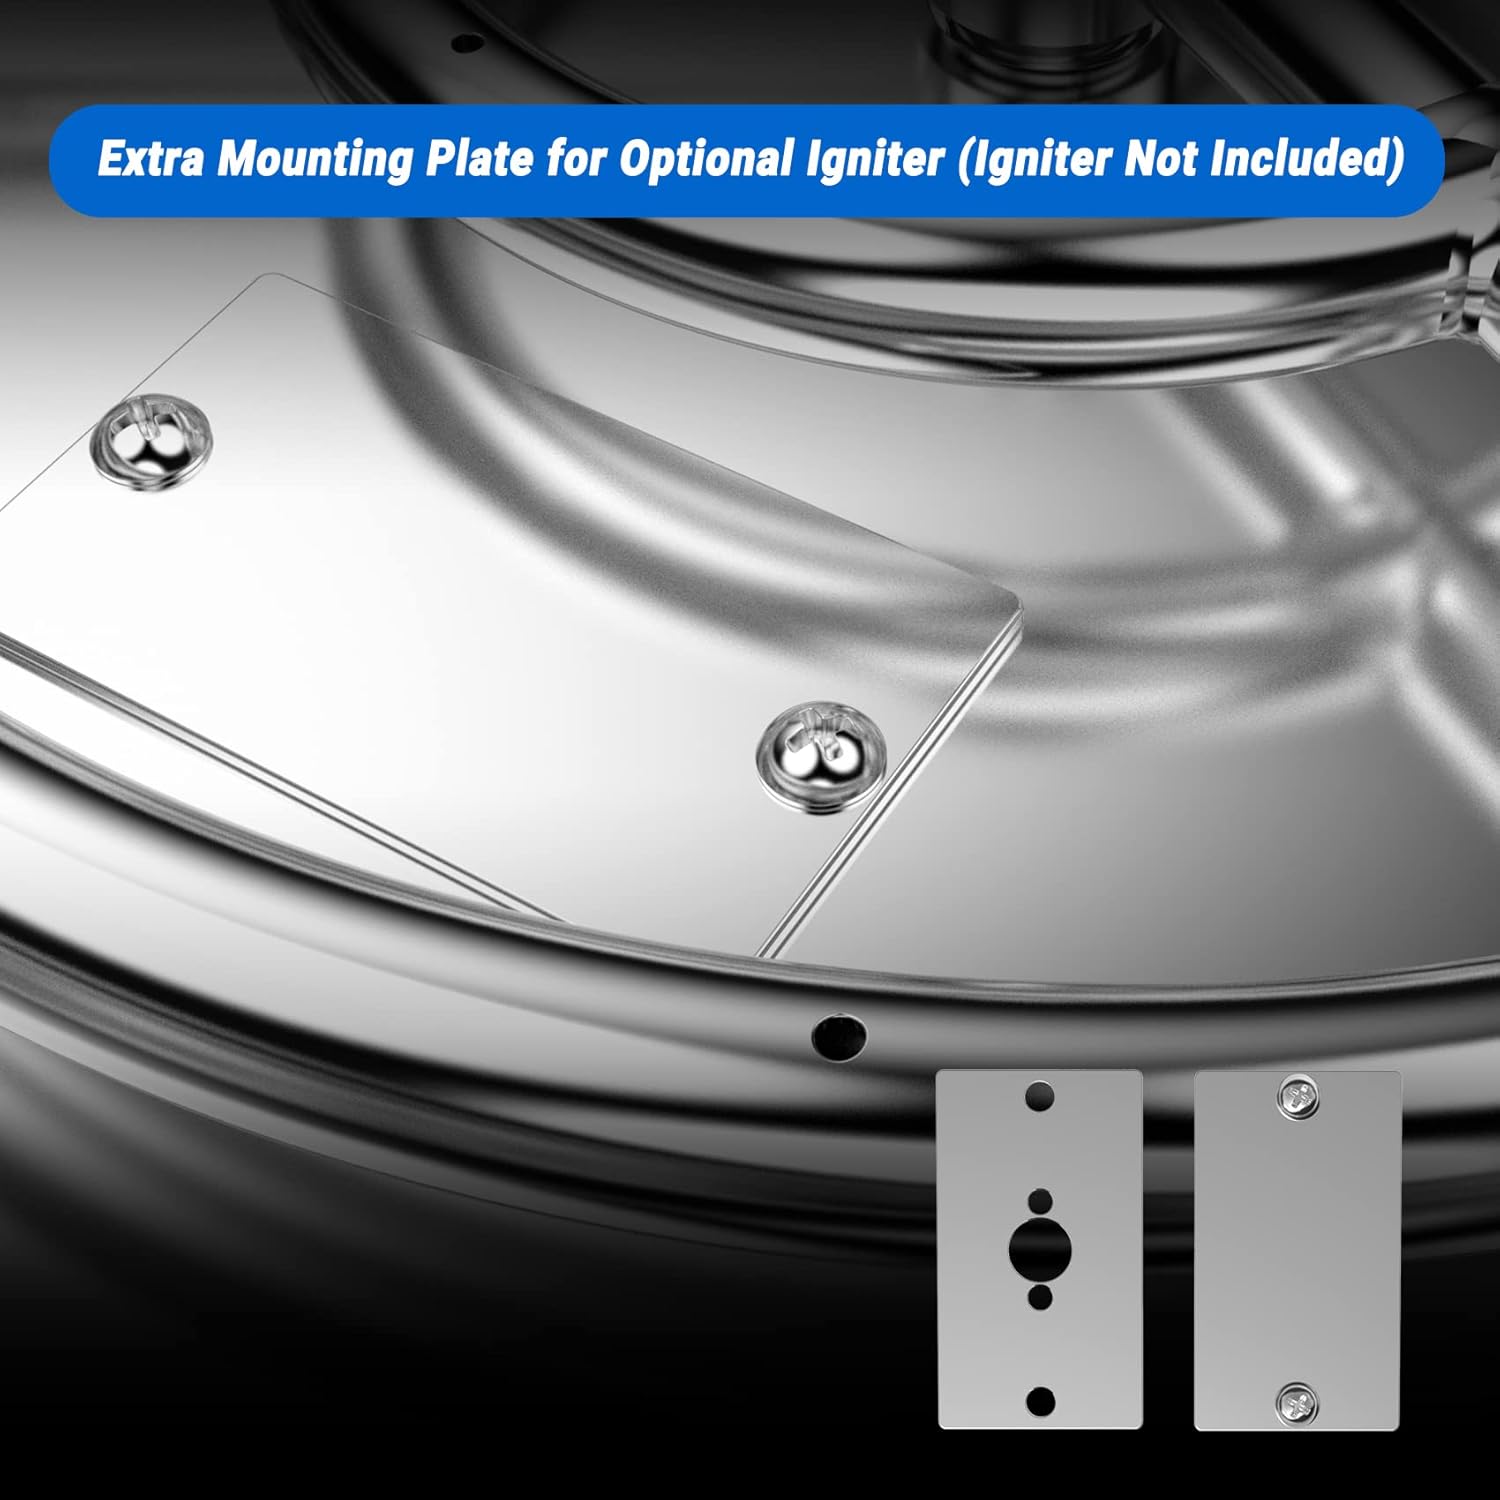
Figure 3: Location of the extra mounting plate for an optional igniter.

Figure 4: The fire pit system is compatible with both Natural Gas and Liquid Propane. An air mixer is required for Liquid Propane setups.
5.3 Installation Video Guide
Video 1: This video demonstrates the installation process for the Skyflame Drop-in Fire Pit Pan with Burner and Cover, including connecting the gas line, installing the igniter, and placing the unit into an enclosure.
6. Operating Instructions
6.1 Connecting to Gas Supply
- Ensure the main gas supply valve is in the OFF position.
- Connect the gas regulator hose (for LP) or gas line (for NG) to your gas supply. For LP tanks, ensure a secure connection to the tank valve.
- Slowly open the main gas supply valve. Perform a leak test on all connections using a soapy water solution. Bubbles indicate a leak; tighten connections and retest until no bubbles appear.
6.2 Ignition Procedure
- Ensure the fire pit area is clear of any combustible materials.
- Slowly open the gas valve on the fire pit control panel (if applicable) or the main gas inlet to allow gas to flow to the burner.
- Immediately activate the igniter (if installed) or use a long lighter/match to ignite the gas at the burner.
- Once ignited, adjust the flame height to your desired level using the control valve.
6.3 Shutting Down
- Turn the gas control valve on the fire pit to the OFF position.
- Close the main gas supply valve (e.g., on the propane tank).
- Allow the fire pit and fire media to cool completely before covering or touching.
7. Maintenance
7.1 Cleaning
- Regularly clean the stainless steel pan and burner ring with a mild soap and water solution. Avoid abrasive cleaners that can scratch the surface.
- Ensure burner holes are clear of debris. Use a thin wire or air compressor to clear any blockages.
- Clean fire glass or lava rocks as needed by rinsing with water and allowing them to dry completely before placing them back in the pan.
7.2 Inspections
- Periodically inspect all gas connections for leaks using the soapy water method.
- Check the gas hose for any signs of wear, cracks, or damage. Replace immediately if damage is found.
- Inspect the igniter (if installed) for proper function and ensure the electrode is clean.
7.3 Storage and Protection
- When not in use, especially during inclement weather or off-season, cover the fire pit pan with the provided protective lid.
- For extended storage, disconnect the gas supply and store the fire pit in a dry, protected area.
8. Troubleshooting
8.1 No Ignition / Low Flame
- Check Gas Supply: Ensure the propane tank (if applicable) is not empty and all gas valves are fully open.
- Inspect Connections: Verify all gas connections are tight and free of leaks.
- Clear Burner Holes: Ensure burner holes are not clogged by fire media or debris.
- Igniter Check: If using an igniter, ensure it is sparking correctly. Clean or adjust the electrode if necessary.
- LP Air Mixer: If using liquid propane, confirm the air mixer is correctly installed and functioning.
8.2 Gas Smell
- Immediately Shut Off Gas: Turn off all gas supply valves.
- Ventilate Area: Open windows and doors to disperse gas.
- Check for Leaks: Perform a thorough leak test with soapy water on all connections.
- Do Not Ignite: Do not attempt to light the fire pit if you smell gas. If the smell persists, contact a qualified gas technician.
9. Warranty and Support
Skyflame products are designed for quality and durability. For specific warranty information regarding your fire pit system, please refer to the warranty card included with your purchase or visit the official Skyflame website.
For technical support, replacement parts, or any questions not covered in this manual, please contact Skyflame customer service through their official channels.
© 2026 Skyflame. All rights reserved.