1. Introduction to the axion STIM-PRO X9+
The axion STIM-PRO X9+ is a versatile 4-channel electrostimulation device combining Transcutaneous Electrical Nerve Stimulation (TENS), Electrical Muscle Stimulation (EMS), and massage functions. It is designed to provide drug-free pain relief, support muscle strengthening, and offer relaxing massage therapy.
TENS therapy works by stimulating specific nerve points, which can help block pain signals and encourage the release of endorphins, the body's natural pain relievers. The STIM-PRO X9+ offers various TENS programs suitable for acute and chronic pain conditions, including back pain, migraines, and disc herniations.
EMS therapy effectively and gently trains muscles, promoting muscle development without stressing joints. The device includes different EMS programs tailored for muscle mass building, strength training, endurance improvement, and muscle relaxation. Stimulation intensity is adjustable from 1 to 100, allowing for personalized treatment for all users, from beginners to athletes.

Image 1.1: The axion STIM-PRO X9+ device shown with various electrode pads and contact spray.
2. Important Safety Information
Please read this entire manual carefully before using the axion STIM-PRO X9+ device. Keep this manual for future reference. This device is a certified medical device. Consult your physician or therapist before use, especially if you have pre-existing medical conditions.
2.1 Contraindications
- Do not use if you have a pacemaker or other implanted electronic devices.
- Do not use if you are pregnant.
- Do not use over areas of skin that are numb, injured, or have open wounds.
- Do not use over the carotid sinus nerves (front of the neck) or across the chest, as this may cause cardiac arrhythmias.
- Do not use over the eyes or mouth.
- Do not use while driving or operating machinery.
- Consult a medical professional if you have epilepsy, heart disease, or any other serious medical condition.
2.2 General Precautions
- Keep out of reach of children.
- Use only with electrodes and accessories recommended or supplied by axion.
- Do not immerse the device in water or other liquids.
- Do not use in the presence of flammable anesthetics or oxygen-rich environments.
- Discontinue use immediately if you experience any adverse reactions and consult a medical professional.
3. Package Contents
Upon opening your axion STIM-PRO X9+ package, please verify that all the following items are included:
- 1x axion STIM-PRO X9+ TENS-EMS Combination Device
- 8x Electrode pads (5x5 cm)
- Special electrode pads (e.g., butterfly shape for back, long strips)
- 1x Contact spray
- 4x Connection cables for electrodes (2 electrodes per cable)
- 4x AA Batteries (included)
- 1x Storage case
- 1x User Manual (this document)

Image 3.1: Overview of the axion STIM-PRO X9+ package contents.
4. Device Overview
Familiarize yourself with the various components and controls of your STIM-PRO X9+ device.

Image 4.1: Front view of the STIM-PRO X9+ with labeled controls and display elements.
4.1 Key Components
- Display Screen: Shows program number, mode (TENS/EMS/Massage), frequency (Hz), pulse width (µs), intensity, and remaining time.
- Channels (CH1, CH2, CH3, CH4): The device has four independent channels, allowing up to 8 electrodes to be used simultaneously.
- Intensity Adjustment Buttons (▲/▼): Separate buttons for each channel to increase or decrease stimulation intensity.
- Mode Button: Cycles through TENS, EMS, and Massage modes.
- SET Button: Used to confirm selections and navigate through adjustable parameters within a program.
- Program Selection Buttons (▲/▼): Used to browse through the available pre-set programs.
- Power Button (⏻): Turns the device on and off.
- Power Supply Connection: Located at the bottom for optional AC adapter (not included in all sets).
- Battery Compartment: Located on the back of the device.
5. Setup Instructions
5.1 Battery Installation
- Open the battery compartment cover located on the back of the device.
- Insert the 4 AA batteries, ensuring correct polarity (+/-) as indicated inside the compartment.
- Close the battery compartment cover securely.
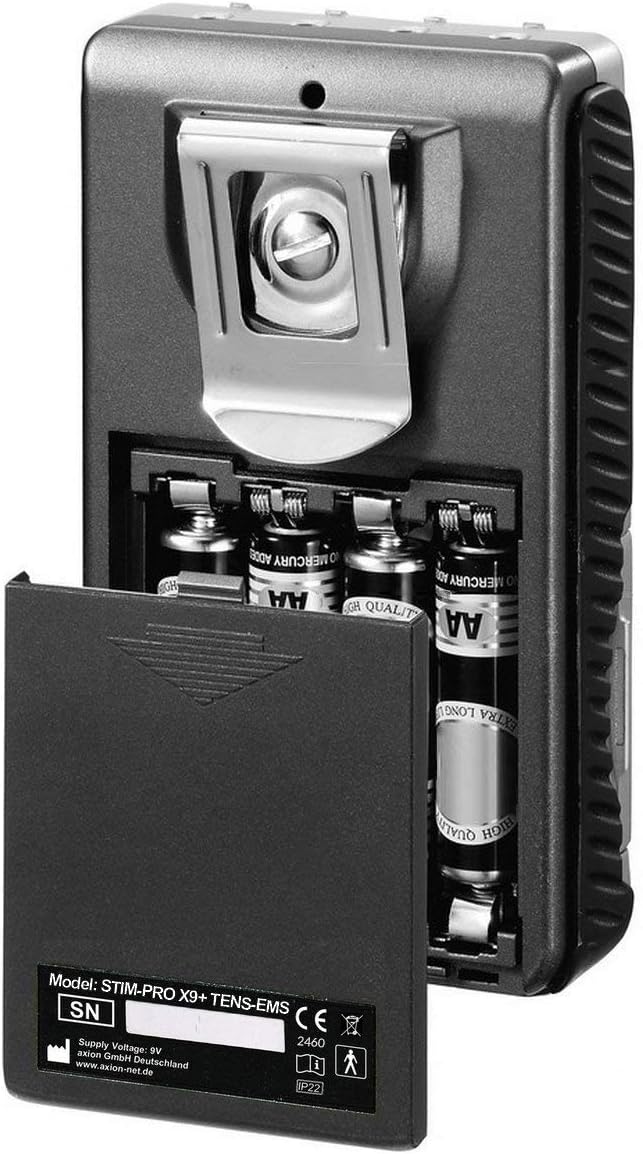
Image 5.1: Battery compartment of the STIM-PRO X9+.
5.2 Connecting Electrodes
- Ensure the device is turned off before connecting electrodes.
- Connect the electrode cables to the output jacks (CH1, CH2, CH3, CH4) on the top of the device. Each cable typically connects to two electrodes.
- Attach the electrode pads to the ends of the cables.
- Clean and dry the skin area where electrodes will be placed.
- Apply a small amount of contact spray to the electrode pads for optimal conductivity and adhesion, if desired.
- Place the self-adhesive electrode pads firmly onto the skin. Ensure good contact over the entire surface of the electrode.
6. Operating Instructions
6.1 Powering On/Off
- To turn on: Press and hold the Power button (⏻) until the display illuminates.
- To turn off: Press and hold the Power button (⏻) until the display turns off.
6.2 Selecting a Program and Mode
- After powering on, the device will typically start in a default program or the last used program.
- Press the MODE button to cycle between TENS, EMS, and Massage modes. The selected mode will be displayed on the screen.
- Use the Program Selection buttons (▲/▼) to browse through the available pre-set programs within the chosen mode. The STIM-PRO X9+ offers 37 programs.
- Once a program is selected, press the SET button to confirm and enter the parameter adjustment screen (if applicable for the program).
6.3 Adjusting Intensity
- After selecting a program, ensure the electrodes are correctly placed on your skin.
- Use the individual Intensity Adjustment buttons (▲/▼) for each channel (CH1-CH4) to gradually increase the stimulation intensity.
- Increase the intensity slowly until you feel a comfortable, strong, but not painful, sensation. Avoid setting the intensity too high, which can cause discomfort or muscle spasms.
- The intensity level for each channel is displayed on the screen.
6.4 Adjusting Program Parameters (if applicable)
Some programs allow for manual adjustment of parameters such as pulse width, frequency, and treatment time. Refer to the detailed program descriptions in the full manual for specific adjustable settings.
- After selecting a program, press the SET button to cycle through adjustable parameters.
- Use the Program Selection buttons (▲/▼) to change the values of the selected parameter.
- Press SET again to confirm the value and move to the next parameter or exit the adjustment menu.
7. Electrode Placement Guidelines
Correct electrode placement is crucial for effective and safe treatment. Always place electrodes on clean, dry, intact skin. The general principle is to place electrodes around or on the muscle/pain area, ensuring the electrical current passes through the target region.
7.1 General Principles
- TENS: For pain relief, place electrodes either directly on or around the painful area, or along the nerve pathway leading to the pain.
- EMS: For muscle stimulation, place electrodes on the belly of the muscle you wish to stimulate. Typically, one electrode is placed at the origin of the muscle and the other at the insertion, or both on the muscle belly with sufficient distance.
- Massage: Place electrodes on the muscle group to be massaged.
- Ensure electrodes are not touching each other.
- Maintain a minimum distance of 2-3 cm between electrodes.
7.2 Example Placements
Refer to the diagram below for illustrative electrode placements for common areas. Always consult a professional for personalized placement advice.
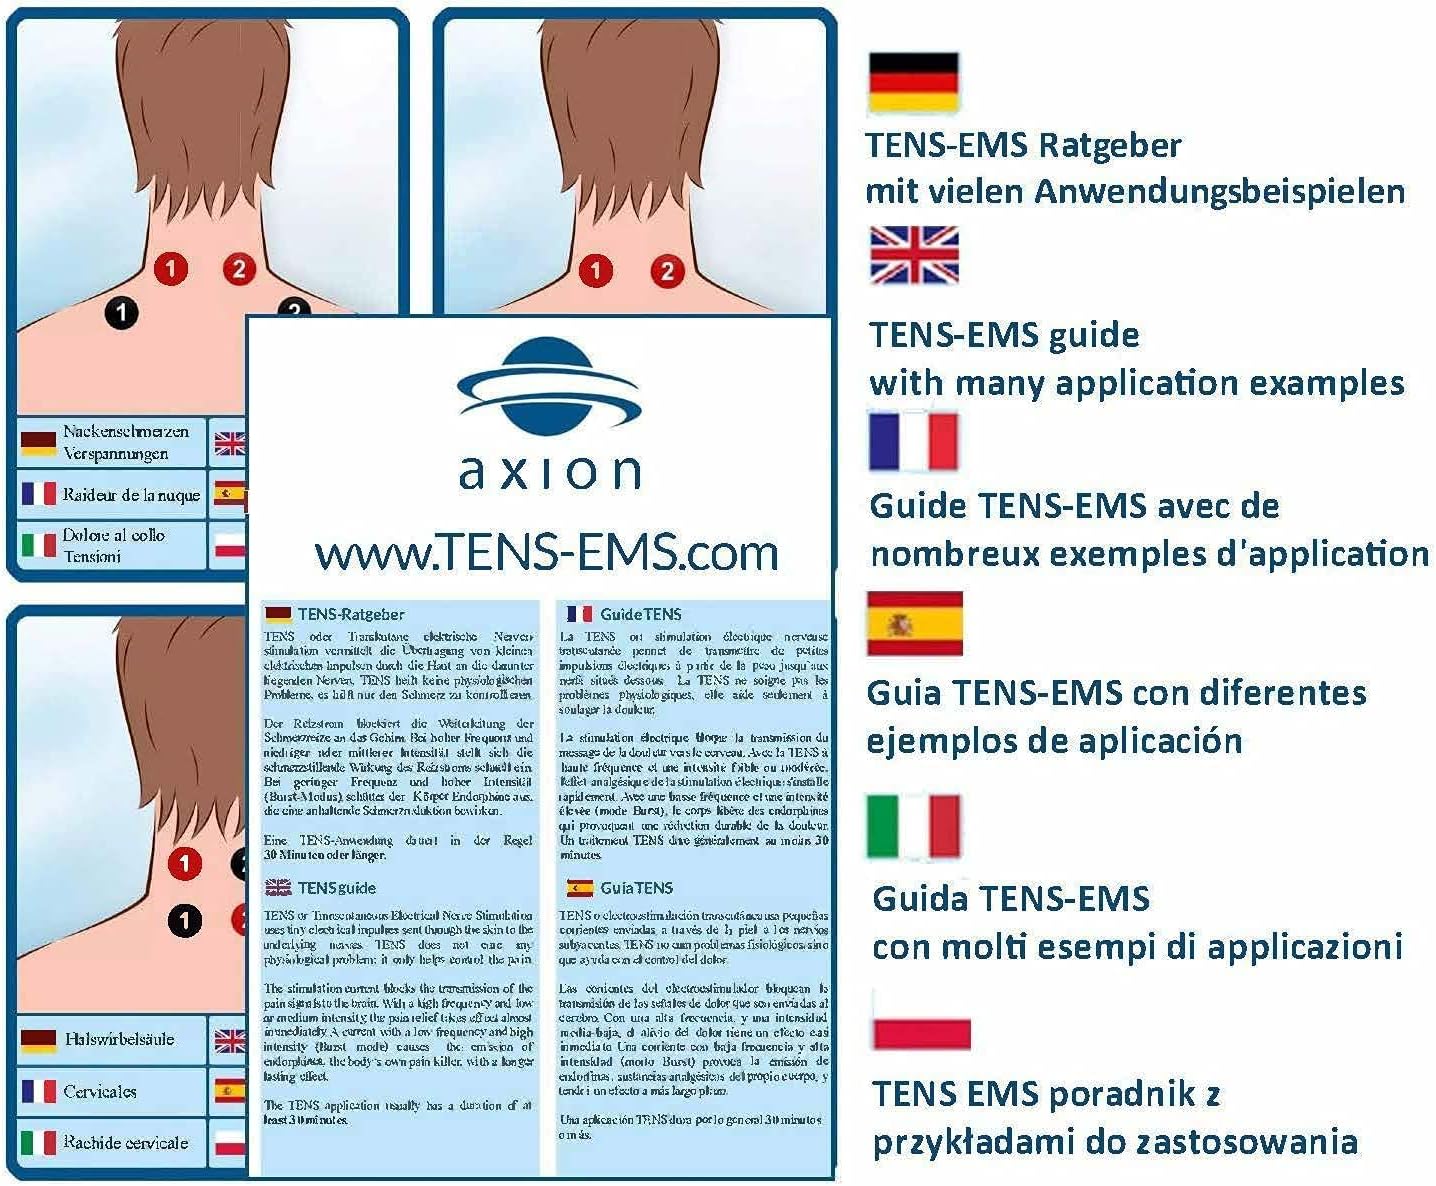
Image 7.1: Example electrode placements for various body areas.
- Neck Pain: Place electrodes on either side of the cervical spine or on the trapezius muscles.
- Shoulder Pain: Place electrodes on the deltoid muscle or around the painful area of the shoulder joint.
- Lower Back Pain: Place electrodes on either side of the lumbar spine, avoiding direct placement over the spinal column.
8. Maintenance and Care
8.1 Cleaning the Device
- Turn off the device and disconnect all cables before cleaning.
- Wipe the device surface with a soft, slightly damp cloth. Do not use abrasive cleaners or immerse the device in water.
- Ensure no liquid enters the device openings.
8.2 Electrode Care
- After each use, gently remove electrodes from the skin.
- Place the electrodes back on their protective film to maintain adhesiveness.
- If electrodes lose their stickiness, clean the adhesive surface with a damp cloth or a specialized electrode gel/spray. Replace electrodes when they no longer adhere well.
8.3 Storage
- Store the device and accessories in the provided storage case in a cool, dry place, away from direct sunlight and extreme temperatures.
- Remove batteries if the device will not be used for an extended period to prevent leakage.
9. Troubleshooting
| Problem | Possible Cause | Solution |
|---|---|---|
| Device does not turn on. | Batteries are dead or incorrectly inserted. | Check battery polarity. Replace with new AA batteries. |
| No sensation or weak sensation. | Electrodes not making good contact; cables loose; intensity too low; electrodes worn out. | Ensure electrodes are firmly on skin. Check cable connections. Increase intensity gradually. Replace old electrodes. Apply contact spray. |
| Uncomfortable or stinging sensation. | Intensity too high; poor electrode contact; electrodes too close together; skin irritation. | Decrease intensity. Re-position electrodes for better contact. Ensure proper spacing. Discontinue use if skin irritation persists. |
| Display is dim or flickering. | Low battery power. | Replace batteries. |
If you experience persistent issues not covered here, please contact axion customer support.
10. Technical Specifications
- Model: STIM-PRO X9+
- Model Number: 1007-1090
- Brand: axion
- Device Type: TENS-EMS Combination Device
- Channels: 4 independent channels
- Electrodes: Up to 8 electrodes (2 per channel)
- Power Supply: 4x AA batteries (included)
- Package Dimensions: 31.1 x 20.5 x 8.7 cm
- Package Weight: 1.43 kg
- Manufacturer: axion GmbH
- Medical Device Certification: Yes
11. Warranty and Support
The axion STIM-PRO X9+ device comes with a standard manufacturer's warranty. Please refer to the warranty card included in your package or visit the official axion website for detailed warranty terms and conditions.
For technical support, questions regarding device operation, or to order replacement parts and accessories, please contact axion customer service:
- Website: www.axion-net.de (General website, specific support contact may vary by region)
- Manufacturer: axion GmbH
Always provide your model number (1007-1090) and purchase date when contacting support.


