1. Introduction
Thank you for choosing the EMKE 300W Stainless Steel Heating Element. This manual provides essential information for the safe and efficient installation, operation, and maintenance of your new heating element. Please read these instructions carefully before use and retain them for future reference.
2. Safety Instructions
To ensure safe operation, please observe the following safety guidelines:
- Always disconnect the power supply before installation, maintenance, or cleaning.
- Installation must be performed by a qualified electrician in accordance with local regulations.
- The heating element is designed for use with bathroom radiators and towel dryers. Do not use for other purposes.
- Ensure the heating element is fully immersed in the heating medium (water/glycol mixture) within the radiator before connecting to power.
- The heating element must always be placed at the bottom of the bathroom radiator.
- Do not operate the device if the cable or plug is damaged.
- Keep children away from the device during operation.
- The product is IPX4 certified, meaning it is protected against splashing water. However, avoid direct water jets.
- This device is equipped with overheat protection. If the device overheats, it will automatically shut off.
3. Package Contents
Please check that all components are present:
- EMKE 300W Stainless Steel Heating Element with Thermostat
- User Manual
4. Specifications
| Feature | Specification |
|---|---|
| Brand | EMKE |
| Model Number | THE230B-ADR |
| Power | 300 W |
| Voltage | 220-240 V 50 Hz |
| Heating Bar Dimensions | 385 x Φ 12 mm |
| Cable Length | 700-1400 mm |
| Max. Operating Pressure | 10 bar |
| Connection Thread | G1/2" |
| Material | Stainless Steel 304 |
| Temperature Range | 30 °C to 70 °C |
| Timer Settings | 2 / 4 hours |
| Protection Class | IPX4 |
The 300W heating element is suitable for bathroom radiators with a power output of 300W to 600W.

Figure 4.1: Recommended Heating Element Wattage and Lengths. This diagram illustrates the various lengths of heating elements available and their corresponding wattages, along with a table recommending the appropriate heating element power for different radiator heat outputs.

Figure 4.2: Technical Drawing with Dimensions. This image provides a detailed technical drawing of the heating element, including its overall length, diameter, and controller dimensions, with measurements in millimeters.
5. Setup and Installation
Follow these steps for proper installation:
- Prepare the Radiator: Ensure the bathroom radiator is drained and ready for the heating element installation.
- Insert the Heating Element: Carefully insert the heating element into the designated opening at the bottom of the radiator. It is crucial that the heating element is always positioned at the lowest point of the radiator to ensure proper heat distribution and prevent damage.
- Secure the Connection: Tighten the G1/2" connection thread securely to prevent leaks. Use appropriate tools, but do not overtighten.
- Fill the Radiator: Fill the radiator with the appropriate heating medium (e.g., water or a water-glycol mixture) according to the radiator manufacturer's instructions. Ensure the heating element is fully submerged.
- Connect to Power: Once the heating element is securely installed and submerged, plug the power cord into a suitable electrical outlet (220-240V, 50Hz).

Figure 5.1: Installation Diagram. This illustration demonstrates how to correctly insert and secure the heating element into the bottom of a bathroom towel radiator.

Figure 5.2: Installed Heating Element. This image shows the EMKE heating element connected to a black towel radiator, highlighting the coiled power cable and the standard German plug.
6. Operating Instructions
The EMKE heating element features an intelligent thermostat with an LCD display for easy control.

Figure 6.1: Digital Control Panel. A close-up view of the heating element's control panel, featuring a digital display showing '2H' (2-hour timer) and buttons for power, temperature/time adjustment, and mode selection.
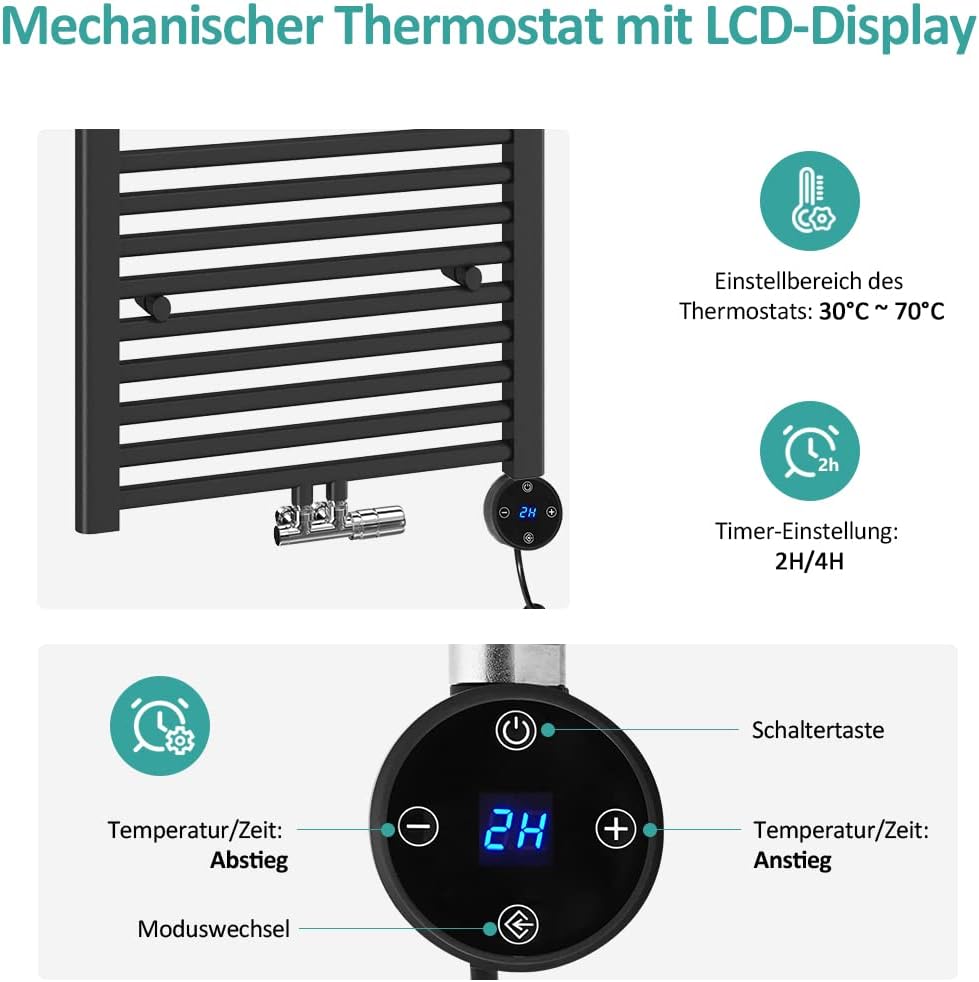
Figure 6.2: Thermostat Control Functions. This diagram labels the buttons on the thermostat: Power button, Temperature/Time Decrease (-), Temperature/Time Increase (+), and Mode Change button, along with the temperature range (30-70°C) and timer settings (2H/4H).
6.1. Power On/Off
- Press the Power button () to turn the heating element on or off.
6.2. Setting Temperature
- When the device is on, the display will show the current temperature.
- Use the Increase (+) and Decrease (-) buttons to adjust the desired temperature between 30 °C and 70 °C. The display will flash the set temperature and then return to showing the current temperature.
6.3. Setting Timer
- Press the Mode Change button () to cycle through timer options.
- Available timer settings are 2 hours (2H) and 4 hours (4H).
- When a timer is active, the heating element will operate for the set duration and then automatically turn off.
- To deactivate the timer, press the Mode Change button until no timer duration is displayed.

Figure 6.3: Waterproof Mechanical Button. This image highlights the waterproof design of the control panel buttons, covered with a protective film for enhanced safety and durability in humid environments.
7. Maintenance
Regular maintenance ensures the longevity and efficient operation of your heating element.
- Cleaning: Disconnect the power supply before cleaning. Wipe the exterior of the heating element and control panel with a soft, damp cloth. Do not use abrasive cleaners or solvents.
- Inspection: Periodically check the power cable and plug for any signs of damage. If damage is found, do not use the device and contact customer support.
- Radiator Fluid: Ensure the radiator always contains sufficient heating fluid and that the heating element remains fully submerged.
8. Troubleshooting
If you encounter issues with your EMKE heating element, refer to the following common problems and solutions:
| Problem | Possible Cause | Solution |
|---|---|---|
| Heating element does not turn on. | No power supply; Power button not pressed; Overheat protection activated. | Check power connection and outlet. Press the Power button. Allow the unit to cool down if overheat protection was triggered. |
| Heating element not heating or heating insufficiently. | Incorrect temperature setting; Insufficient fluid in radiator; Heating element not fully submerged. | Adjust temperature setting. Ensure radiator is adequately filled and the heating element is fully submerged. |
| Timer function not working as expected. | Incorrect timer setting; User confusion with timer activation. | Ensure the timer is correctly set to 2H or 4H using the Mode Change button. If the timer is not displayed, it is not active. |
| Leakage from the connection point. | Loose connection; Damaged seal. | Disconnect power, drain radiator, and re-tighten the connection. If leakage persists, check the seal or contact customer support. |
If the problem persists after attempting these solutions, please contact EMKE customer support.
9. Warranty and Support
EMKE is committed to providing high-quality products and excellent customer service.
- Return Policy: We offer a 14-day return policy for your convenience.
- Repair Service: This product is covered by a 2-year repair service from the date of purchase.
- For any questions, technical assistance, or warranty claims, please contact EMKE customer support through your purchase platform or the official EMKE website.

Figure 9.1: EMKE Customer Support. Our dedicated customer service team is available to assist you with any inquiries or issues.


