1. Introduction
The INKBIRDPLUS Home Weather Station is a multifunctional device designed to provide comprehensive environmental data for your home. It integrates a barometer, thermometer, and hygrometer to display indoor and outdoor temperature, humidity, moon phase, and atmospheric pressure. Featuring a vibrant color LCD with adjustable brightness, this station offers clear readability and humanized alarm functions for enhanced convenience. It supports connection with up to three remote outdoor sensors, allowing you to monitor multiple locations.
2. Product Overview
2.1 Package Contents
- 1 x INKBIRDPLUS Indoor-Outdoor Weather Station (Main Unit)
- 1 x Outdoor Temperature Humidity Sensor
- 1 x Power Adapter for Main Unit
- 1 x User Manual
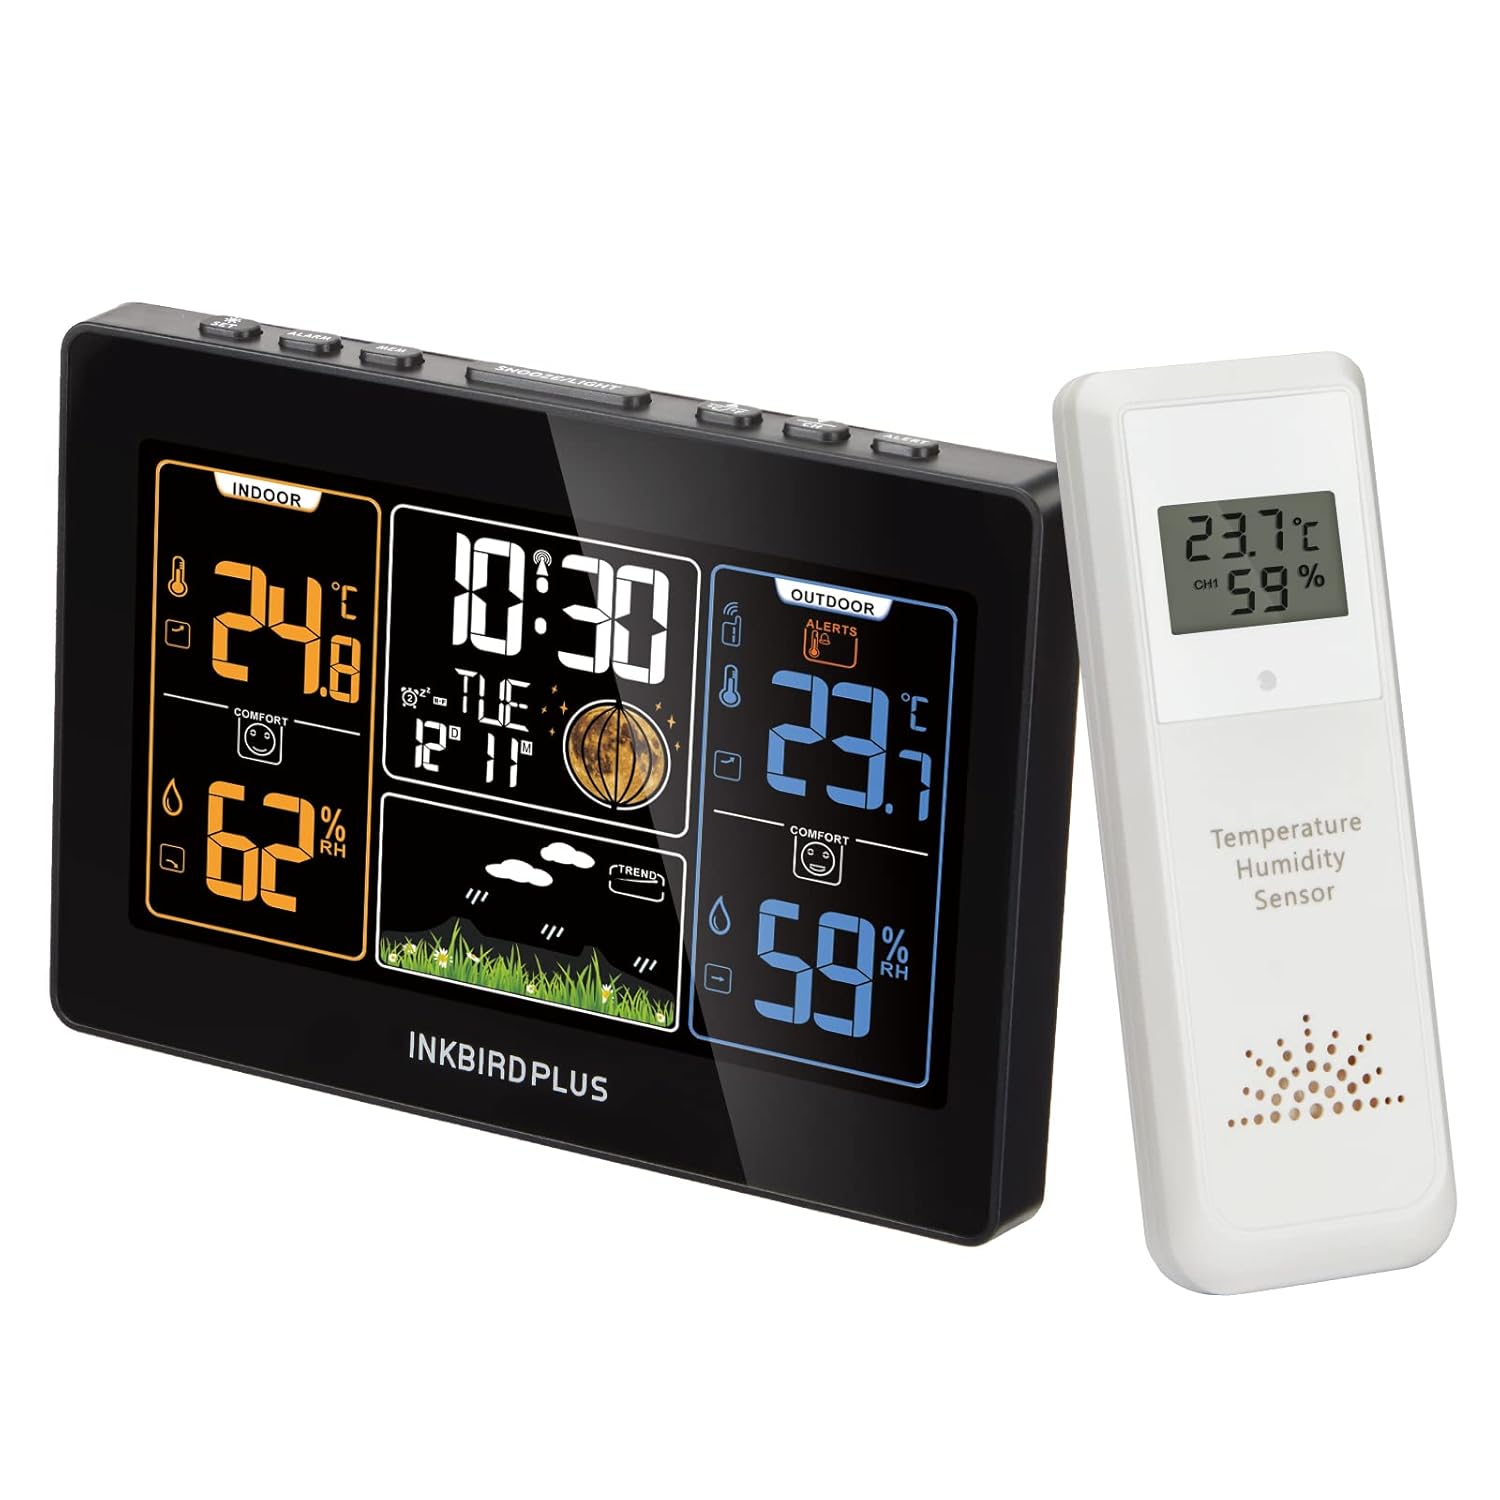
Figure 2.1: INKBIRDPLUS Home Weather Station main unit and remote outdoor sensor.

Figure 2.2: Visual representation of the items included in the product package.
2.2 Key Features
- Multifunctional Display: Shows indoor/outdoor temperature and humidity, moon phase, and atmospheric pressure.
- Color LCD Screen: Vibrant display with 5 adjustable brightness levels for optimal viewing in various lighting conditions.
- Multiple Sensor Support: Capable of monitoring up to 4 locations (1 main unit + 3 remote sensors). Note: This product includes one outdoor sensor. Additional sensors are sold separately.
- Humanized Alarms: Features multiple alarm settings with snooze function.
- Outdoor Temperature Alarms: Customizable high/low temperature alerts for the outdoor sensor.
- Weather Forecast: Provides a 12-hour weather forecast based on atmospheric pressure changes.
- Atomic Clock Function: Auto-adjusts time via local radio waves for accuracy.
- Dual Power Supply: Main unit can be powered by AC adapter or AAA batteries (not included). Remote sensor uses AAA batteries.
- Flexible Placement: Designed for both tabletop use and wall mounting.

Figure 2.3: Overview of key features including barometer, thermometer, hygrometer, perpetual calendar, atomic clock, LED, color LCD, adjustable backlight, humanized alarms, dual power supply, and low voltage reminder. Dimensions are also shown.

Figure 2.4: The main display of the weather station highlighting its ability to show temperature, humidity, time, alarm status, barometric pressure, and alerts.

Figure 2.5: Illustration of how three remote sensors can be connected to a single main unit, allowing monitoring in various locations such as a house, garden, or cellar.

Figure 2.6: Detailed diagram labeling various display elements including Indoor Temperature, Body Comfort Level, Indoor Humidity, Date, Weather Forecast, Atmospheric Pressure Trend, Outdoor Humidity, Outdoor Temperature, Temperature Alarm, Remote Sensor Channel, Moon Phase, RCC Function, Clock, and Alarms.
3. Setup
3.1 Powering the Main Unit
- Using AC Adapter: Connect the provided power adapter to the DC 5V port on the back of the main unit and plug it into a standard wall outlet.
- Using Batteries (Backup): Open the battery compartment on the back of the main unit. Insert 3 x AAA batteries (not included), ensuring correct polarity (+/-). Batteries serve as a backup in case of power outage.
3.2 Powering the Outdoor Sensor
- Open the battery compartment on the back of the outdoor sensor.
- Insert 2 x AAA batteries (not included), ensuring correct polarity (+/-).
- Close the battery compartment securely.

Figure 3.1: Illustration of the power supply methods for the indoor receiver (AC adapter or 3x AAA batteries) and the remote sensor (2x AAA batteries).
3.3 Sensor Placement and Synchronization
- Place the outdoor sensor in a shaded, dry location away from direct sunlight and precipitation to ensure accurate readings.
- Ensure the sensor is within the transmission range of the main unit: up to 100 meters (330 feet) in obstacle-free environments, or 60 meters (200 feet) with obstacles.
- Upon powering both units, the main unit will automatically attempt to connect with the outdoor sensor. The outdoor temperature and humidity readings should appear on the main display.
- If the connection is not established, press and hold the "CHANNEL" button on the main unit to initiate a manual search for the sensor.

Figure 3.2: Depiction of the wireless transmission range between the main unit and the outdoor sensor, indicating 200 feet (60 meters) with obstacles and 330 feet (100 meters) obstacle-free.
3.4 Mounting Options
- Tabletop Stand: Extend the integrated stand on the back of the main unit to place it on any flat surface.
- Wall Mount: Use the hanging hole on the back of the main unit to mount it on a wall using a screw (not included).

Figure 3.3: Demonstrates the two primary mounting options for the weather station: wall mount using a keyhole slot and tabletop stand.
4. Operating Instructions
4.1 Display Overview
The color LCD screen displays various information simultaneously. Refer to Figure 2.6 for a detailed labeled diagram of the display elements.
4.2 Setting Time and Date
- The atomic clock function automatically adjusts the current time via local radio waves, typically overnight.
- If manual adjustment is needed, consult the full user manual for specific button sequences.
4.3 Alarm Settings
- The weather station supports multiple alarms with snooze functionality.
- Three cyclic patterns of wake-up alarms are selectable: Weekdays, Weekends, and Every Day.
- To set an alarm, press the "ALARM" button and follow the on-screen prompts.

Figure 4.1: The weather station offers humanized alarm clock settings, allowing users to choose between weekday, weekend, or everyday alarm patterns.

Figure 4.2: A magnified view of the alarm clock section on the display, showing the time and alarm indicators.
4.4 Adjusting Display Brightness
- The color LCD screen has 5 levels of adjustable brightness.
- Press the "SNOOZE/LIGHT" button on the top of the unit to cycle through the brightness levels (100%, 75%, 50%, 25%, 0% off).

Figure 4.3: Demonstrates the five adjustable brightness levels of the color LCD screen, from 100% to 0% (off), controlled by the SNOOZE/LIGHT button.
4.5 Outdoor Temperature Alarms
- You can set high and low temperature alerts for the outdoor sensor.
- The weather station will sound an alert when the outdoor temperature goes outside the set range.
- Refer to the full user manual for detailed instructions on setting these alarms.

Figure 4.4: A magnified view of the alarm clock section on the display, showing the time and alarm indicators.
4.6 Weather Forecast
- The weather station provides a 12-hour weather forecast based on changes in atmospheric pressure detected by the outdoor sensor.
- The forecast is represented by intuitive icons: Sunny, Cloudy, Partly Cloudy, Rainy, Heavy Rain, and Snowy.

Figure 4.5: Visual representation of the weather forecast icons used on the display, including Sunny, Cloudy, Partly Cloudy, Rainy, Heavy Rain, and Snowy.

Figure 4.6: Explanation that the weather station forecasts the weather for the next 12 hours based on temperature and atmospheric pressure from outdoor sensors.
5. Maintenance
- Cleaning: Wipe the main unit and sensor with a soft, dry cloth. Do not use abrasive cleaners or solvents.
- Battery Replacement: Replace batteries in both the main unit (if used) and the outdoor sensor when the low battery indicator appears on the display. Ensure correct polarity.
- Sensor Care: Periodically check the outdoor sensor for debris or obstructions that might affect its readings. Ensure it remains in a protected, shaded location.
6. Troubleshooting
| Problem | Possible Cause | Solution |
|---|---|---|
| No display on main unit. | No power; batteries depleted or incorrectly inserted; AC adapter not connected. | Ensure AC adapter is securely plugged in. Check and replace batteries, ensuring correct polarity. |
| Outdoor temperature/humidity not displayed or incorrect. | Sensor out of range; sensor batteries depleted; interference; sensor not synchronized. | Move sensor closer to the main unit. Replace sensor batteries. Reduce sources of interference. Press and hold the "CHANNEL" button on the main unit to re-synchronize. |
| "L L" displayed for indoor temperature. | Indoor temperature is below the measurable range (e.g., below 59°F/15°C). | This indicates the temperature is too low for the sensor to provide a specific reading. Ensure the unit is in a suitable indoor environment. |
| Clock loses time or is inaccurate. | Weak radio signal for atomic clock synchronization; interference. | Relocate the main unit to an area with better reception, away from electronic devices that may cause interference. Allow time for automatic synchronization overnight. |
| Weather forecast seems inaccurate. | Forecast is based on atmospheric pressure changes, not real-time satellite data; sensor placement. | Understand that the forecast is a prediction based on local pressure trends. Ensure the outdoor sensor is placed correctly and providing accurate data. |
7. Specifications
| Feature | Detail |
|---|---|
| Product Dimensions | 4.45 x 6.42 x 1.57 inches (Main Unit) |
| Weight | 1.06 Pounds |
| Power Source (Main Unit) | AC Adapter (included), 3 x AAA Batteries (not included) |
| Power Source (Remote Sensor) | 2 x AAA Batteries (not included) |
| Connectivity Technology | Wireless |
| Special Features | Adjustable Brightness, Barometer, Thermometer, Hygrometer, Atomic Clock, Alarms |
| Color | Black or White |
| Max Remote Sensors | Up to 3 (one included) |
| Wireless Transmission Range | 100 meters (330 feet) obstacle-free; 60 meters (200 feet) with obstacles |
8. Warranty and Support
For warranty information, please refer to the documentation included with your product packaging or contact INKBIRDPLUS customer support.
INKBIRDPLUS is committed to providing excellent smart home living products. For further assistance, technical support, or inquiries, please visit the official INKBIRDPLUS store or contact their customer service channels.
Official Store: INKBIRDPLUS Amazon Store


