1. Introduction
This manual provides detailed instructions for the installation, configuration, and maintenance of your ASRock B450M/AC R2.0 AM4 AMD Promontory B450 Micro ATX Motherboard. Please read this manual thoroughly before beginning the installation process to ensure proper setup and operation.

Image 1.1: The ASRock B450M/AC R2.0 motherboard alongside its retail packaging.
2. Setup and Installation
This section guides you through the physical installation of the motherboard and its primary components.
2.1 Physical Overview and Dimensions
The ASRock B450M/AC R2.0 is a Micro ATX form factor motherboard, designed for compact system builds. Its dimensions are approximately 9.6 x 9.6 inches (24.4 x 24.4 cm).

Image 2.1: Physical dimensions of the ASRock B450M/AC R2.0 Micro ATX motherboard.
2.2 CPU Installation
This motherboard supports AMD AM4 Socket Ryzen 2000, 3000, 4000 G-Series, 5000, and 5000 G-Series Desktop Processors. Refer to the CPU support list for specific compatible models and required BIOS versions.
- Prepare the Socket: Lift the load lever on the AM4 socket.
- Align the CPU: Carefully align the triangular mark on the CPU with the corresponding mark on the socket.
- Insert the CPU: Gently place the CPU into the socket. Do not force it.
- Secure the CPU: Lower the load lever to secure the CPU in place.
- Apply Thermal Paste and Cooler: Apply thermal paste to the CPU and install the CPU cooler according to its manufacturer's instructions.
2.2.1 CPU Compatibility List
Below are sections of the CPU support list, detailing compatible processors, their power requirements, core count, frequency, cache, CPU revision, and the validated BIOS version. Ensure your BIOS is updated to the minimum required version for your chosen CPU.

Image 2.2: Part 1 of the CPU Support List, showing compatible Ryzen 9 and Ryzen 7 processors.

Image 2.3: Part 2 of the CPU Support List, including Ryzen 7, Ryzen 5, and Athlon processors.

Image 2.4: Part 3 of the CPU Support List, detailing Ryzen 7, Ryzen 5, and Athlon processors.
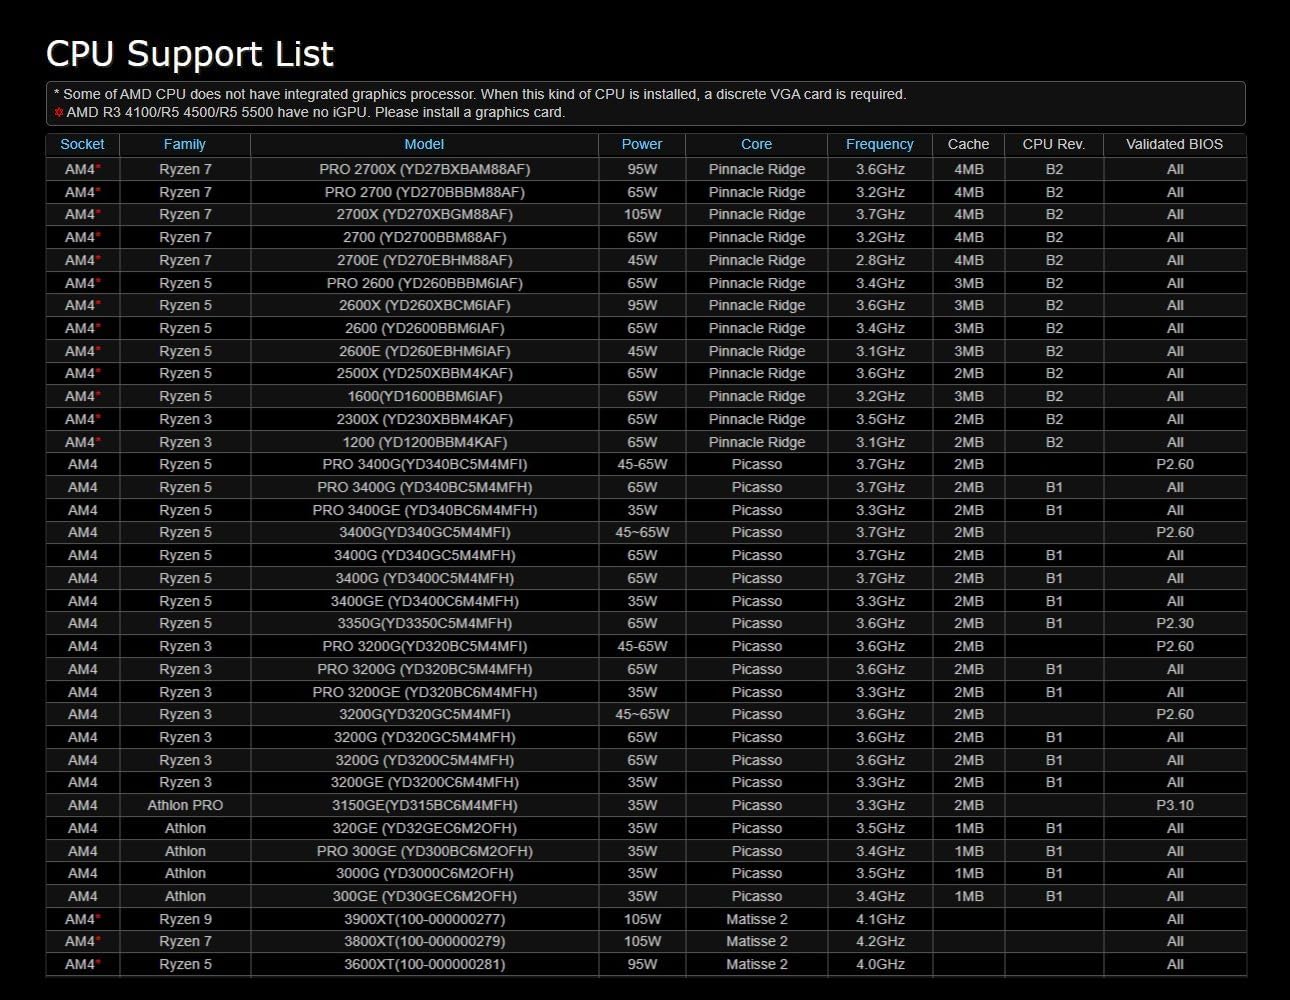
Image 2.5: Part 4 of the CPU Support List, covering additional Ryzen 7, Ryzen 5, and Athlon processors.

Image 2.6: Part 5 of the CPU Support List, featuring Ryzen 9, Ryzen 7, and Ryzen 5 processors, including Cezanne and Matisse architectures.
2.3 Memory (RAM) Installation
The motherboard supports DDR4 memory modules with speeds up to 3200MHz (OC) and a maximum capacity of 32GB. It features four DIMM slots.
- Open DIMM Latches: Push down the latches at both ends of the DIMM slot.
- Align Memory Module: Align the notch on the memory module with the key in the DIMM slot.
- Insert Memory: Press the memory module firmly into the slot until the latches click into place.
- Dual Channel Configuration: For optimal performance, install memory modules in matching pairs into the recommended slots (e.g., A2 and B2).
2.4 Storage Device Installation
The motherboard provides SATA 6Gb/s ports for traditional hard drives and SSDs, and an M.2 slot for NVMe or SATA M.2 SSDs.
- SATA Drives: Connect SATA data cables from your drives to the SATA ports on the motherboard. Connect power cables from your power supply to the drives.
- M.2 SSD: Insert the M.2 SSD into the M.2 slot at an angle, then gently push it down and secure it with the provided screw.
2.5 Expansion Cards (PCIe)
The motherboard includes one PCIe 3.0 x16 slot and one PCIe 2.0 x16 slot for graphics cards and other expansion cards.
- Select Slot: Choose the appropriate PCIe slot for your expansion card.
- Insert Card: Align the card with the slot and press firmly until it is seated.
- Secure Card: Secure the card to the chassis with a screw.
2.6 Power Connections
Connect the main 24-pin ATX power connector and the 8-pin CPU power connector from your power supply to the corresponding ports on the motherboard.
2.7 Front Panel and I/O Connections
Connect the front panel headers (power button, reset button, HDD LED, power LED, USB ports, audio jacks) and rear I/O cables (USB, audio, network) to their respective headers on the motherboard. Refer to the motherboard diagram in the full manual for exact locations.
3. Operating Instructions
Once all components are installed, you can proceed with initial power-on and system configuration.
3.1 Initial Boot and BIOS/UEFI Setup
- Power On: Connect your monitor, keyboard, and mouse. Power on your system.
- Access BIOS/UEFI: During startup, repeatedly press the Del or F2 key to enter the BIOS/UEFI setup utility.
- Configure Settings:
- Load Optimized Defaults: It is recommended to load optimized defaults first.
- Memory Profile (XMP): Enable XMP (Extreme Memory Profile) for your DDR4 3200MHz memory if supported, to achieve advertised speeds.
- Boot Order: Set the boot order to prioritize your operating system installation media (USB drive or DVD).
- Advanced Features: The BIOS supports features like Resizable BAR, PBO 2, and undervolting for advanced users.
- Save and Exit: Save your changes and exit the BIOS/UEFI. The system will restart.
3.2 Operating System Installation
The ASRock B450M/AC R2.0 motherboard is compatible with Windows 10. Follow the on-screen instructions of your operating system installation media to install Windows.
3.3 Driver Installation
After installing the operating system, install the necessary drivers for the motherboard components. These typically include chipset drivers, audio drivers, LAN drivers, and Wi-Fi drivers. Drivers can be found on the ASRock official website for your specific motherboard model.
4. Maintenance
Regular maintenance helps ensure the longevity and stable operation of your motherboard.
4.1 General Cleaning
Periodically clean dust from your computer case and motherboard using compressed air. Ensure the system is powered off and unplugged before cleaning.
4.2 BIOS Updates
ASRock may release BIOS updates to improve compatibility, stability, or add new features. Check the ASRock website for the latest BIOS versions for your model. Follow the provided instructions carefully when updating the BIOS to avoid system instability.
4.3 CMOS Battery Replacement
The motherboard uses a CR2032 coin cell battery to retain BIOS settings and the system clock when the computer is powered off. If you experience issues with incorrect time or lost BIOS settings, the CMOS battery may need replacement. Ensure the system is powered off and unplugged before replacing the battery.
5. Troubleshooting
This section addresses common issues you might encounter.
- No Power:
- Check all power connections (24-pin ATX, 8-pin CPU, GPU).
- Ensure the power supply switch is in the ON position.
- Verify the front panel power button connection to the motherboard.
- No Display:
- Ensure the monitor is connected to the graphics card (if dedicated) or the motherboard (if using an APU with integrated graphics).
- Reseat the graphics card and memory modules.
- Test with a single memory stick.
- System Instability/Crashes:
- Check CPU and GPU temperatures.
- Verify memory settings (XMP enabled correctly).
- Ensure all drivers are up to date.
- Run memory diagnostic tools.
- Peripheral Issues (USB, Audio, Network):
- Install or update relevant drivers from the ASRock website.
- Check physical connections.
For further assistance, refer to the ASRock support website or contact their technical support.
6. Specifications
Key technical specifications for the ASRock B450M/AC R2.0 Motherboard:
| Feature | Detail |
|---|---|
| Brand | ASRock |
| Model Name | B450M/AC R2.0 |
| CPU Socket | Socket AM4 |
| Chipset Type | AMD B450 |
| Compatible Processors | AMD A Series, Ryzen 2000, 3000, 4000 G-Series, 5000, 5000 G-Series Desktop Processors |
| RAM Memory Technology | DDR4 |
| Memory Speed | 2133 MHz (up to 3200MHz OC supported) |
| Memory Storage Capacity (Max) | 32 GB |
| Product Dimensions (LxWxH) | 10.83 x 10.24 x 2.36 inches (Micro ATX) |
| Item Weight | 2.23 pounds |
| PCIe Slots | 1 PCIe 3.0 x16, 1 PCIe 2.0 x16 |
| Graphics Output | HDMI (for APUs) |
| SATA Ports | SATA 6Gb/s |
| USB 2.0 Ports | 2 (rear I/O, additional headers available) |
| Platform | Windows 10 |
| CMOS Battery | 1 CR2032 battery required |
7. Warranty and Support
7.1 Product Warranty
ASRock products are covered by a limited warranty. The specific terms and duration of the warranty may vary by region and retailer. Please retain your proof of purchase for warranty claims. For detailed warranty information, visit the official ASRock website or consult your retailer.
7.2 Technical Support
For technical assistance, driver downloads, BIOS updates, and frequently asked questions, please visit the official ASRock support website:
When contacting support, please have your motherboard model (B450M/AC R2.0) and serial number ready.


