
1. Safety Information
Please read these safety instructions carefully before using your new induction hob. Keep this manual in a safe place for future reference.
- Electrical Safety: Ensure the hob is correctly installed by a qualified electrician. Do not use if the power cord is damaged.
- Burn Hazard: The hob surface becomes hot during operation. Do not touch hot surfaces. Use oven mitts.
- Induction Specific: Do not place metallic objects (e.g., knives, forks, spoons, lids) on the hob surface as they can become hot.
- Children and Vulnerable Persons: This appliance can be used by children aged 8 years and above and persons with reduced physical, sensory or mental capabilities or lack of experience and knowledge if they have been given supervision or instruction.
- Cleaning: Always switch off the appliance and allow it to cool before cleaning.
2. Product Overview
The Bosch Serie 2 PUG611AA5E is a 60 cm induction hob featuring four cooking zones, designed for efficient and precise cooking. Its sleek black tempered glass surface integrates seamlessly into modern kitchens.

Image: Top view of the Bosch Serie 2 PUG611AA5E induction hob, showing the four cooking zones and the touch control panel at the front.

Image: The Bosch Serie 2 PUG611AA5E induction hob seamlessly integrated into a modern kitchen countertop.
3. Setup & Installation
Proper installation is crucial for the safe and efficient operation of your induction hob. It must be installed by a qualified professional in accordance with local regulations and the provided diagrams.
3.1. Installation Dimensions
Refer to the following diagrams for precise cutout and clearance dimensions. All dimensions are in millimeters (mm).
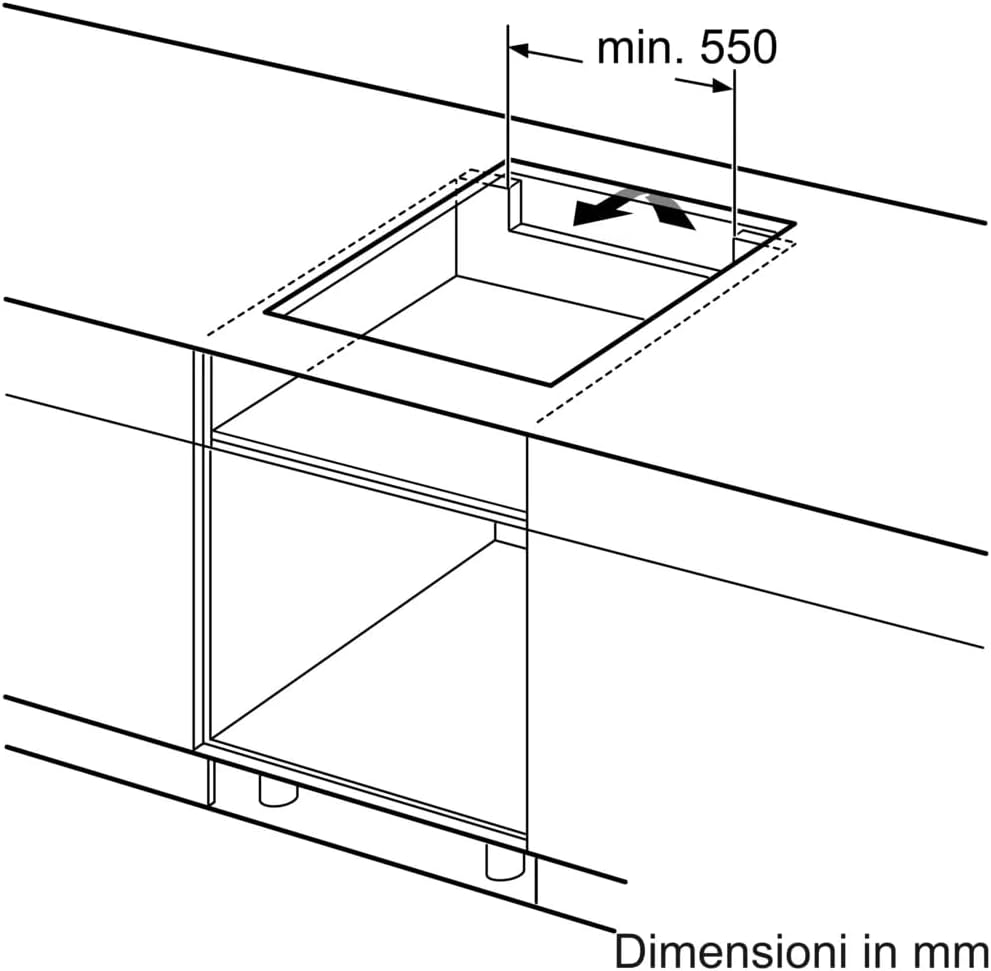
Image: Top-down view of the hob cutout dimensions, indicating a minimum width of 550 mm for the installation space.

Image: Side view diagram illustrating minimum clearances for a drawer installed directly below the hob. Minimum 65 mm from hob bottom to drawer top, and 20 mm from the back of the drawer to the wall for ventilation.
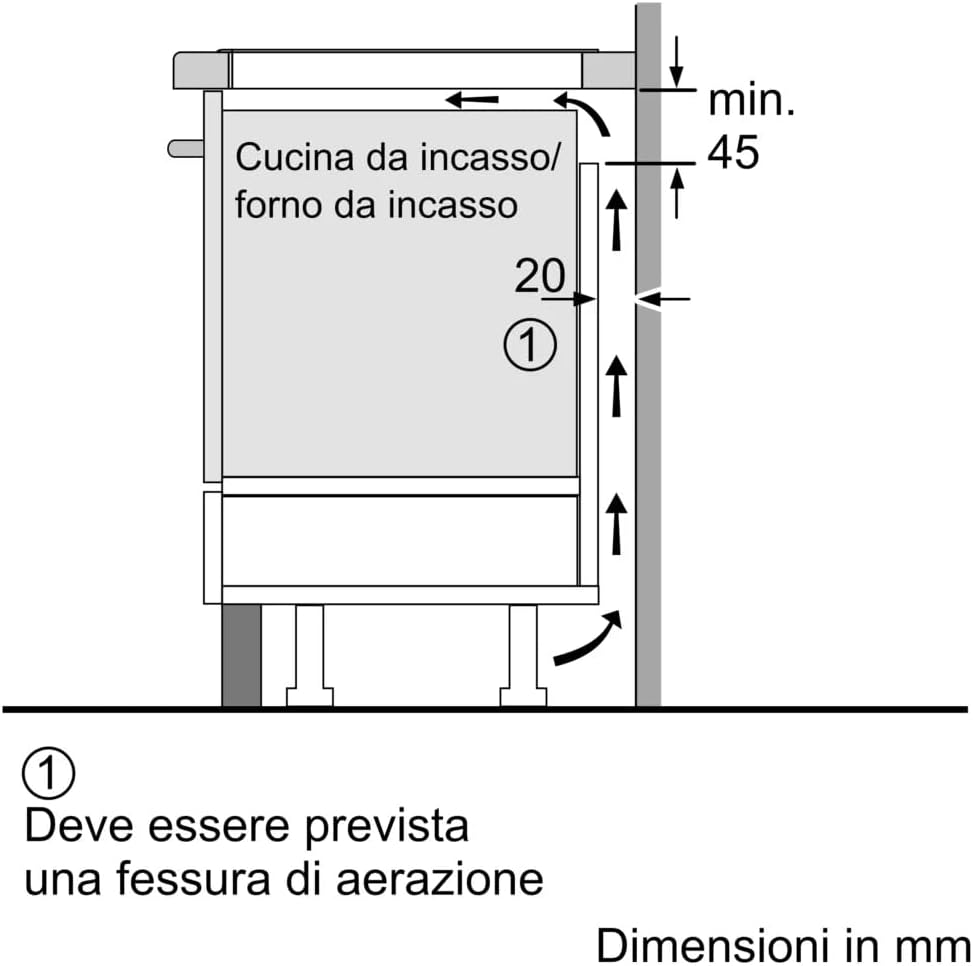
Image: Side view diagram showing minimum clearances for a built-in oven below the hob. A minimum 45 mm clearance from the hob bottom to the oven top, and a 20 mm aeration gap (1) must be provided at the rear.

Image: Detailed installation diagram with various dimensions (A, B, C) and requirements. A: Minimum distance from the opening for the hob to the wall. B: Insertion depth. C: The free space between the worktop surface and the top of the oven front must be 30 mm. See space requirements for the oven. The worktop must support loads of approximately 60 kg; suitable substructures must be used if necessary.
3.2. Electrical Connection
The hob requires a dedicated electrical circuit. The electrical connection must be performed by a qualified electrician. Ensure the voltage and frequency match the specifications provided on the appliance rating plate.
4. Operating Instructions
Your Bosch induction hob offers intuitive controls for precise cooking. Ensure you use induction-compatible cookware.
4.1. Switching On/Off
- To switch on: Press the main power button (usually marked with a circle or power symbol).
- To switch off: Press and hold the main power button until the hob turns off.
4.2. Selecting a Cooking Zone and Power Level
- Place an induction-compatible pan on the desired cooking zone.
- Select the cooking zone by touching its corresponding sensor.
- Adjust the power level using the '+' and '-' touch controls or the slider, typically ranging from 1 (low) to 9 (high).
4.3. Special Features (if applicable)
- Boost Function: For rapid heating, select a cooking zone and activate the boost function (often indicated by 'P' or a specific boost symbol).
- Timer Function: Set a cooking duration for a specific zone. The hob will switch off the zone automatically once the time expires.
5. Maintenance
Regular cleaning and proper care will ensure the longevity and optimal performance of your induction hob.
5.1. Cleaning the Hob Surface
- Always allow the hob to cool completely before cleaning.
- Use a soft cloth or sponge with a mild detergent and warm water for general cleaning.
- For stubborn stains or burnt-on food, use a specialized ceramic hob cleaner and a hob scraper.
- Avoid abrasive cleaners, scouring pads, or harsh chemicals, as these can damage the tempered glass surface.
- Dry the surface thoroughly after cleaning to prevent water marks.
5.2. General Care
- Avoid dropping heavy or sharp objects on the glass surface.
- Do not slide rough-bottomed pans across the surface to prevent scratches.
6. Troubleshooting
Before contacting customer service, please consult the following common issues and solutions:
| Problem | Possible Cause | Solution |
|---|---|---|
| Hob does not switch on. | No power supply or main switch off. | Check the circuit breaker and ensure the hob is correctly plugged in. Press the main power button firmly. |
| Cooking zone not heating. | Non-induction compatible cookware or pan not detected. | Use cookware with a ferromagnetic base. Ensure the pan is centered on the cooking zone. |
| Display shows an error code (e.g., 'E' followed by numbers). | Specific internal fault or operational issue. | Switch off the hob at the main power supply for a few minutes, then switch it back on. If the error persists, contact customer service. |
| Hob switches off unexpectedly. | Overheating or automatic safety shutdown. | Allow the hob to cool down. Ensure proper ventilation around the appliance. |
7. Specifications
| Feature | Detail |
|---|---|
| Brand | Bosch |
| Model Number | PUG611AA5E |
| Color | Black |
| Special Features | Induction |
| Heating Elements | 4 |
| Power Source | Electric Cable |
| Fuel Type | Electricity |
| Heating Surface Material | Tempered Glass |
| Material | Tempered Glass |
| Product Dimensions (Hob) | Approx. 592mm (W) x 522mm (D) x 51mm (H) |
| Cutout Dimensions | Approx. 560mm (W) x 490-500mm (D) |
| Burner Type | Induction |
| Language (Manual) | English |
| Date First Available on Amazon.com.be | March 21, 2022 |
8. Warranty & Support
For warranty information, please refer to the documentation provided with your purchase or contact Bosch customer service directly. Keep your proof of purchase for any warranty claims.
- Spare Parts Availability: Information unavailable.
- Software Updates Guaranteed Until: Information not available.
For technical assistance, spare parts, or service requests, please visit the official Bosch website or contact their authorized service centers.