1. Product Overview
The AZDOME Mini USB Hardwire Kit (Model JYX03) is designed to provide a continuous power supply to your dashcam, enabling 24-hour parking monitoring and protecting your vehicle's battery from discharge. This kit converts your car's 12V/24V power to a stable 5V/3A output, suitable for various mini USB powered devices, specifically optimized for the AZDOME M63 dashcam.

Figure 1: AZDOME Mini USB Hardwire Kit components. This image displays the main hardwire kit, including the power module, mini USB cable, and various fuse adapters, along with the ground wire and ACC wire.
2. Safety Information and Features
Please read all safety instructions carefully before installation and use. Improper installation can lead to damage to the product or your vehicle.
2.1. Intelligent Low Voltage Protection
The hardwire kit is equipped with intelligent low voltage protection to prevent your car battery from draining. If the voltage drops below a preset threshold (11.6V for 12V systems or 23.6V for 24V systems), the kit will automatically cut off power to the dashcam, ensuring enough power remains to start your vehicle.

Figure 2: Low Voltage Protection Diagram. This diagram illustrates how the hardwire kit connects to the car's electrical system (12V fuse, ground, 5V/3A Mini USB output) and its function in protecting against low battery voltage.
2.2. Multiple Protection Mechanisms
The hardwire kit incorporates several safety features to ensure reliable operation and protection for both the device and your vehicle:
- Over-current Protection: Prevents damage from excessive current flow.
- Short-circuit Protection: Safeguards against short circuits.
- Reverse Connection Protection: Protects against incorrect wiring polarity.
- Battery Drain Protection: Ensures your car battery is not fully discharged.
- Overheat Protection: Prevents the device from overheating.

Figure 3: Hardwire Kit Protection Features. This image visually represents the various safety protections built into the hardwire kit, including over-current, short-circuit, reverse connection, battery drain, and overheat protection.
3. Package Contents
Please check the package contents upon receipt to ensure all items are present:
- AZDOME Mini USB Hardwire Kit (JYX03)
- Low-Profile Mini Fuse Adapter
- Mini Fuse Adapter
- ATO (Regular) Fuse Adapter
- Micro2 Fuse Adapter
- User Manual (this document)
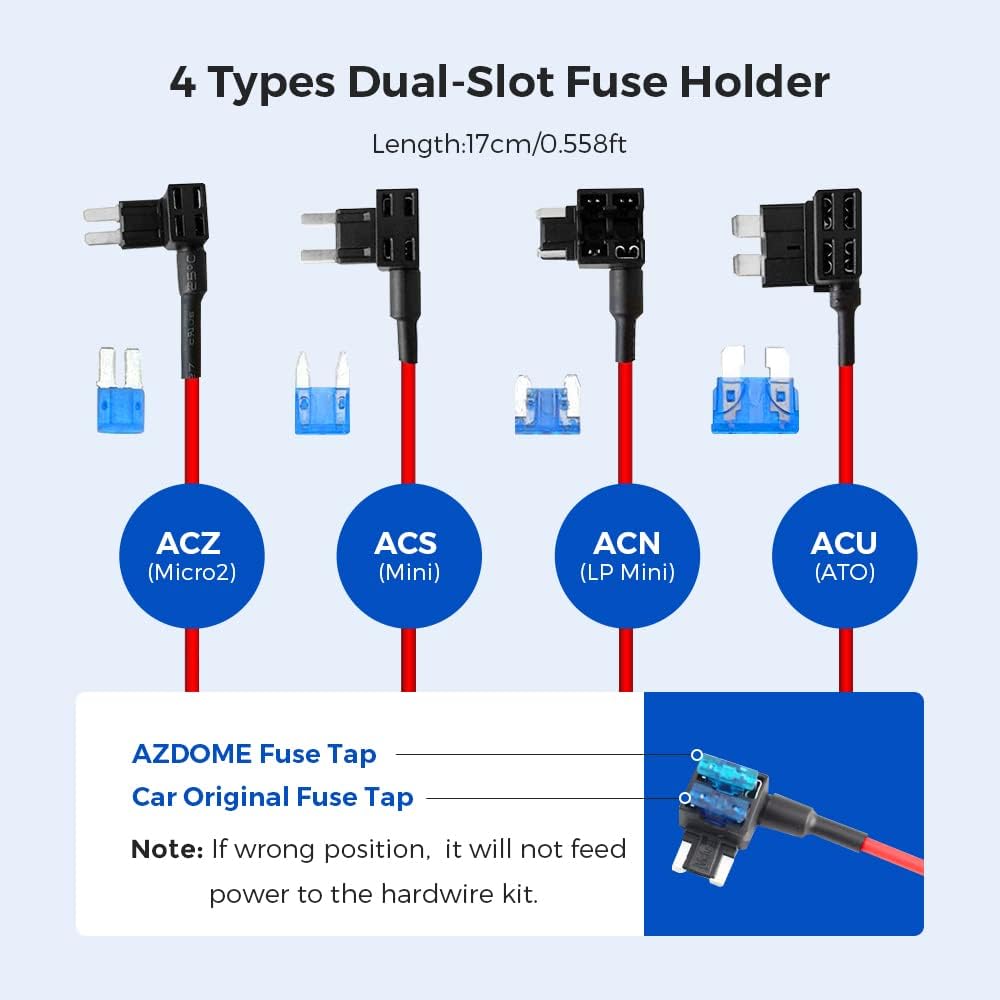
Figure 4: Included Fuse Adapters. This image displays the four types of dual-slot fuse holders provided: ACZ (Micro2), ACS (Mini), ACN (LP Mini), and ACU (ATO), ensuring compatibility with most vehicle fuse boxes.
4. Specifications
| Feature | Specification |
|---|---|
| Model | JYX03 |
| Input Voltage | DC 12V - 24V |
| Output Voltage | DC 5V |
| Output Current | 3A |
| Connector Type | Mini USB (Angled Front) |
| Low Voltage Cut-off (12V) | 11.6V |
| Low Voltage Cut-off (24V) | 23.6V |
| Cable Length | Approximately 3.2 meters (10.5 feet) |
5. Installation Guide
Important Note: If you are not experienced with car electrical systems, it is highly recommended to seek professional assistance for installation to avoid damage to your vehicle or the product.
- Locate the Fuse Box: Identify the fuse box in your vehicle. This is typically located under the dashboard, in the engine bay, or in the trunk. Refer to your vehicle's owner's manual for the exact location.
- Identify Fuse Slots: Using a circuit pen or multimeter, identify two fuse slots:
- One constant power fuse slot (BAT+) that provides power even when the ignition is off (for 24-hour parking monitoring).
- One ACC fuse slot that provides power only when the ignition is on.
- Identify Correct Fuse Type: Determine the type of fuse used in your car's fuse box (e.g., Micro2, Mini, LP Mini, ATO Regular). Select the appropriate fuse adapter from the kit.
- Connect the Wires:
- Connect the yellow wire (BAT+) to the constant power fuse slot using the selected fuse adapter.
- Connect the red wire (ACC) to the ignition-switched fuse slot using another fuse adapter.
- Connect the black wire (GND) to a metal screw or bolt on the vehicle's chassis to establish a good ground connection.
- Crimping the Red Wire (if necessary): If your fuse adapter requires it, crimp the red wire of your hardwire kit onto the Add-A-Fuse connector. Ensure a secure connection.

Figure 5: Crimping the Red Wire. This sequence of images demonstrates how to properly crimp the red wire of the hardwire kit onto an Add-A-Fuse connector for a secure electrical connection.
- Route and Conceal Cables: Carefully route the hardwire kit's cable from the fuse box to the desired dashcam mounting location, concealing it along the vehicle's trim or headliner for a neat installation.
- Connect to Dashcam and Test: Plug the mini USB connector into your dashcam. Turn on your vehicle's ignition to test if the dashcam powers on. Then, turn off the ignition to verify if the parking monitoring mode activates (if supported by your dashcam).

Figure 6: Easy Installation Steps. This visual guide outlines the six main steps for installing the hardwire kit: locating the fuse box, finding fuse slots, identifying fuse type, connecting wires, grounding the black wire, and testing the dashcam.
6. Operating Instructions
6.1. 24-Hour Parking Monitoring
Once correctly installed, the hardwire kit provides continuous power to your dashcam, allowing it to operate even when the vehicle's ignition is off. This enables 24-hour parking monitoring, which is crucial for capturing incidents while your car is parked. Ensure your dashcam supports parking mode and is configured correctly.
6.2. Low Voltage Protection Activation
The low voltage protection feature operates automatically. When the car battery voltage drops to the specified cut-off level (11.6V for 12V systems or 23.6V for 24V systems), the hardwire kit will automatically cease providing power to the dashcam. This action preserves sufficient battery power for vehicle ignition. The dashcam will power off when this protection activates.
7. Compatibility
This AZDOME Hardwire Kit is specifically designed for dashcams that use a Mini USB (Angled Front) port for power input. It is optimized for the AZDOME M63 dashcam.
While it may be compatible with other Mini USB devices, it is important to verify the port type and power requirements. This kit is not compatible with Micro USB or Type-C USB powered devices.

Figure 7: Universal Compatibility. This image highlights that the hardwire kit is specifically designed for the AZDOME M63 dashcam, which features a front-angled Mini USB port. It explicitly shows incompatibility with Micro USB and Type-C USB ports.
8. Troubleshooting
- Dashcam does not power on after installation:
- Check all wire connections (yellow, red, black) to ensure they are secure and correctly connected to the fuse box and ground.
- Verify that the chosen fuse slots are indeed providing power (constant and ACC) using a circuit tester.
- Ensure the correct fuse adapter type was used and that the fuse itself is not blown.
- Confirm your dashcam uses a Mini USB port and not Micro USB or Type-C.
- Parking monitoring does not work:
- Ensure the yellow wire (BAT+) is connected to a constant power fuse slot that remains active when the ignition is off.
- Check your dashcam's settings to ensure parking mode is enabled and configured correctly.
- Verify that the car battery voltage is above the low voltage cut-off threshold.
- Car battery drains quickly:
- While the hardwire kit has low voltage protection, prolonged parking monitoring with a small or old car battery can still lead to discharge. Consider reducing parking monitoring duration or checking your battery health.
- Ensure the low voltage cut-off is functioning correctly.
9. Maintenance
The AZDOME Hardwire Kit requires minimal maintenance. Periodically check the connections to ensure they remain secure. Keep the power module free from excessive dust or moisture. If you notice any signs of damage to the cables or module, discontinue use and contact support.
10. Customer Support
For technical support, warranty information, or any questions regarding your AZDOME Mini USB Hardwire Kit, please contact AZDOME customer service. Refer to the product packaging or the official AZDOME website for contact details.
Note: Warranty information is not available in this document. Please refer to the manufacturer's official channels for details.


