1. Introduction
This manual provides detailed instructions for the safe and effective use of your Proster Digital K-Type Thermometer. This device is designed for accurate temperature measurement across two channels, utilizing K-type thermocouples. It is suitable for a wide range of applications, including industrial and home use.
The thermometer features a broad temperature measurement range, high accuracy, and convenient functions such as data hold, automatic shutdown, and T1-T2 differential temperature calculation.

Image 1: The Proster Digital K-Type Thermometer shown in various application scenarios, including measuring temperatures in drinking water, ovens, industrial processes, laboratory settings, and ceramics production.
2. Package Contents
Please verify that all items listed below are present in your package:
- 1 x Proster Digital K-Type Thermometer
- 2 x Stainless Steel K-type Thermocouples (TP02, -50~750°C / -58~1382°F)
- 2 x Wired K-type Thermocouples (TP01, -50~400°C / -58~752°F)
- 1 x 9V Battery
- 1 x User Manual

Image 2: The complete package contents, including the thermometer, 9V battery, user manual, and four K-type thermocouples (two wired and two stainless steel probes).

Image 3: A closer look at the two types of K-type thermocouples provided: bead-type (wired) for temperatures up to 400°C (752°F) and stainless steel probes for temperatures up to 700°C (1292°F).
3. Component Identification
Familiarize yourself with the various parts of your Proster Digital K-Type Thermometer:
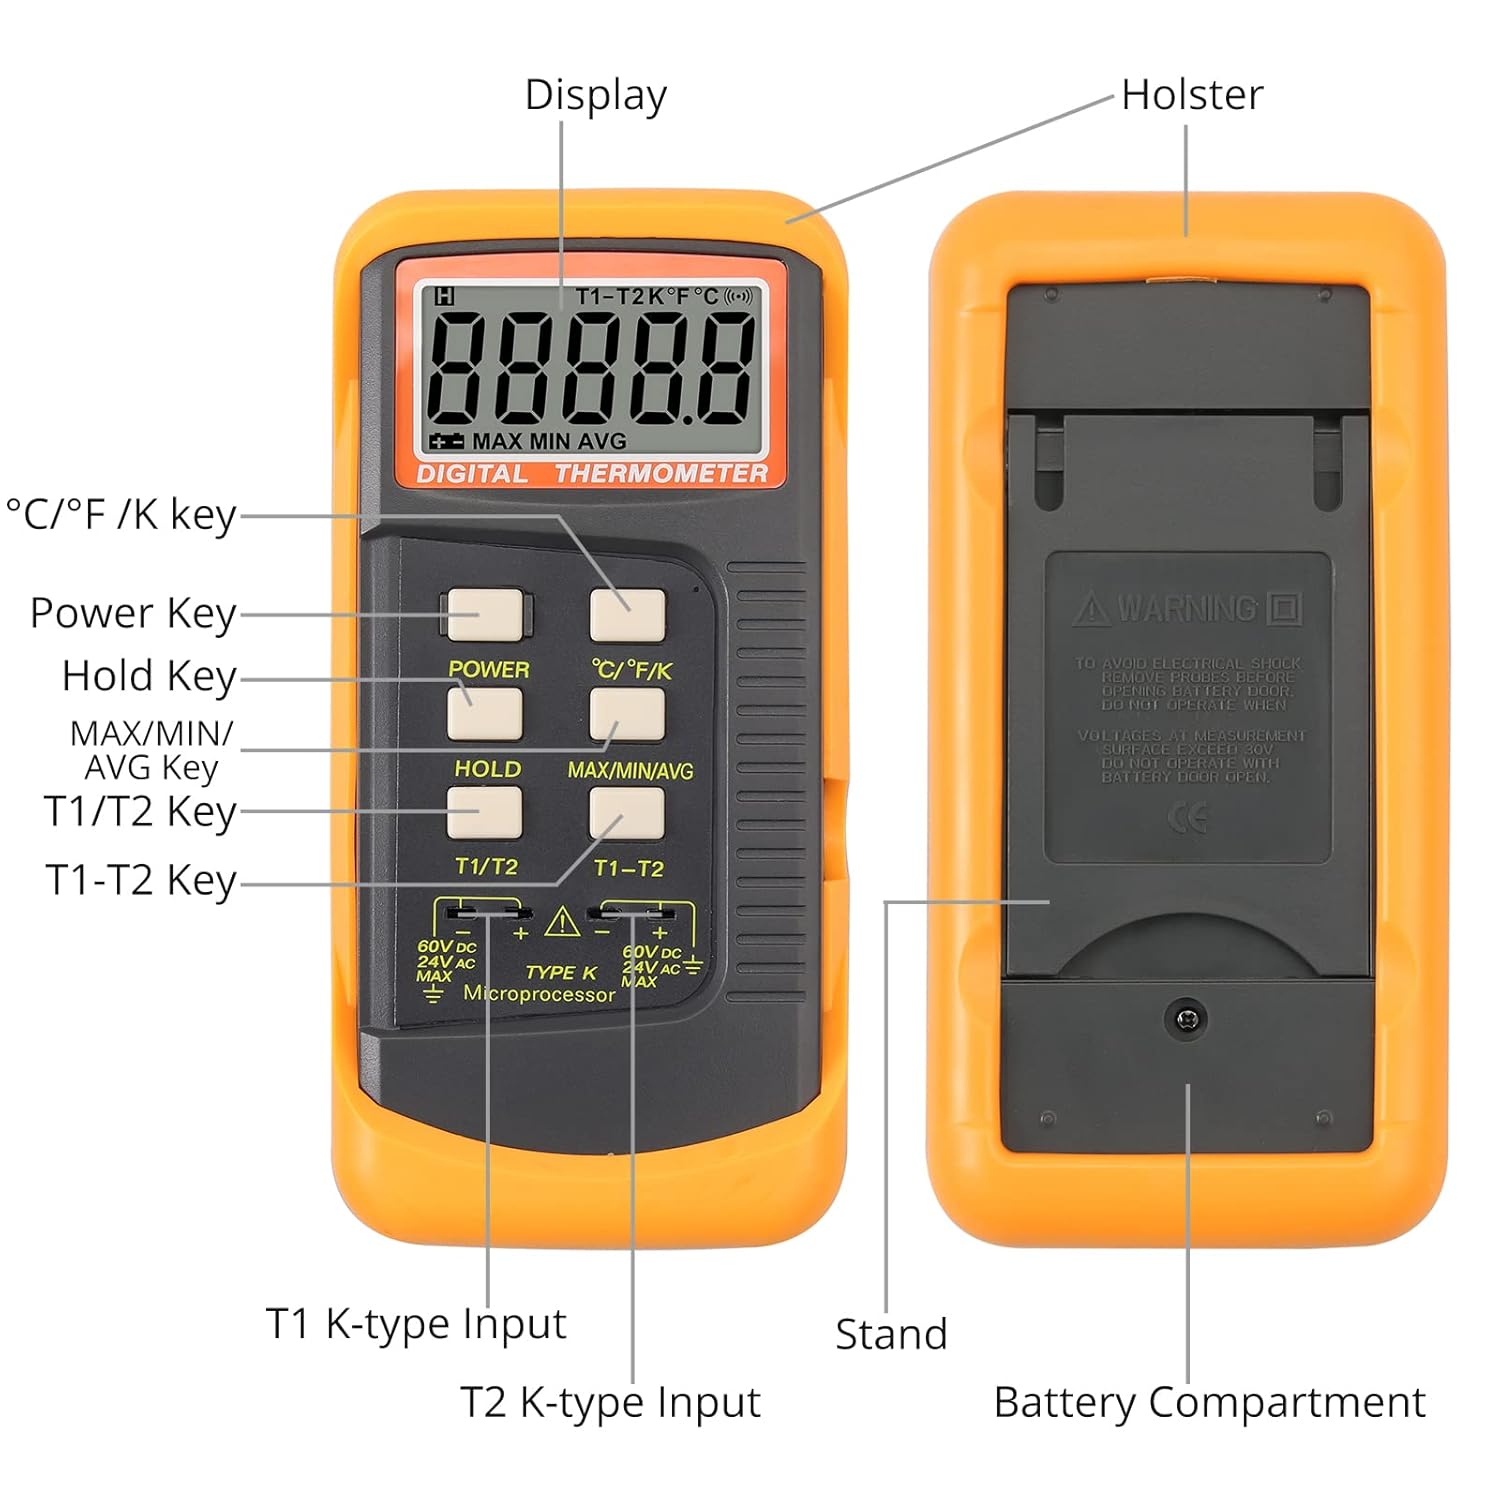
Image 4: A detailed diagram identifying the key components of the thermometer, including the display, holster, power key, hold key, MAX/MIN/AVG key, T1/T2 key, T1-T2 key, T1 K-type input, T2 K-type input, stand, and battery compartment.
- Display: Shows temperature readings, units, and function indicators.
- Power Key: Turns the device on or off.
- °C/°F/K Key: Switches between Celsius, Fahrenheit, and Kelvin temperature units.
- Hold Key: Freezes the current temperature reading on the display.
- MAX/MIN/AVG Key: Cycles through maximum, minimum, and average temperature readings.
- T1/T2 Key: Selects between Channel 1 (T1) and Channel 2 (T2) readings.
- T1-T2 Key: Displays the temperature difference between Channel 1 and Channel 2.
- T1 K-type Input: Port for connecting the first K-type thermocouple.
- T2 K-type Input: Port for connecting the second K-type thermocouple.
- Battery Compartment: Located on the back, houses the 9V battery.
- Holster: Removable silicone rubber casing for protection.
- Stand: Fold-out stand on the back for desktop use.
4. Setup
4.1 Battery Installation
- Carefully remove the protective silicone holster from the thermometer.
- Locate the battery compartment cover on the back of the device.
- Use a small screwdriver to loosen the screw securing the battery cover.
- Open the battery compartment and connect the provided 9V battery to the battery clips, ensuring correct polarity.
- Place the battery inside the compartment and close the cover. Secure it with the screw.
- Reattach the silicone holster for protection.
4.2 Connecting Thermocouples
- Identify the T1 and T2 K-type input ports at the bottom of the thermometer.
- Insert the K-type thermocouple plugs into the corresponding ports. Ensure a firm connection.
- For single-channel measurement, connect one thermocouple to either T1 or T2. For dual-channel or differential measurement, connect thermocouples to both T1 and T2.
Video 1: This video demonstrates the battery installation process and how to connect the K-type thermocouples to the Proster Digital Thermometer. It also briefly shows the device in operation.
5. Operating Instructions
5.1 Power On/Off
- Press the POWER button to turn the thermometer on.
- Press and hold the POWER button for a few seconds to turn the thermometer off. The device also features an automatic shutdown function to conserve battery.
5.2 Selecting Temperature Units
- Press the °C/°F/K button to cycle through Celsius (°C), Fahrenheit (°F), and Kelvin (K) units. The selected unit will be displayed on the screen.

Image 5: The thermometer's display showing temperature readings in Celsius, Fahrenheit, and Kelvin, demonstrating the unit switching capability.
5.3 Single and Dual Channel Measurement
- After connecting one or two thermocouples, the display will show the temperature reading(s).
- Press the T1/T2 button to switch between displaying the temperature from Channel 1 (T1) or Channel 2 (T2) if both are connected.
5.4 T1-T2 Differential Measurement
- With two thermocouples connected to T1 and T2, press the T1-T2 button to display the temperature difference between the two channels. This is useful for comparing temperatures at two different points simultaneously.
5.5 Data Hold Function
- Press the HOLD button to freeze the current temperature reading on the display. The 'HOLD' indicator will appear.
- Press the HOLD button again to release the reading and return to live measurement.
5.6 MAX/MIN/AVG Function
- Press the MAX/MIN/AVG button to cycle through the maximum, minimum, and average temperature readings recorded since the device was powered on or the function was reset.
- To reset the MAX/MIN/AVG values, press and hold the MAX/MIN/AVG button until the display clears or resets.
6. Maintenance
- Cleaning: Wipe the thermometer with a clean, damp cloth. Do not use abrasive cleaners or immerse the device in water.
- Storage: Store the thermometer in a dry, cool place away from direct sunlight and extreme temperatures.
- Battery Replacement: Replace the 9V battery when the low battery indicator appears on the display to ensure accurate readings.
- Thermocouple Care: Handle thermocouples carefully. Avoid bending or kinking the wires excessively, as this can damage the internal elements and affect accuracy.
7. Troubleshooting
- No Display/Device Not Turning On: Check if the 9V battery is correctly installed and has sufficient charge. Replace the battery if necessary.
- Inaccurate Readings: Ensure the thermocouple is properly connected to the input port. Verify that the thermocouple is suitable for the temperature range being measured. Allow sufficient time for the thermocouple to stabilize at the measured temperature.
- 'OL' or '---' on Display: This indicates an open circuit (thermocouple not connected or damaged) or that the temperature is outside the measurement range of the connected thermocouple or the device itself. Check thermocouple connection and ensure the temperature is within the specified range.
8. Specifications
| Feature | Specification |
|---|---|
| Temperature Range | -50°C to 1372°C (-58°F to 2498°F) |
| Thermocouple Type (TP01) | K-Type (Wired), -50°C to 400°C (-58°F to 752°F) |
| Thermocouple Type (TP02) | K-Type (Stainless Steel), -50°C to 750°C (-58°F to 1382°F) |
| Accuracy | ±0.5% |
| Resolution | 0.1°C / 0.1°F |
| Display Type | LCD |
| Power Source | 1 x 9V Battery (included) |
| Special Feature | High Accuracy, Data Hold, Auto Power Off, MAX/MIN/AVG, T1-T2 Function |
| Outer Material | Stainless Steel (probes) |
| Product Care | Wipe Clean |
| Dimensions | 8.35 x 5.59 x 1.73 inches (21.2 x 14.2 x 4.4 cm) |
| Weight | 11.29 ounces (320 grams) |

Image 6: The physical dimensions of the Proster Digital K-Type Thermometer, showing its length (15.6 cm / 6.14 in), width (7.7 cm / 3.03 in), and thickness (4.0 cm / 1.57 in).
9. Warranty and Support
For warranty information or technical support, please refer to the contact details provided with your purchase or visit the official Proster website. Keep your purchase receipt as proof of purchase for warranty claims.


