1. Important Safety Information
Read all instructions carefully before using this appliance to reduce the risk of fire, electric shock, injury to persons, or exposure to excessive microwave energy. Keep these instructions for future reference.
- Do not attempt to operate this oven with the door open as this can result in harmful exposure to microwave energy.
- Do not place any object between the oven front face and the door or allow soil or cleaner residue to accumulate on sealing surfaces.
- Do not operate the oven if it is damaged. It is particularly important that the oven door closes properly and that there is no damage to the: (1) door (bent), (2) hinges and latches (broken or loosened), (3) door seals and sealing surfaces.
- The oven should not be adjusted or repaired by anyone except properly qualified service personnel.
- Ensure proper grounding to avoid electrical shock.
2. Product Overview
The Samsung ME16A4021AS is a 1.6 cu. ft. capacity over-the-range microwave oven designed for efficient cooking and ventilation. It features 1000-watt cooking power, a 2-speed 300 CFM ventilation system, and an LED display with various auto-cook settings.

Front view of the Samsung ME16A4021AS Over-the-Range Microwave, showcasing its stainless steel finish and control panel.
3. Installation and Setup
This microwave is designed for over-the-range installation. Professional installation is recommended. Before installation, ensure you have the necessary tools and that the mounting surface can support the weight of the appliance.
3.1 Unpacking
- Remove all packaging materials and accessories.
- Inspect the oven for any damage, such as dents or a misaligned door. Do not install if damaged.
- Ensure the turntable and turntable support are included.
3.2 Dimensions
Accurate measurements are crucial for proper installation above your cooking range.
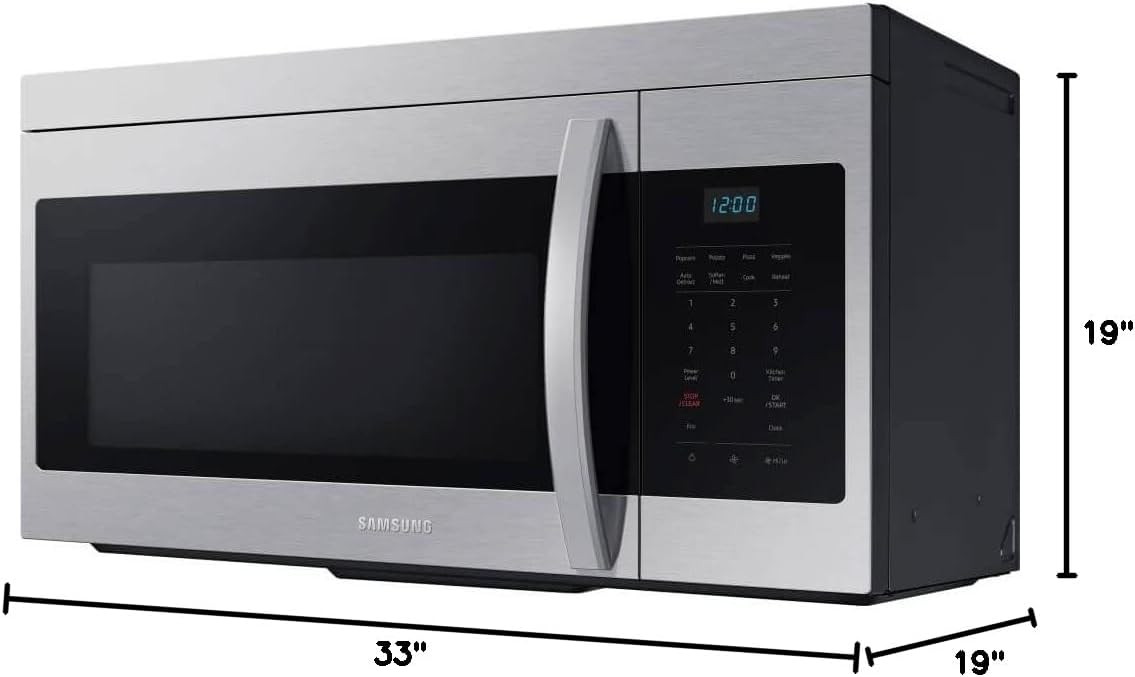
Diagram showing the dimensions of the microwave: 33 inches width, 19 inches depth, and 19 inches height.
3.3 Ventilation System Setup
The microwave features a 300 CFM ventilation system. It can be configured for external venting or recirculation. Refer to the detailed installation guide for instructions on changing the fan blade direction for recirculation if needed.

Bottom view of the microwave, highlighting the ventilation filters and integrated light for the cooking surface.
4. Operating Instructions
Familiarize yourself with the control panel and its functions for optimal use.

Close-up view of the microwave's control panel, displaying various cooking options and numerical keypad.
4.1 Basic Operation
- Place food in a microwave-safe container on the turntable.
- Close the microwave door securely.
- Enter desired cooking time using the number pad.
- Press the START/+30 SEC button to begin cooking.
- To stop cooking, press the STOP/CLEAR button.
4.2 Auto Cook Functions
The microwave features pre-programmed settings for common food items:
- Popcorn: For popping popcorn.
- Potato: For baking potatoes.
- Pizza: For reheating pizza slices.
- Veggie: For cooking fresh or frozen vegetables.
- Auto Defrost: Automatically defrosts food based on weight.
- Soften/Melt: For softening butter or melting chocolate.
- Reheat: For reheating various dishes.
To use an Auto Cook function, press the corresponding button and follow the prompts on the display.
4.3 Power Level
Adjust the microwave power level for different cooking needs. Press Power Level and then select a number from 1-10 (10 being 100% power).
4.4 Clock Setting
To set the clock, press the Clock button, enter the current time using the number pad, and press Clock again to confirm.
4.5 Eco Mode
Press the Eco button to enter Eco Mode, which reduces standby power consumption when the microwave is not in use.

Interior view of the microwave with the door open, showing the glass turntable and interior cavity.
5. Maintenance
Regular maintenance ensures the longevity and efficient operation of your microwave.
5.1 Cleaning the Interior
- Wipe the interior cavity with a damp cloth after each use.
- For stubborn stains, place a bowl of water with lemon slices inside and microwave for 2-3 minutes. The steam will loosen food particles.
- Clean the turntable and support ring with warm, soapy water.
5.2 Cleaning the Exterior
- Wipe the exterior surfaces with a soft, damp cloth.
- For stainless steel surfaces, use a specialized stainless steel cleaner and polish in the direction of the grain.
5.3 Replacing Grease Filters
The grease filters located on the bottom of the microwave should be cleaned regularly (monthly) or replaced if heavily soiled. Refer to the full installation manual for detailed instructions on removal and replacement.
6. Troubleshooting
If you encounter issues with your microwave, consult the following table before contacting service.
| Problem | Possible Cause | Solution |
|---|---|---|
| Oven does not start | Door not closed properly; Power cord unplugged; Blown fuse/tripped circuit breaker | Ensure door is latched; Check power connection; Reset circuit breaker |
| Food not cooking evenly | Food not stirred/rotated; Turntable not rotating | Stir/rotate food during cooking; Ensure turntable is correctly placed and clean |
| Light bulb not working | Bulb is loose or burned out | Tighten or replace bulb (refer to service manual for type) |
| Excessive noise during operation | Turntable not seated correctly; Fan obstruction | Reposition turntable; Check for obstructions in fan area |
7. Specifications
Key technical specifications for the Samsung ME16A4021AS microwave oven.
| Feature | Specification |
|---|---|
| Model Info | ME16A4021AS |
| Capacity | 1.6 Cubic Feet |
| Cooking Power | 1000 Watts |
| Ventilation System | 300 CFM, 2-Speed |
| Installation Type | Over-the-Range |
| Product Dimensions (D x W x H) | 19 x 33 x 19 inches |
| Item Weight | 44.2 pounds |
| Color | Stainless Steel |
| Special Features | Auto Cook, Eco Mode, LED Display, Auto Defrost |
| Included Components | Turntable |
| Voltage | 120 Volts |
8. Warranty and Support
For warranty information and customer support, please refer to the warranty card included with your product or visit the official Samsung website. Keep your proof of purchase for warranty claims.
For technical assistance or service requests, contact Samsung Customer Service directly.


