1. Introduction
The HOTONE Ampero II Stomp is a powerful and versatile multi-effects processor designed for guitar, bass, and acoustic instruments. Featuring advanced CDCM HD & F.I.R.E. modeling technology, a dynamic touchscreen, and extensive I/O options, it offers a comprehensive solution for tone shaping and performance. This manual provides essential information for setting up, operating, and maintaining your Ampero II Stomp.
2. Key Features
- Advanced Signal Processing: 24-bit depth, 44.1kHz sample rate, and up to 127dB dynamic range for pristine audio quality.
- Dynamic Touchscreen: A 4-inch 800 x 480 color dynamic touchscreen with a newly designed UI for intuitive control and customizable display modes.
- Dual Effect Chain: Supports multiple serial/parallel signal routing with up to 12 simultaneous effect modules.
- Extensive Effects Library: Delivers over 300 effects, including 87 amp models, 68 cab models, and 300 presets based on CDCM HD & F.I.R.E. modeling.
- Impulse Response (IR) Support: Dedicated IR loader module with 3rd party IR support (up to 50 custom IR slots) and 20 classic speaker IRs included. Supports up to 2048 IR sampling points.
- Versatile I/O: Stereo I/O jacks, stereo FX Loop jacks, MIDI I/O jacks, and an EXP/CTRL jack for expanded controls.
- USB Audio Interface: USB 2.0 Type-C port for firmware upgrading, loading/editing/managing effects/IRs via free Mac/PC software, and 8-in, 8-out USB audio interface with Reamp function.
- Integrated Looper: Built-in stereo looper with a maximum of 60 seconds recording time and undo/redo function.
- Assignable Footswitches: Three assignable footswitches with halo LEDs for changing patches, turning effects on/off, setting tap tempo, and more.
3. Physical Overview
The Ampero II Stomp features a robust and pedalboard-friendly design with clearly labeled controls and comprehensive connectivity.
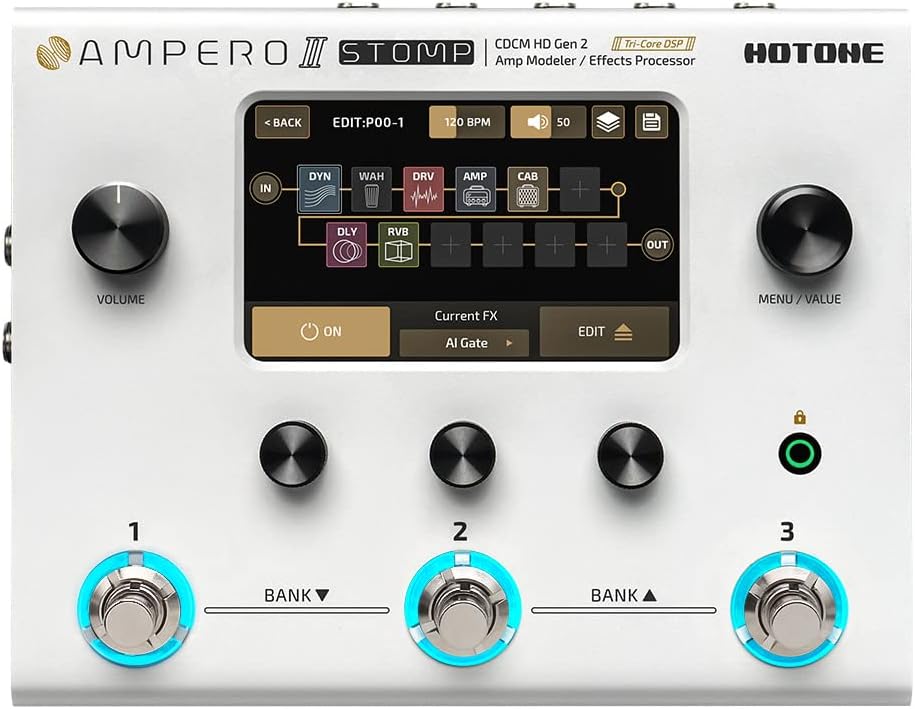
Figure 3.1: Top view of the Ampero II Stomp, showing the touchscreen, knobs, and footswitches.

Figure 3.2: Detailed view of the Ampero II Stomp's input and output ports.
Controls and Connections:
- VOLUME Knob: Adjusts the overall output volume of the unit.
- MENU/VALUE Knob (Main Knob): Used for navigating menus and adjusting parameters on the touchscreen.
- Quick Access Knobs: Three knobs located below the touchscreen for quick adjustments of parameters displayed on the lower part of the screen.
- Footswitches (1, 2, 3): Assignable footswitches with halo LEDs for various functions like patch changes, effect on/off, and tap tempo.
- Device Lock Button: Used to lock or unlock the device to prevent accidental changes.
- INPUT: 1/4" TS unbalanced stereo inputs for guitar or other instruments.
- BALANCED OUTPUT: 1/4" TRS balanced stereo outputs.
- EXP/CTRL: 1/4" TRS input for connecting an external expression pedal or footswitch controller.
- Power Supply Connection: Input for 9-18V DC center negative power supply.
- Power Switch: Turns the unit power on/off.
- USB: USB 2.0 Type-C jack for connecting to your computer for editing, firmware updates, and USB audio.
- MIDI: Standard 5-pin MIDI input and thru output.
- STEREO FX LOOP: 1/4" TRS unbalanced stereo input (RETURN) and output (SEND) jacks for integrating external effects pedals.
- AUX IN & PHONES: 1/8" stereo auxiliary input and headphones output.
4. Initial Setup
4.1 Powering On
- Connect the provided 9-18V DC center negative power adapter to the Power Supply Connection port on the Ampero II Stomp.
- Ensure all audio connections are made before powering on.
- Flip the Power Switch to the 'ON' position. The unit will boot up and display the main interface on the touchscreen.
4.2 Basic Connections
- Instrument Connection: Connect your guitar, bass, or acoustic instrument to the INPUT jack using a 1/4" TS cable.
- Output to Amplifier/PA: Connect the BALANCED OUTPUT (1/4" TRS) jacks to your amplifier, mixer, or audio interface. For stereo output, use both Left and Right outputs.
- Headphones: For silent practice, connect your headphones to the PHONES (1/8" stereo) jack.
- USB Connection: Connect the USB Type-C port to your computer for using the Ampero II Stomp as an audio interface or for managing presets and IRs with the Ampero Editor software.
5. Operation
5.1 Touchscreen Navigation
The Ampero II Stomp's 4-inch touchscreen is the primary interface for navigating menus, selecting effects, and adjusting parameters. Tap icons and elements to select them, and use the MENU/VALUE knob or Quick Access Knobs to change values.
5.2 Patch Management
The unit comes with 300 presets (patches) that combine various amp models, cabinet simulations, and effects. You can easily switch between patches using the footswitches or by navigating the touchscreen. Patches can be edited and saved to customize your sound.
5.3 Effects Modules
The Ampero II Stomp allows for a dual effect chain with up to 12 simultaneous effect modules. You can add, remove, and reorder effects within a patch using the touchscreen interface. Each module offers various parameters for fine-tuning your tone.
5.4 Looper Function
The built-in looper allows you to record and layer audio phrases, perfect for practice or creative performance. Access the looper via the touchscreen or assign a footswitch for quick control. It supports up to 60 seconds of recording with undo/redo capabilities.
5.5 Tuner
An integrated tuner provides accurate tuning for your instrument. Activate the tuner via the touchscreen or a dedicated footswitch assignment.
5.6 USB Audio Interface
Connect the Ampero II Stomp to your computer via USB to use it as an 8-in, 8-out audio interface. This enables direct recording of your processed or dry signal, as well as re-amping capabilities for studio work.
5.7 Ampero Editor Software
For advanced editing and management of patches, IRs, and firmware updates, download the free Ampero Editor software for Mac/PC. This software provides a visual interface mirroring the unit's touchscreen for detailed control.
5.8 Product Videos
Video 5.1: An overview of the Hotone Ampero II MP-300, showcasing its features and capabilities.
Video 5.2: A demonstration of the HOTONE Multi Effects Pedal MP-300, highlighting its various functions and sound options.
6. Specifications
| Attribute | Value |
|---|---|
| Digital Audio Signal Processing | 24-bit depth, 44.1kHz sample rate |
| Frequency Response | 20Hz – 20kHz ± 1dB |
| Dynamic Range | Max. 127dB (digital to analog) |
| Inputs | Two 1/4″ TS instrument jacks, One 1/8″ Stereo Aux In, One 1/4″ TRS EXP/CTRL jack, One 1/4″ TRS unbalanced stereo FX loop return jack, One Standard 5 pin MIDI input jack |
| Outputs | Two 1/4″ TRS balanced stereo output jacks, One 1/4″ TRS unbalanced stereo FX loop send jack, One 1/8″ stereo headphones output jack, One standard 5 pin MIDI output jack |
| Input Impedance | E.GT: 1MΩ; A.GT: 4.7MΩ; LINE: 10kΩ; FX Loop Return: 100kΩ; Aux In: 10kΩ |
| Output Impedance | Output: 1KΩ; FX Loop Send: 1KΩ; Headphones: 47Ω |
| Screen | 4″ 800 x 480 Color Dynamic Display Touch Screen |
| USB Port | USB 2.0 Type-C port, supports USB Audio 2.0 |
| Impulse Response/IR processing | Supports 24-bit/44.1kHz Mono WAV files, 1024 and 2048 points; Supports up to 50 user IRs |
| Power Requirements | 9-18V DC Center Negative |
| Current Consumption | 800mA Max (9V DC) |
| Dimensions | 185mm(W) x 145mm(D) x 58mm(H) |
| Weight | 1050g (2.31 lbs) |
7. Troubleshooting
7.1 Common Issues and Solutions
- No Power: Ensure the power adapter is correctly connected and is the correct voltage (9-18V DC center negative). Check the power outlet.
- No Sound: Verify all audio cables are securely connected. Check the VOLUME knob on the unit and your amplifier/mixer. Ensure the correct input/output settings are selected on the Ampero II Stomp.
- Ampero Editor Software Not Connecting: Ensure the correct USB drivers are installed. Temporarily disable any VPN software on your computer, as this can sometimes interfere with the connection. Restart both the Ampero II Stomp and the software.
- Unwanted Noise/Hum: Check for ground loops. Ensure all cables are in good condition. Try using a different power outlet or a power conditioner.
- Frozen Screen/Unresponsive: Power cycle the unit by turning it off and then on again. If the issue persists, a factory reset may be necessary (refer to the full manual for factory reset procedures).
8. Maintenance
- Cleaning: Use a soft, dry cloth to clean the unit. For stubborn marks, a slightly damp cloth can be used, but ensure no moisture enters the unit. Avoid abrasive cleaners.
- Storage: Store the Ampero II Stomp in a dry, cool place away from direct sunlight and extreme temperatures. If transporting, use a padded case to protect it from physical damage.
- Firmware Updates: Regularly check the HOTONE official website for firmware updates. Keeping your unit updated ensures optimal performance and access to new features.
9. Warranty and Support
The HOTONE Ampero II Stomp comes with a manufacturer's warranty. Please refer to the warranty card included with your product or visit the official HOTONE website for detailed warranty terms and conditions. For technical support, product registration, or service inquiries, please contact HOTONE customer support through their official channels.