
1. Product Overview
The Makita 452480-0 is a genuine replacement control knob designed specifically for the Makita BKP80 model. This component is essential for the proper function and adjustment capabilities of your tool, ensuring precise control and operation. It is manufactured by Makita Werkzeug GmbH, guaranteeing compatibility and quality.
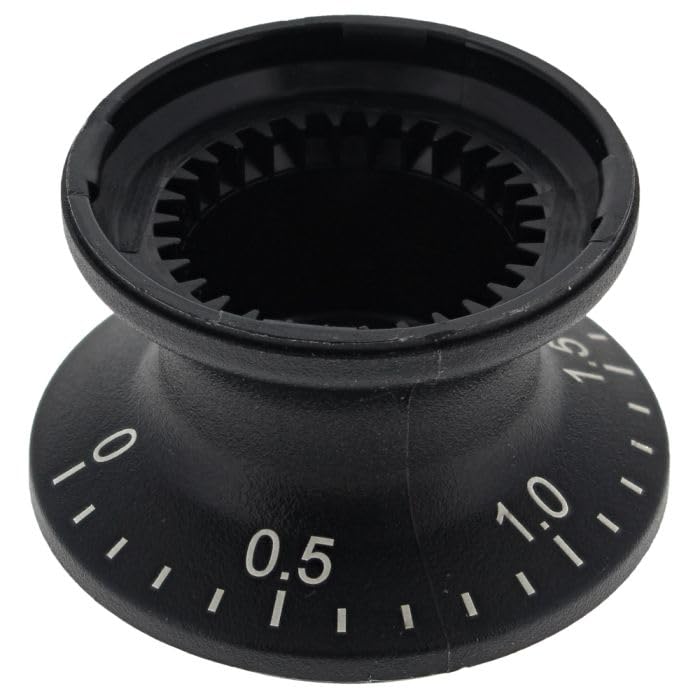
Figure 1: The Makita 452480-0 Control Knob. This image displays the black rotary knob with white numerical markings (0, 0.5, 1.0, 1.5) and corresponding tick marks. The top opening reveals internal serrations designed for secure attachment to a shaft.
2. Safety Information
Always prioritize safety when handling replacement parts and performing maintenance on power tools. Failure to follow these safety guidelines may result in injury or damage to the tool.
- Disconnect Power: Before attempting any installation or replacement, ensure the Makita BKP80 tool is completely disconnected from its power source (unplugged or battery removed).
- Wear Protective Gear: Use appropriate personal protective equipment (PPE) such as safety glasses and gloves.
- Use Correct Tools: Only use tools appropriate for the task to avoid damaging the part or the tool.
- Keep Work Area Clean: Ensure your workspace is clean, well-lit, and free of obstructions.
- Small Parts: This product contains small parts. Keep out of reach of children.
3. Installation
This section outlines the general procedure for replacing the control knob on your Makita BKP80. Specific steps may vary slightly depending on the exact configuration of your tool.
- Prepare the Tool: Ensure the Makita BKP80 is powered off and disconnected from any power source. Place the tool on a stable, clean surface.
- Access the Knob: Depending on the tool's design, you may need to remove a cover or housing to access the existing control knob. Refer to your Makita BKP80's primary user manual for specific disassembly instructions if necessary.
- Remove Old Knob: Carefully remove the old or damaged control knob. This may involve unscrewing a set screw, prying it off, or releasing a clip. Note its orientation if it affects functionality.
- Inspect Shaft: Clean the shaft or spindle where the new knob will be installed. Ensure it is free of debris or damage.
- Install New Knob: Align the new Makita 452480-0 control knob with the shaft. Gently push or slide it into place. Ensure the internal serrations engage properly with the shaft for a secure fit. If there is a set screw, tighten it just enough to secure the knob without overtightening.
- Test Fit and Function: Once installed, gently rotate the knob to ensure it moves smoothly and engages with the internal mechanism of the tool. Verify that any numerical markings align correctly with the tool's indicators.
- Reassemble Tool: Reattach any covers or housings that were removed during the process.
4. Operation
Once the Makita 452480-0 control knob is correctly installed, it functions as an integral part of your Makita BKP80 tool. Its primary purpose is to allow for precise adjustments, such as depth settings, speed control, or other operational parameters, depending on the specific function it controls on the BKP80 model.
- Adjustment: Rotate the knob clockwise or counter-clockwise to make the desired adjustments. The numerical markings (0, 0.5, 1.0, 1.5) provide visual indicators for precise settings.
- Engagement: Ensure the knob is fully engaged and does not slip during operation.
- Refer to BKP80 Manual: For detailed instructions on how the control knob affects the specific functions of your Makita BKP80 tool, please refer to the original user manual for the BKP80 model.
5. Maintenance
Proper maintenance ensures the longevity and reliable performance of your control knob and the tool it is part of.
- Cleaning: Periodically wipe the knob with a clean, dry cloth to remove dust and debris. Avoid using harsh chemicals or abrasive cleaners, as they may damage the material or markings.
- Inspection: Regularly inspect the knob for any signs of wear, cracks, or looseness. If the knob feels loose, ensure it is properly secured to the shaft.
- Storage: When not in use, store the Makita BKP80 tool (with the knob installed) in a clean, dry environment, away from extreme temperatures and direct sunlight.
6. Troubleshooting
If you encounter issues with your newly installed control knob, consider the following common problems and solutions:
- Knob is Loose:
- Ensure the knob is fully seated on the shaft.
- If applicable, check and tighten any set screws that secure the knob to the shaft.
- Knob Does Not Turn Smoothly:
- Remove the knob and inspect the shaft and the knob's internal mechanism for any obstructions or debris. Clean thoroughly.
- Ensure the knob is not overtightened if it uses a set screw.
- Knob Markings Do Not Align:
- Remove the knob and re-install it, paying close attention to the initial alignment with the tool's indicators or the shaft's flat spots/keys.
If problems persist, or if the knob appears damaged, contact Makita customer support or an authorized service center.
7. Specifications
| Specification | Detail |
|---|---|
| Item Model Number | 452480-0 |
| Compatible Model | Makita BKP80 |
| Manufacturer | Makita Werkzeug GmbH |
| ASIN | B09K7Y12D6 |
| Parcel Dimensions | 3 x 3 x 3 cm; 20 g |
| Date First Available | Sept. 24 2024 |
8. Warranty and Support
As a genuine Makita replacement part, the 452480-0 control knob is covered by Makita's standard warranty policy for parts. For specific warranty details, claims, or technical support, please contact Makita customer service directly or visit their official website.
- Makita Official Website: www.makita.ca (or your regional Makita website)
- Customer Service: Refer to the contact information provided in your original Makita BKP80 tool manual or on the Makita website.