1. Introduction
Welcome to the user manual for your PDW HXW Avatar SD201-3SH Electronic Drum Set. This professional electronic drum set is designed to provide an authentic drumming experience with advanced features for practice, performance, and recording. This manual will guide you through the setup, operation, and maintenance of your new instrument, ensuring you get the most out of its capabilities.
The SD201-3SH features 5 dual-triggering mesh drums and 3 dual-triggering cymbals, including a triple-trigger ride cymbal, all equipped with choke functionality. Its powerful SM104 module offers 467 sounds, 30 preset drum kits, and 20 user-programmable kits, alongside comprehensive sound customization options and built-in practice tools like a metronome and accompaniment songs.
2. Product Overview and Components
The PDW HXW Avatar SD201-3SH Electronic Drum Set includes the following main components:
- 10-inch dual-trigger mesh snare drum
- Two 8-inch dual-trigger mesh tom drums
- One 10-inch dual-trigger mesh tom drum
- 10-inch mesh bass drum with included foot pedal
- 10-inch dual-trigger hi-hat cymbal with separate stand
- Two 12-inch dual-trigger crash cymbals
- 13-inch triple-trigger ride cymbal
- SM104 Drum Module
- Full-duty drum rack with all necessary attachments and cables

Figure 2.1: Overview of the PDW HXW Avatar SD201-3SH Electronic Drum Set, showing all drums, cymbals, module, and rack.
3. Setup Instructions
Follow these steps to assemble and set up your electronic drum set:
- Unpack Components: Carefully remove all components from the packaging and verify that all parts listed in Section 2 are present.
- Assemble Drum Rack: Assemble the main drum rack frame according to the included diagram. Ensure all clamps and joints are securely tightened.
- Mount Drums: Attach the snare, tom drums, and bass drum to the rack using the provided mounts. Position them ergonomically for comfortable playing.
- Install Cymbals: Mount the hi-hat, crash, and ride cymbals onto their respective stands or rack arms. Place the hi-hat cymbal on its dedicated stand with the foot pedal.
- Connect Pedals: Connect the bass drum pedal to the bass drum pad and the hi-hat pedal to the hi-hat stand.
- Mount and Connect Module: Secure the SM104 Drum Module to the rack using its dedicated mount. Connect each drum pad and cymbal to the corresponding input on the module using the provided cables. Refer to the module's port labels for correct connections.
- Power On: Connect the power adapter to the module and a power outlet. Turn on the module using the power button.

Figure 3.1: The drum set assembled, showing the positioning of drums and cymbals on the rack.

Figure 3.2: Detailed view of the hi-hat stand and its foot pedal.

Figure 3.3: Detailed view of the bass drum pad and its foot pedal.
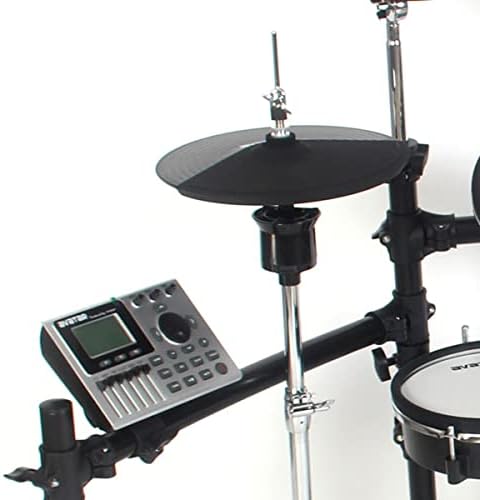
Figure 3.4: The SM104 drum module mounted on the rack, showing its proximity to the hi-hat.
4. Operating Instructions
The SM104 Drum Module is the central control unit for your electronic drum set. It allows you to select drum kits, customize sounds, and utilize various practice features.
4.1. Module Overview

Figure 4.1: Front panel of the SM104 Drum Module, showing the display, controls, and faders.

Figure 4.2: Angled view of the SM104 Drum Module, highlighting the faders and main navigation controls.
The module features a clear display, navigation buttons, dedicated faders for individual drum/cymbal volumes, and various function buttons for recording, setup, and practice.
4.2. Selecting Drum Kits
The SM104 module comes with 30 preset drum kits and allows for 20 user-programmable kits. Use the navigation buttons (usually arrow keys or a dial) to browse through the available kits. The display will show the name of the currently selected kit.
4.3. Sound Customization
Each drum and cymbal pad can be individually customized. Access the setup menu (often via a "SETUP" button) to adjust parameters such as:
- Volume: Adjust the output level of each pad.
- Sensitivity: Controls how responsive the pad is to strikes.
- Curve: Defines the dynamic response (how velocity translates to sound volume).
- Mask Time: Prevents re-triggering from a single strike.
- Retrigger Level: Sets the threshold for subsequent triggers.
- Anti-Cross: Minimizes accidental triggering of adjacent pads.
- Dynamic Range: Adjusts the range between the softest and loudest sounds.
Use the faders on the module's front panel for quick volume adjustments of Kick, Snare, Toms, Hi-Hat, Crash, and Ride.
4.4. Recording and Playback
The SM104 module supports on-board recording. Press the "REC" button to start recording your performance. Use the "PLAY/PAUSE" button to listen back to your recorded tracks. Features like "review" and "loop" allow for detailed analysis and practice.
4.5. Practice Tools
Enhance your practice sessions with the module's built-in tools:
- Metronome: Activate the metronome (often via a "CLICK" button) to practice with a steady tempo. Adjust tempo and time signature as needed.
- Background Accompaniment Songs: The module includes 15 built-in background songs. Select and play these songs to practice drumming along to various musical styles.
- Time Scope: Utilize the time scope feature (if available) to visually analyze your timing and improve rhythm accuracy.

Figure 4.3: A user demonstrating the playability of the electronic drum set.
5. Maintenance
Proper maintenance will extend the life and performance of your electronic drum set:
- Cleaning: Use a soft, dry cloth to wipe down the drum pads, cymbals, module, and rack. For stubborn dirt, a slightly damp cloth can be used, but ensure no moisture enters the electronic components. Avoid abrasive cleaners.
- Storage: When not in use for extended periods, store the drum set in a cool, dry place away from direct sunlight and extreme temperatures.
- Cable Management: Ensure all cables are neatly routed and not kinked or pinched to prevent damage.
- Pad Care: Avoid striking the mesh pads with excessive force or sharp objects, as this can damage the mesh heads and sensors.
6. Troubleshooting
If you encounter issues with your drum set, refer to the following common problems and solutions:
| Problem | Possible Cause | Solution |
|---|---|---|
| No sound from a specific pad/cymbal | Cable disconnected or faulty; pad sensitivity too low; module output muted. | Check cable connections to the module and pad. Increase pad sensitivity in module settings. Ensure module output is not muted and volume is up. |
| No sound from the entire set | Power issue; master volume too low; audio output cable disconnected. | Verify power adapter is connected and module is on. Increase master volume. Check audio cables connecting the module to an amplifier/headphones. |
| Double triggering or missed triggers | Pad sensitivity or retrigger settings incorrect; anti-cross setting needs adjustment. | Adjust pad sensitivity, mask time, and retrigger level in the module's pad settings. Fine-tune anti-cross settings. |
| Module display is blank | Power issue; module malfunction. | Ensure power adapter is securely connected and power outlet is functional. Try power cycling the module. If issue persists, contact support. |
For issues not listed here, please refer to the manufacturer's online resources or contact customer support.
7. Specifications
| Feature | Description |
|---|---|
| Model Name | SD201-3SH |
| Brand | PDW |
| Manufacturer | HXW Avatar |
| Snare Drum | 10-inch dual-trigger mesh |
| Tom Drums | Two 8-inch dual-trigger mesh, one 10-inch dual-trigger mesh |
| Bass Drum | 10-inch mesh with foot pedal |
| Hi-Hat Cymbal | 10-inch dual-trigger with separate stand |
| Crash Cymbals | Two 12-inch dual-trigger with choke function |
| Ride Cymbal | 13-inch triple-trigger with choke function |
| Drum Module | SM104 Module |
| Sounds | 467 |
| Drum Kits | 30 preset, 20 user-programmable |
| Module Features | Recording, replay, review, loop, metronome, 15 accompaniment songs |
| Body Material | Bass Wood (for certain components, likely the drum shells) |
| First Available Date | Oct. 22 2021 |
8. Warranty and Support
For detailed information regarding the product warranty, please refer to the warranty card included with your purchase or visit the official PDW or HXW Avatar website. Warranty terms and conditions may vary by region.
If you require technical assistance, have questions about your product, or need to report a defect, please contact the manufacturer's customer support. Contact information can typically be found on the product packaging, the manufacturer's website, or your purchase receipt.


