
1. Product Overview
The SUPERJARE Bakers Rack with Power Outlet is a versatile kitchen storage solution designed to organize appliances, spices, and other kitchen essentials. It features multiple shelves, a wire basket, S-hooks, and integrated power outlets for convenience. This rack is constructed from P2 Particleboard and Metal, offering a sturdy and functional addition to your kitchen or living space.

Image 1.1: The SUPERJARE Bakers Rack with Power Outlet, fully assembled and in use in a kitchen.
2. Safety Information
- Electrical Safety: The integrated power outlets are designed for small kitchen appliances. Do not overload the outlets. Ensure the power switch is off when not in use or during cleaning.
- Weight Capacity: Adhere to the specified weight limits for each shelf to prevent damage or injury. The top perch supports up to 55 lbs, the main countertop up to 120 lbs, and lower shelves vary (e.g., 60 lbs, 80 lbs). Refer to the specifications section for detailed capacities.
- Stability: Always place the rack on a flat, stable surface. Utilize the adjustable feet to ensure balance. For added safety, use the included wall anchor to secure the rack to a wall, especially in households with children or pets.
- Assembly: Follow all assembly instructions carefully. Do not overtighten screws. Ensure all connections are secure before placing items on the rack.
- Material Care: Avoid prolonged exposure to moisture to prevent water damage to the particleboard surfaces.
3. Package Contents
Before assembly, verify that all components are present and undamaged. If any parts are missing or damaged, contact customer support.
- Metal Frame Components
- P2 Particleboard Shelves (various sizes)
- Integrated Power Outlet Unit with Switch and 6.5-foot Power Cord
- Wire Basket (slide-out)
- 6 S-Hooks
- Adjustable Feet
- Assembly Hardware (screws, bolts, Allen wrench)
- Wall Anchor Kit
- Instruction Manual
4. Setup and Assembly
Assembly typically requires two people and takes approximately 60-90 minutes. Ensure you have adequate space and a soft surface to prevent scratching components during assembly.
- Unpack and Identify Parts: Lay out all components on a clean, soft surface. Compare them with the parts list in the manual to ensure everything is present.
- Assemble the Main Frame: Connect the metal frame pieces according to the diagrams in the included manual. Secure with the provided screws, but do not fully tighten until all major components are in place.
- Attach Shelves: Carefully place the particleboard shelves onto the designated frame sections. Secure them with screws. Ensure the power outlet panel is correctly oriented on its shelf.
- Install Cross Braces: Attach the X-shaped cross braces to the back of the frame for enhanced stability.
- Install Wire Basket and S-Hooks: Slide the wire basket into its designated slot. Attach the S-hooks to the side bars as desired.
- Adjust Feet: Once the rack is assembled and in its desired location, adjust the leveling feet at the bottom to ensure the rack is stable and does not wobble.
- Secure to Wall (Optional but Recommended): Use the provided wall anchor kit to secure the top of the rack to a wall. This prevents tipping and adds stability.
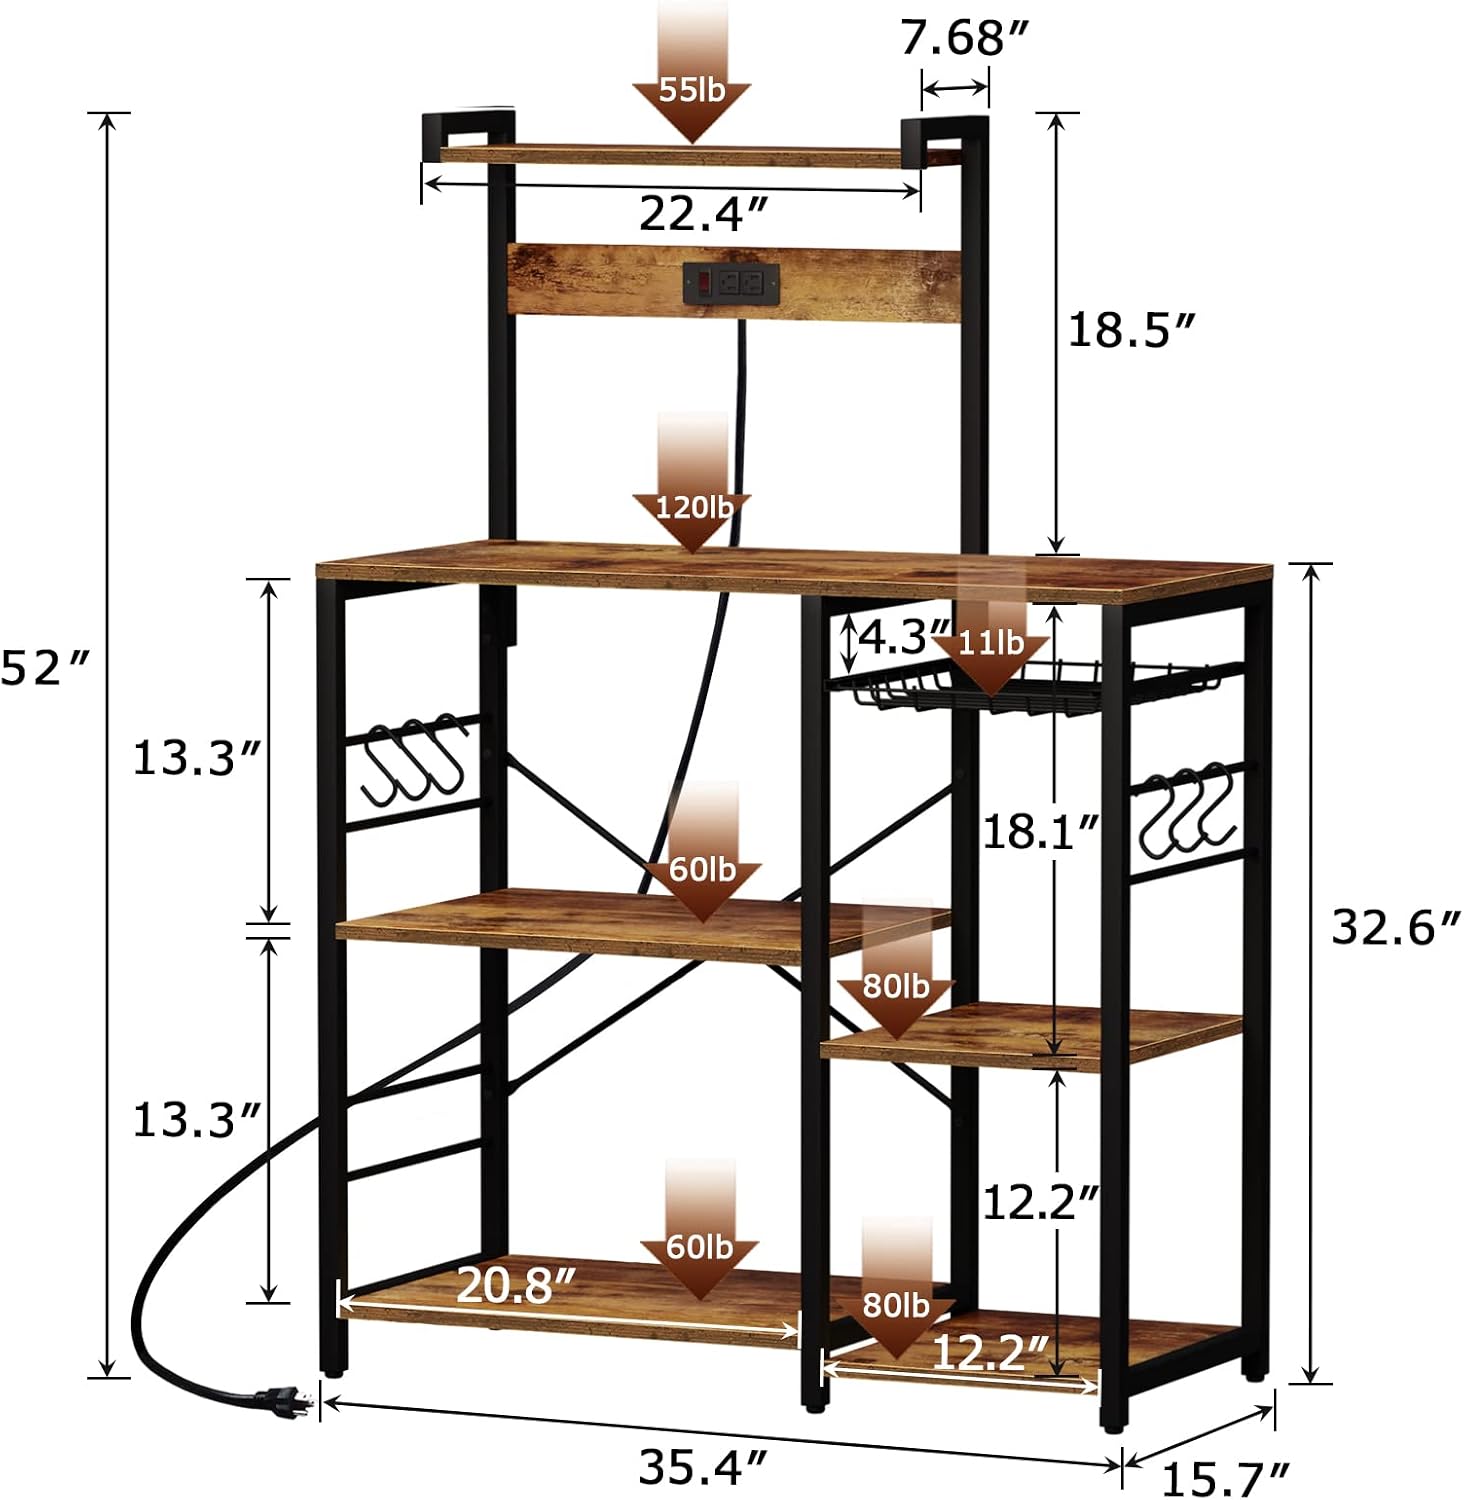
Image 4.1: Product dimensions and individual shelf weight capacities.

Image 4.2: Detail of the X-brace for stability.

Image 4.3: Adjustable foot for leveling the rack.
Assembly Video
Video 4.4: An overview of the SUPERJARE Bakers Rack with Power Outlet, demonstrating its features and potential uses. This video is provided by Huuger Direct.
5. Operating Instructions
5.1 Using the Power Outlets
The bakers rack includes a built-in power strip with two AC outlets and a master switch.
- Connecting Appliances: Plug your small kitchen appliances (e.g., coffee maker, toaster, microwave) into the two AC outlets.
- Power Switch: Use the red master switch to turn power to both outlets on or off. This provides a convenient way to power down multiple appliances simultaneously without unplugging them individually.
- Power Cord: The rack features a 6.5-foot power cord for flexible placement.

Image 5.1: Detail of the power outlet unit with two AC outlets and a power switch.
5.2 Utilizing Storage Features
- Top Perch: Ideal for lightweight items such as spice bottles, small decorative plants, or frequently used condiments.
- Main Countertop: Provides a spacious area for larger appliances like microwaves, coffee machines, or blenders.
- Lower Shelves: Use these for storing pots, pans, cookbooks, or other kitchen gadgets. The varied heights accommodate different item sizes.
- Wire Basket: The slide-out wire basket is suitable for storing fruits, vegetables, or other items that benefit from air circulation.
- S-Hooks: Hang kitchen utensils, oven mitts, mugs, or towels on the six included S-hooks for easy access and organization.

Image 5.2: The slide-out wire basket feature.

Image 5.3: Features including the top perch, S-hooks, and adjustable feet.
6. Maintenance
- Cleaning: Wipe down the particleboard surfaces with a soft, damp cloth. Avoid abrasive cleaners or harsh chemicals that could damage the finish. For metal parts, use a mild detergent if necessary and dry thoroughly.
- Spills: Clean up spills immediately to prevent water damage or staining on the particleboard.
- Regular Checks: Periodically check all screws and connections to ensure they remain tight. Retighten if necessary to maintain stability.
- Power Outlet Care: Keep the power outlets clean and free of dust. Do not insert foreign objects into the outlets.
7. Troubleshooting
- Rack is Unstable/Wobbles:
- Ensure the rack is on a level surface. Adjust the leveling feet at the bottom until stable.
- Check all assembly screws and bolts. Tighten any loose connections.
- Verify that the X-braces are correctly installed and tightened at the back of the unit.
- Consider using the wall anchor kit to secure the rack to a wall for maximum stability.
- Power Outlets Not Working:
- Ensure the main power cord is securely plugged into a functional wall outlet.
- Check the red master switch on the power strip; ensure it is in the 'ON' position.
- If only one outlet is not working, or power is intermittent, there may be an internal issue with the power strip. Discontinue use and contact customer support.
- Avoid overloading the outlets with high-wattage appliances simultaneously.
- Missing or Damaged Parts:
- Review the package contents list. If parts are missing or damaged upon arrival, contact SUPERJARE customer support immediately for replacements.
8. Specifications
| Brand | SUPERJARE |
| Model Number | B09K46CPJY |
| Material | P2 Particleboard, Metal |
| Color | Vintage Brown |
| Product Dimensions (D x W x H) | 15.7" x 35.4" x 52" |
| Item Weight | 16 ounces (Note: This may refer to packaging weight, actual product weight is typically higher for furniture of this size.) |
| Number of Shelves | 6 |
| Shelf Type | Tiered Shelf |
| Shelf Weight Capacity | Up to 120 pounds (main countertop), 55 pounds (top perch), other shelves vary (60-80 pounds). Refer to Image 4.1 for detailed breakdown. |
| Power Outlets | 2 AC Outlets with 1 Master Switch |
| Power Cord Length | 6.5 feet |
| Special Feature | Heavy Duty, Integrated Power Outlet |
9. Warranty and Support
For warranty information, product support, or to report missing/damaged parts, please contact SUPERJARE customer service directly. Refer to the packaging or the retailer's website for specific contact details.
Please have your model number (B09K46CPJY) and purchase date available when contacting support.