
Airide W217602715
Firestone Airide 2715 Rear Air Springs Kit User Manual
Model: W217602715
Introduction
The Firestone Airide 2715 Rear Air Springs Kit is engineered to enhance the load-carrying capacity, stability, and overall ride quality of your vehicle. Utilizing Firestone's proven air spring technology, this system is designed for commercial-grade durability and reliability. This manual provides essential information for the proper installation, operation, and maintenance of your air spring system.
Safety Information
Always prioritize safety during installation and operation. Read all instructions thoroughly before beginning. Failure to follow safety precautions may result in injury or damage to the product or vehicle.
- Ensure the vehicle is securely supported on jack stands before working underneath.
- Wear appropriate personal protective equipment, including safety glasses and gloves.
- Do not exceed the vehicle's Gross Vehicle Weight Rating (GVWR) or the air spring system's maximum load capacity of 7,500 lbs.
- Regularly inspect the air springs and air lines for signs of wear, damage, or leaks.
- Maintain proper air pressure as specified in the operating instructions.
Product Overview and Components
The Firestone Airide 2715 kit includes all necessary components for installation. Familiarize yourself with the parts before proceeding.

Figure 1: Overview of all components included in the Firestone Airide 2715 Rear Air Springs Kit. This includes two air springs, various mounting brackets, air lines, fittings, and hardware.
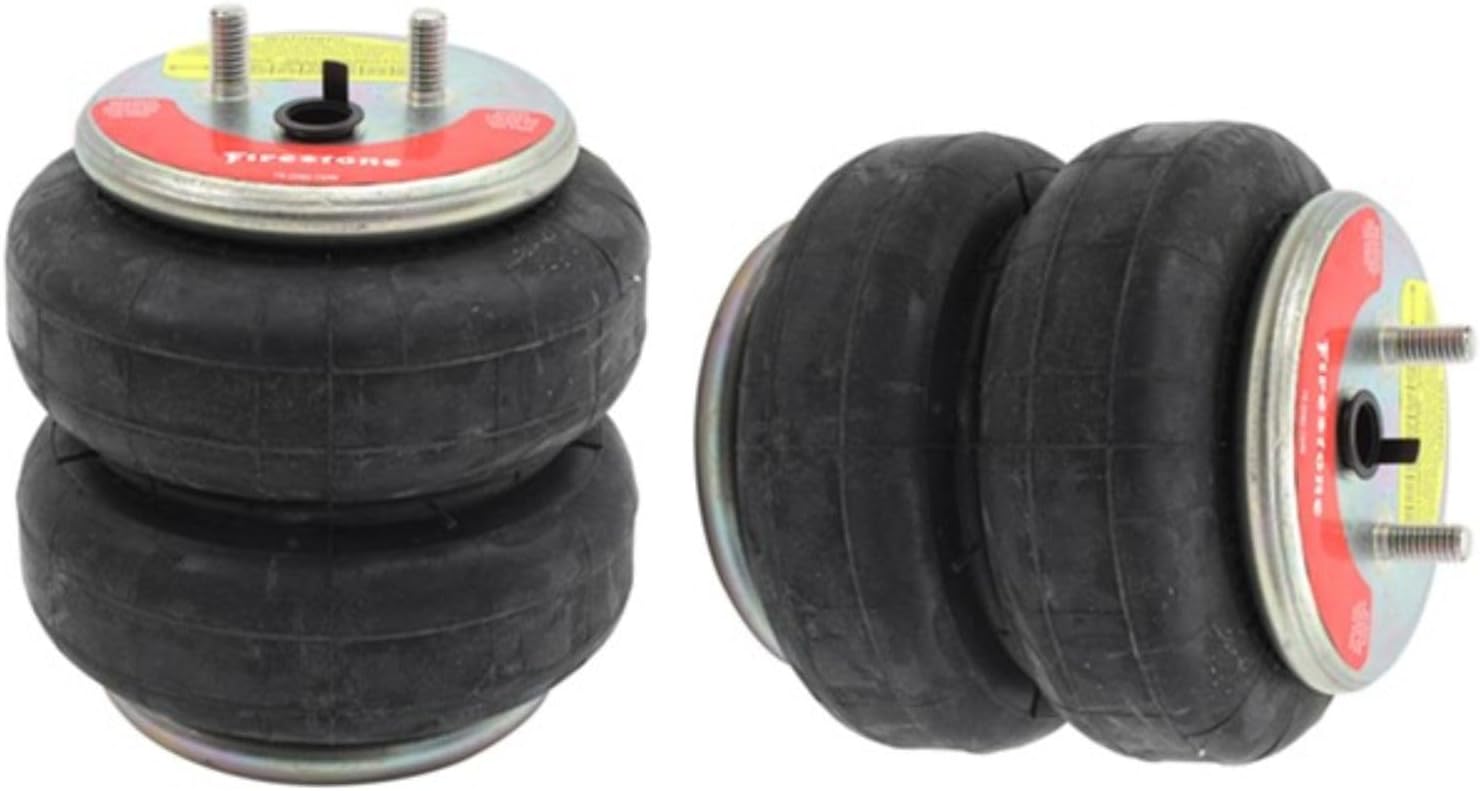
Figure 2: Detailed view of the two Firestone Airide air springs, which are the core components for load support and ride quality enhancement.

Figure 3: Various mounting brackets, air lines, and connection hardware that facilitate the secure installation of the air springs to the vehicle's frame and suspension.
Key Components:
- Air Springs: Two heavy-duty air springs designed to provide adjustable load support.
- Mounting Brackets: Vehicle-specific brackets for secure attachment to the frame and axle.
- Air Lines and Fittings: Tubing and connectors for routing air from the inflation valves to the air springs.
- Inflation Valves: Individual valves for separate side-to-side or front-to-rear air pressure adjustment.
- Hardware: All necessary bolts, nuts, washers, and other fasteners.
Setup and Installation
The Firestone Airide 2715 kit is designed as a "no-drill" system for most applications, utilizing existing factory holes. Installation typically takes 1 to 2 hours.
Vehicle Compatibility:
This rear air spring kit is compatible with 2012-2025 C3500HD Cab-Chassis commercial vehicles without a factory bed.
Installation Steps (General Guide):
- Prepare Vehicle: Park the vehicle on a level surface, engage the parking brake, and block the wheels. Lift the rear of the vehicle and support it securely with jack stands, allowing the axle to hang freely.
- Assemble Brackets: Attach the upper and lower mounting brackets to the air springs according to the detailed instructions provided in the kit. Ensure all fasteners are tightened to the specified torque.
- Mount Air Springs: Position the assembled air spring units between the vehicle's frame and suspension. Secure the upper brackets to the frame and the lower brackets to the axle using the provided hardware and existing factory holes.
- Install Air Lines: Route the air lines from each air spring to a convenient location for the inflation valves, typically near the rear bumper or license plate. Ensure lines are clear of hot exhaust components, sharp edges, and moving parts. Secure lines with zip ties or clips.
- Install Inflation Valves: Drill a small hole (if necessary, or use existing openings) in the chosen location and mount the inflation valves. Connect the air lines to the valves using the push-to-connect fittings.
- Test System: Inflate the air springs to a low pressure (e.g., 10-20 PSI) and check all connections for air leaks using a soapy water solution. Lower the vehicle to the ground.
- Final Adjustment: Inflate the air springs to the desired operating pressure based on load conditions.

Figure 4: An example of a commercial cab-chassis truck with a flatbed, demonstrating the type of vehicle this air spring kit is designed for and how it integrates with the rear suspension.
Operating Instructions
The Firestone Airide system allows for adjustable air pressure to optimize ride quality and load leveling.
Inflation and Deflation:
- Inflation: Use a standard air compressor or tire inflator to add air to the inflation valves.
- Deflation: Press the center pin of the inflation valve to release air.
Recommended Air Pressure:
- Minimum Pressure: Always maintain a minimum of 5-10 PSI in the air springs to prevent damage.
- Loaded Conditions: Inflate the air springs to level the vehicle and achieve the desired ride quality when carrying a load. Individual inflation valves allow for side-to-side adjustment to compensate for off-center loads.
- Maximum Pressure: Do not exceed the maximum recommended pressure, typically 100 PSI, or the maximum pressure specified on the air spring itself.
- Unloaded Conditions: For optimal ride comfort when unloaded, reduce air pressure to the minimum recommended level.
Proper air pressure helps maintain brake effectiveness and overall vehicle stability.
Maintenance
Regular maintenance ensures the longevity and optimal performance of your Firestone Airide system.
- Monthly Inspection: Check air pressure monthly. Inspect air springs, air lines, and fittings for any signs of wear, cracks, chafing, or leaks.
- Leak Detection: If pressure loss is suspected, spray a soapy water solution on all connections and the air spring surface. Bubbles indicate a leak.
- Cleaning: Keep air springs and surrounding components clean from dirt, debris, and corrosive materials.
- Torque Check: Periodically check the torque on all mounting hardware to ensure they remain secure.
Troubleshooting
Common issues and their potential solutions:
| Problem | Possible Cause | Solution |
|---|---|---|
| Air spring loses pressure | Air leak in line, fitting, or air spring; damaged valve core. | Check all connections with soapy water. Tighten fittings, replace damaged air line sections, or replace valve core. Inspect air spring for punctures or tears. |
| Vehicle not leveling properly | Uneven air pressure; excessive load; air leak on one side. | Adjust air pressure individually for each side. Reduce load if exceeding capacity. Check for leaks on the lower side. |
| Rough ride when unloaded | Too much air pressure when unloaded. | Reduce air pressure to the minimum recommended PSI (5-10 PSI) when the vehicle is unloaded. |
| Difficulty inflating air springs | Clogged air line; faulty inflation valve. | Check air lines for kinks or obstructions. Replace inflation valve if faulty. |
Specifications
| Attribute | Detail |
|---|---|
| Brand | Airide (Firestone) |
| Model Number | W217602715 |
| Product Name | Firestone Ride-Rite - GM Silverado/Sierra 3500HD Cab Chassis |
| Vehicle Compatibility | 2012-2025 C3500HD Cab-Chassis (Commercial Vehicles without factory bed) |
| Load Capacity | Up to 7,500 lbs (Note: Do not exceed vehicle's GVWR) |
| Material | Alloy Steel (Brackets), Rubber (Air Springs) |
| Item Weight | 31.9 Pounds |
| Product Dimensions | 13.5 x 11.5 x 9.2 inches (Packaging/Kit) |
| Installation Type | No-Drill System (most applications) |
| UPC | 767555166628 |
Warranty and Support
Specific warranty details are typically provided with the product packaging or can be obtained directly from Firestone Airide. For technical support, installation assistance, or warranty claims, please refer to the contact information provided by the manufacturer or your authorized dealer.

Figure 5: The official Ride-Rite Air Helper Springs logo, representing the product line.
Ask a question about this manual
Ask about setup, troubleshooting, compatibility, parts, safety, or missing instructions. Manuals+ will review the question and use this page’s manual context to help answer it.