1. Introduction
Thank you for choosing the Chatthen MC-03 Door/Window Alarm. This wireless magnetic alarm system is designed to enhance the security of your home, office, or store. Featuring a powerful 130dB siren and a convenient remote control, it provides effective protection against unauthorized entry and offers various alert modes for different needs. Please read this manual carefully to ensure proper installation and operation.
2. Product Overview
2.1 Components
- Main Alarm Unit (with siren)
- Magnetic Strip
- Remote Control
- Double-sided Adhesive Tape
2.2 Key Features
- 130dB Loud Siren: Deters intruders effectively.
- Wireless Remote Control: Arm, disarm, switch modes, and activate SOS function from up to 15 meters away.
- Three Alarm Modes: Choose between Anti-theft Mode, Doorbell Mode, and Reminder Mode.
- Low Battery Indicator: Alerts you when batteries need replacement.
- Easy Installation: Self-adhesive design requires no tools.

Image 2.1: Main alarm unit, magnetic strip, and remote control.

Image 2.2: Product parameters and appearance details, showing the speaker, battery hole, light, magnet, power button on the alarm unit, and lock, unlock, function, and SOS buttons on the remote control.
3. Setup
3.1 Battery Installation
The main alarm unit requires 2 AAA batteries (included). The remote control requires 2 CR2032 batteries (not included, please purchase separately).
- Open the battery compartment on the back of the main alarm unit.
- Insert 2 AAA batteries, ensuring correct polarity (+/-).
- Close the battery compartment.
- For the remote control, open its battery compartment and insert 2 CR2032 batteries, observing polarity.

Image 3.1: Battery installation in the main alarm unit.
3.2 Mounting the Alarm
The alarm unit and magnetic strip are installed using the provided double-sided adhesive tape. No tools are required.
- Identify the desired location on your door, window, or cabinet. Ensure the surfaces are clean and dry.
- Attach the double-sided adhesive tape to the back of both the main alarm unit and the magnetic strip.
- Mount the main alarm unit on the door/window frame.
- Mount the magnetic strip on the moving part of the door/window, aligning it with the main alarm unit.
- Important: Ensure the gap between the main alarm unit and the magnetic strip is less than 1 cm when the door/window is closed. A larger gap will prevent proper function.

Image 3.2: Proper alignment and installation of the alarm unit and magnetic strip.
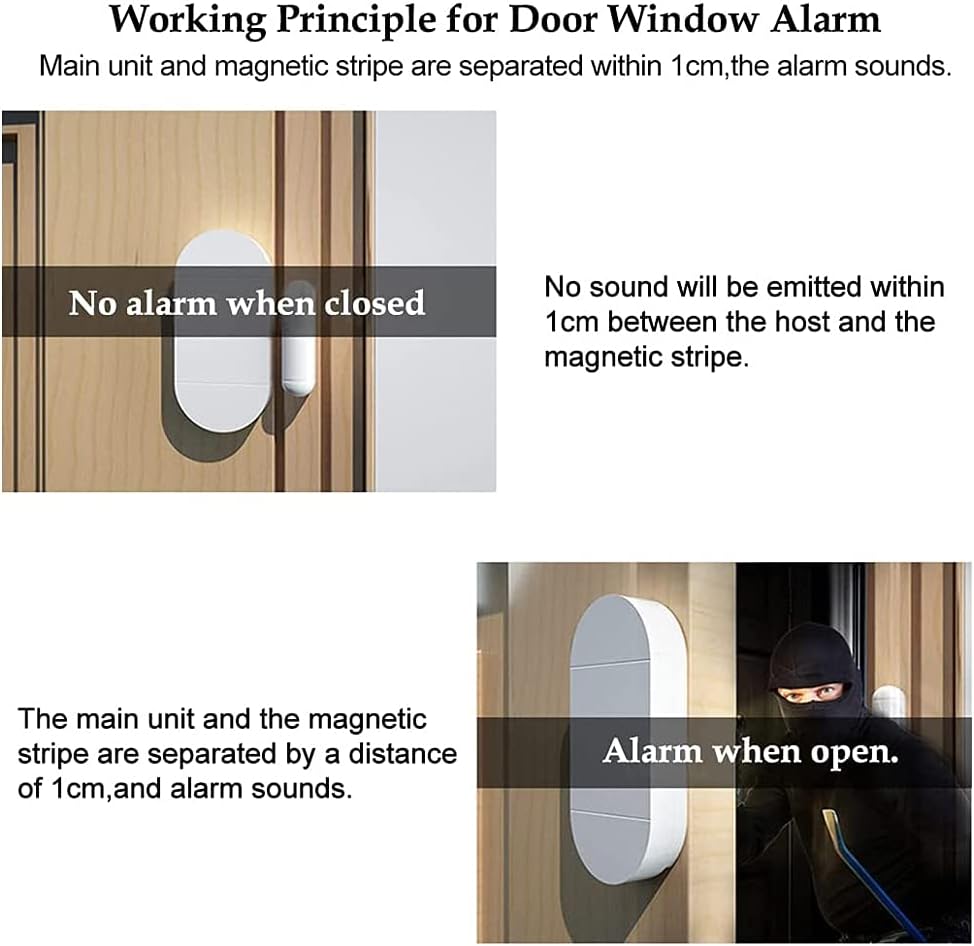
Image 3.3: Working principle of the door/window alarm.
4. Operating Instructions
The alarm system is controlled via the remote control. The maximum control distance is 15 meters without interference.

Image 4.1: Remote control functions.
4.1 Remote Control Functions
- Arm Button (Lock Icon): Press to activate the alarm system. The alarm will sound for 30 seconds if triggered.
- Disarm Button (Unlock Icon): Press to deactivate the alarm system and clear any active alarm.
- Function Button (House Icon): Press to cycle through the three alarm modes:
- Mode 1: Anti-theft Mode (Siren Continue) - Continuous 130dB siren when triggered.
- Mode 2: Doorbell Mode (Dingdong Sound) - Emits a 'dingdong' sound when triggered, suitable for entry reminders.
- Mode 3: Reminder Mode (Di Di Intermittent Alert) - Emits an intermittent 'Di Di' sound when triggered.
- SOS Button (SOS Icon): Press in an emergency to immediately trigger the 130dB siren, regardless of the current arming status.
4.2 Using the Alarm
- To Arm: Press the Arm button on the remote control. The alarm unit will emit a confirmation sound.
- To Disarm: Press the Disarm button on the remote control. The alarm unit will emit a confirmation sound.
- To Change Mode: Press the Function button repeatedly to cycle through the three modes. The alarm unit will indicate the current mode with a specific sound.
- Emergency SOS: In an emergency, press the SOS button to activate the siren immediately.

Image 4.2: Various operational scenarios for the alarm system.
5. Maintenance
5.1 Battery Replacement
The alarm unit features a low battery indicator. When the battery voltage drops below 2.4V, the alarm will emit a "DiDi" sound to remind you to replace the batteries. Replace the 2 AAA batteries in the main alarm unit and the 2 CR2032 batteries in the remote control as needed to ensure optimal performance.

Image 5.1: Low battery indicator.
5.2 Cleaning
Wipe the alarm unit and remote control with a soft, dry cloth. Do not use abrasive cleaners or immerse the devices in water.
6. Troubleshooting
| Problem | Possible Cause | Solution |
|---|---|---|
| Alarm does not sound when door/window opens. | 1. Gap between alarm unit and magnetic strip is too large. 2. Batteries are low or depleted. 3. Alarm is in Disarm mode. | 1. Adjust placement to ensure gap is less than 1 cm. 2. Replace batteries in the main alarm unit. 3. Press the Arm button on the remote control. |
| Remote control is not working. | 1. Remote control batteries are low or depleted. 2. Out of range. | 1. Replace CR2032 batteries in the remote control. 2. Move closer to the alarm unit (within 15 meters). |
| Alarm emits "DiDi" sound periodically. | Low battery indicator. | Replace the 2 AAA batteries in the main alarm unit. |
7. Specifications
| Feature | Specification |
|---|---|
| Model Number | MC-03 |
| Brand | Chatthen |
| Dimensions (Alarm Unit) | 9 x 4 x 5 cm |
| Weight | 120 grams |
| Power Source (Alarm Unit) | 2 x AAA Batteries |
| Power Source (Remote Control) | 2 x CR2032 Batteries |
| Voltage | 3 Volts (DC) |
| Sound Level | 130 Decibels |
| Installation Method | Self-adhesive |
| Control Method | Remote Control |
| Maximum Range (Remote) | 15 Meters |
8. Warranty and Support
Warranty information for the Chatthen MC-03 Door/Window Alarm is not provided in the product data. For any warranty claims or technical support, please contact the seller or manufacturer directly through your purchase platform.


