
Introduction
This manual provides important information regarding the safe operation, installation, and maintenance of your Power Dynamics DS65MB 2-Way Bluetooth Speaker system. Please read this manual thoroughly before using the product to ensure proper function and to prevent damage.
Safety Instructions
- Read all instructions carefully before use.
- Keep this manual for future reference.
- Do not expose the speakers to rain or moisture.
- Ensure proper ventilation around the speakers.
- Only connect to a grounded mains outlet with the correct voltage (230V/50Hz).
- Do not open the speaker casing; there are no user-serviceable parts inside.
- Avoid placing the speakers near heat sources or in direct sunlight.
Product Features
- Set of 2 speakers (1 active, 1 passive)
- Built-in Class D stereo amplifier
- Bluetooth for wireless audio streaming
- Integrated USB MP3 player
- 2-way speaker design (woofer and tweeter)
- Bass reflex system for enhanced low frequencies
- Line input (RCA) and microphone input (6.3mm jack)
- Adjustable bass, treble, and master volume controls
- Durable metal speaker grilles
- Includes mounting brackets and power cable
Package Contents
- 1x Active DS65MB Speaker
- 1x Passive DS65MB Speaker
- Mounting Brackets
- Power Cable
- Speaker Cable (for connecting active to passive speaker)
- User Manual

Image: The Power Dynamics DS65MB speaker pair, illustrating their front grilles and overall design.
Setup and Installation
Mounting the Speakers
The DS65MB speakers are supplied with adjustable mounting brackets for flexible installation. They can be mounted horizontally or vertically on walls or ceilings.

Image: A single Power Dynamics DS65MB speaker shown with its adjustable mounting bracket and hardware.
- Attach the bracket to the speaker using the provided knob.
- Secure the bracket to your desired mounting surface (wall or ceiling) using appropriate screws and anchors (not included). Ensure the surface can support the speaker's weight.
- Adjust the speaker angle as desired and tighten the knob to secure its position.
Connecting the Speakers
The system comprises one active speaker, which houses the amplifier and controls, and one passive speaker.

Image: A pair of Power Dynamics DS65MB speakers, illustrating their design and how they can be positioned.
- Connect the passive speaker to the active speaker using the supplied speaker cable. Ensure correct polarity (+ to + and - to -).
- Connect the active speaker to a standard power outlet (230V/50Hz) using the included power cable.
Operating Instructions
Control Panel Overview
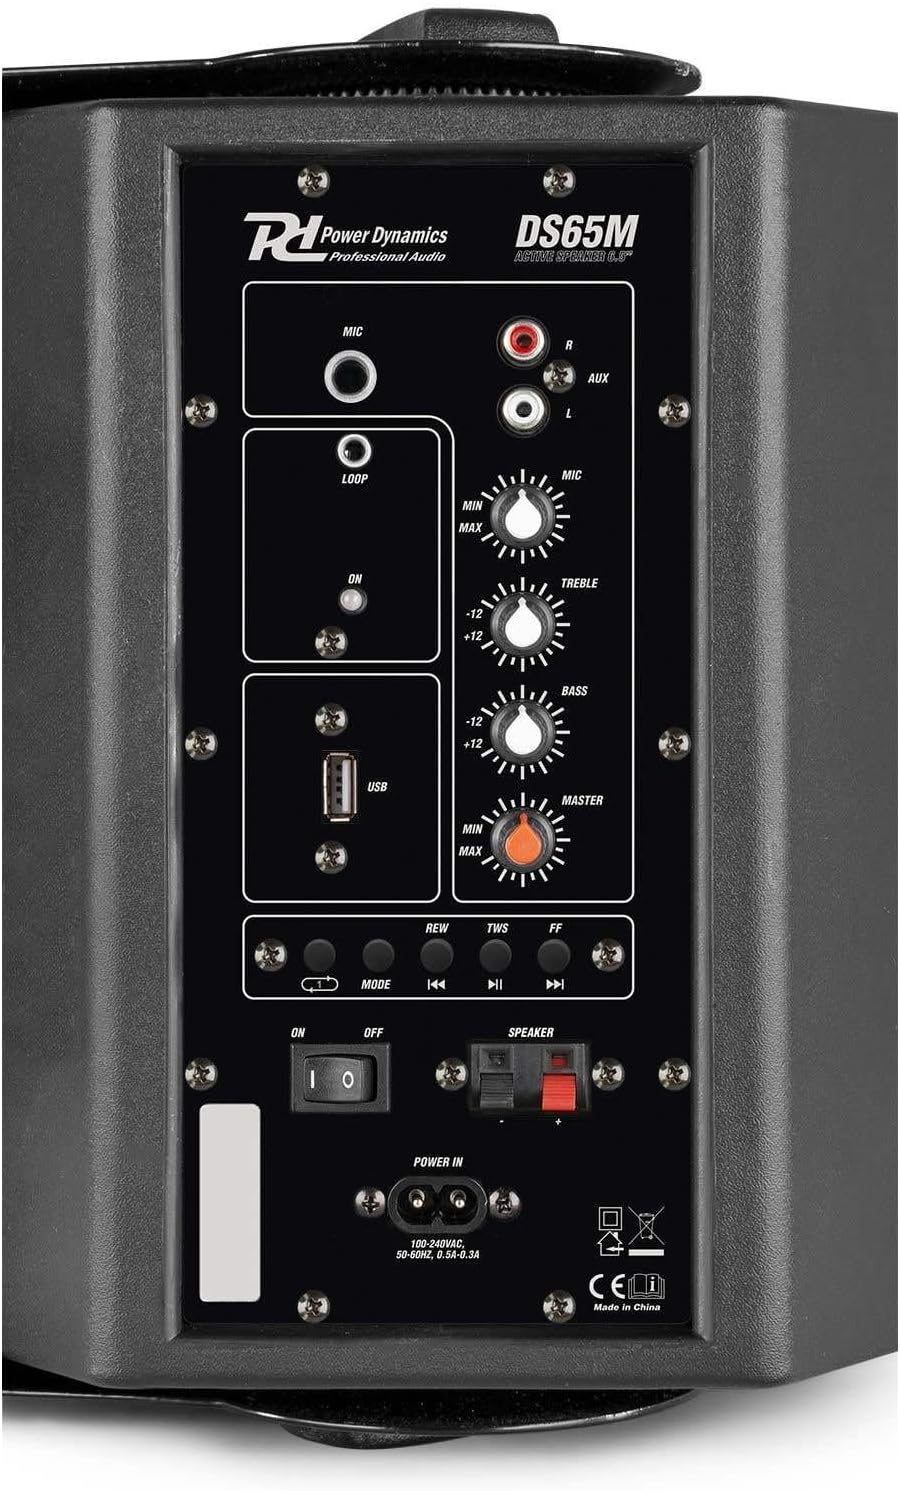
Image: The rear control panel of the active Power Dynamics DS65MB speaker, showing microphone input, AUX input, USB port, and various control knobs for volume, treble, and bass.
- MIC Input: 6.3mm jack for connecting a microphone.
- AUX Input (RCA): For connecting external audio sources like CD players or mixers.
- USB Port: For playing MP3 audio files directly from a USB flash drive.
- MODE Button: Press to cycle through input modes: Bluetooth, USB, AUX.
- Volume Control (MASTER): Adjusts the overall output volume of the speaker system.
- TREBLE Control: Adjusts the high-frequency response of the audio.
- BASS Control: Adjusts the low-frequency response of the audio.
- Power Switch: Turns the speaker system on or off.
Bluetooth Connection
- Turn on the active speaker using the power switch.
- Press the MODE button repeatedly until "Bluetooth" mode is selected. The indicator light will flash.
- On your Bluetooth-enabled device (e.g., smartphone, tablet), search for available devices and select "DS65MB" to pair.
- Once successfully connected, you can stream audio wirelessly to the speakers.
USB MP3 Playback
- Insert a USB flash drive containing MP3 audio files into the USB port.
- Press the MODE button repeatedly until "USB" mode is selected.
- Use the playback control buttons (REW, TWS, FF) on the control panel to navigate and play tracks.
Line Input (AUX)
- Connect your external audio source (e.g., CD player, mixer) to the RCA AUX input on the active speaker using an appropriate cable.
- Press the MODE button repeatedly until "AUX" mode is selected.
- Play audio from your connected device.
Microphone Usage
- Connect a microphone to the 6.3mm MIC input jack.
- Adjust the dedicated MIC volume knob on the control panel to achieve the desired microphone level.
Maintenance
- Clean the speaker cabinets with a soft, dry, lint-free cloth.
- Do not use abrasive cleaners, solvents, or strong detergents, as these may damage the finish.
- Ensure that the speaker grilles are free from dust and debris to maintain optimal sound quality.
- Store the speakers in a cool, dry place when not in use for extended periods.
Troubleshooting
| Problem | Possible Cause | Solution |
|---|---|---|
| No power | Power cable not connected; Power outlet faulty | Ensure power cable is securely plugged in; Try a different power outlet |
| No sound output | Incorrect input mode selected; Volume too low; Speaker cables loose/incorrectly connected | Press MODE to select the correct input; Increase MASTER volume; Check speaker cable connections (active to passive) and polarity |
| Bluetooth not connecting | Speaker not in Bluetooth pairing mode; Device too far from speaker; Bluetooth on device is off | Ensure speaker is in Bluetooth mode (flashing indicator); Move device closer to speaker; Enable Bluetooth on your device |
| Distorted sound | Volume too high (clipping); Faulty audio cable; Source audio quality is poor | Reduce MASTER volume; Try a different audio cable; Check the quality of the audio source |
Specifications
| Feature | Specification |
|---|---|
| Max. Power | 125 W |
| RMS Power | 60 W |
| Woofer Size | 6.5 inches |
| Tweeter Size | 1/2 inch |
| Frequency Range | 60 Hz - 16,000 Hz |
| SPL @ 1w/1m | 87 dB |
| Line Input | RCA |
| Microphone Connection | 6.3 mm Jack |
| Connection Voltage | 230 V / 50 Hz |
| Dimensions (per speaker) | 22 x 20 x 29 cm |
| Weight (per speaker) | 4.4 kg |
| Model Number | DS65MB |
| Manufacturer | Tronios B.V. |
Warranty and Support
For warranty information and technical support, please refer to the documentation provided with your purchase or contact your retailer. Keep your proof of purchase for any warranty claims.


