
1. Introduction
This manual provides instructions for the safe and efficient operation of your MYPIN Smart Pet Feeder. Please read this manual thoroughly before use and retain it for future reference.
The MYPIN Smart Pet Feeder is designed to automatically dispense dry pet food, allowing you to manage your pet's feeding schedule remotely via a mobile application. It features a 6-liter capacity, programmable timer, and voice recording function.
2. Important Safety Instructions
- Read all instructions before operating the appliance.
- Do not immerse the main unit in water or other liquids.
- This appliance is intended for indoor use only.
- Use only dry pet food with a diameter up to 15mm. Do not use wet food.
- Keep out of reach of children and pets to prevent tampering.
- Ensure the power adapter is securely connected and the power cord is not damaged.
- Install D-cell alkaline batteries for backup power in case of power outages (batteries not included).
- Clean the removable parts regularly to maintain hygiene.
3. Product Overview
Familiarize yourself with the components of your MYPIN Smart Pet Feeder.

Figure 3.1: Front and side view of the MYPIN Smart Pet Feeder with labels for Visible Cover, Cover Knob, 6L Visible Food Container, Body, Indicator Light, Buzzer, Mic, Recording button, Manual Feed button, Wi-Fi Settings button, Food Outlet, Removable Feeding Tray, Battery Compartment, Speaker, Power Cable, and Power Socket.
- Visible Cover: Protects the food and allows visibility of food level.
- 6L Visible Food Container: Holds up to 6 liters of dry pet food.
- Indicator Light: Displays device status (e.g., Wi-Fi connection, low food).
- Mic: Microphone for recording voice messages.
- Recording Button: Initiates voice recording.
- Manual Feed Button: Dispenses a single portion of food immediately.
- Wi-Fi Settings Button: Used for Wi-Fi pairing.
- Food Outlet: Where food is dispensed into the tray.
- Removable Feeding Tray: Collects dispensed food.
- Battery Compartment: Holds 3 D-cell batteries for backup power.
- Power Socket: Connects to the 5V DC power adapter.
4. Setup
4.1 Unpacking and Assembly
- Remove all components from the packaging.
- Ensure all parts are present: main feeder unit, food container, feeding tray, power adapter, and quick start guide.
- Attach the feeding tray to the main unit.
- Place the food container onto the main unit.
4.2 Powering the Feeder
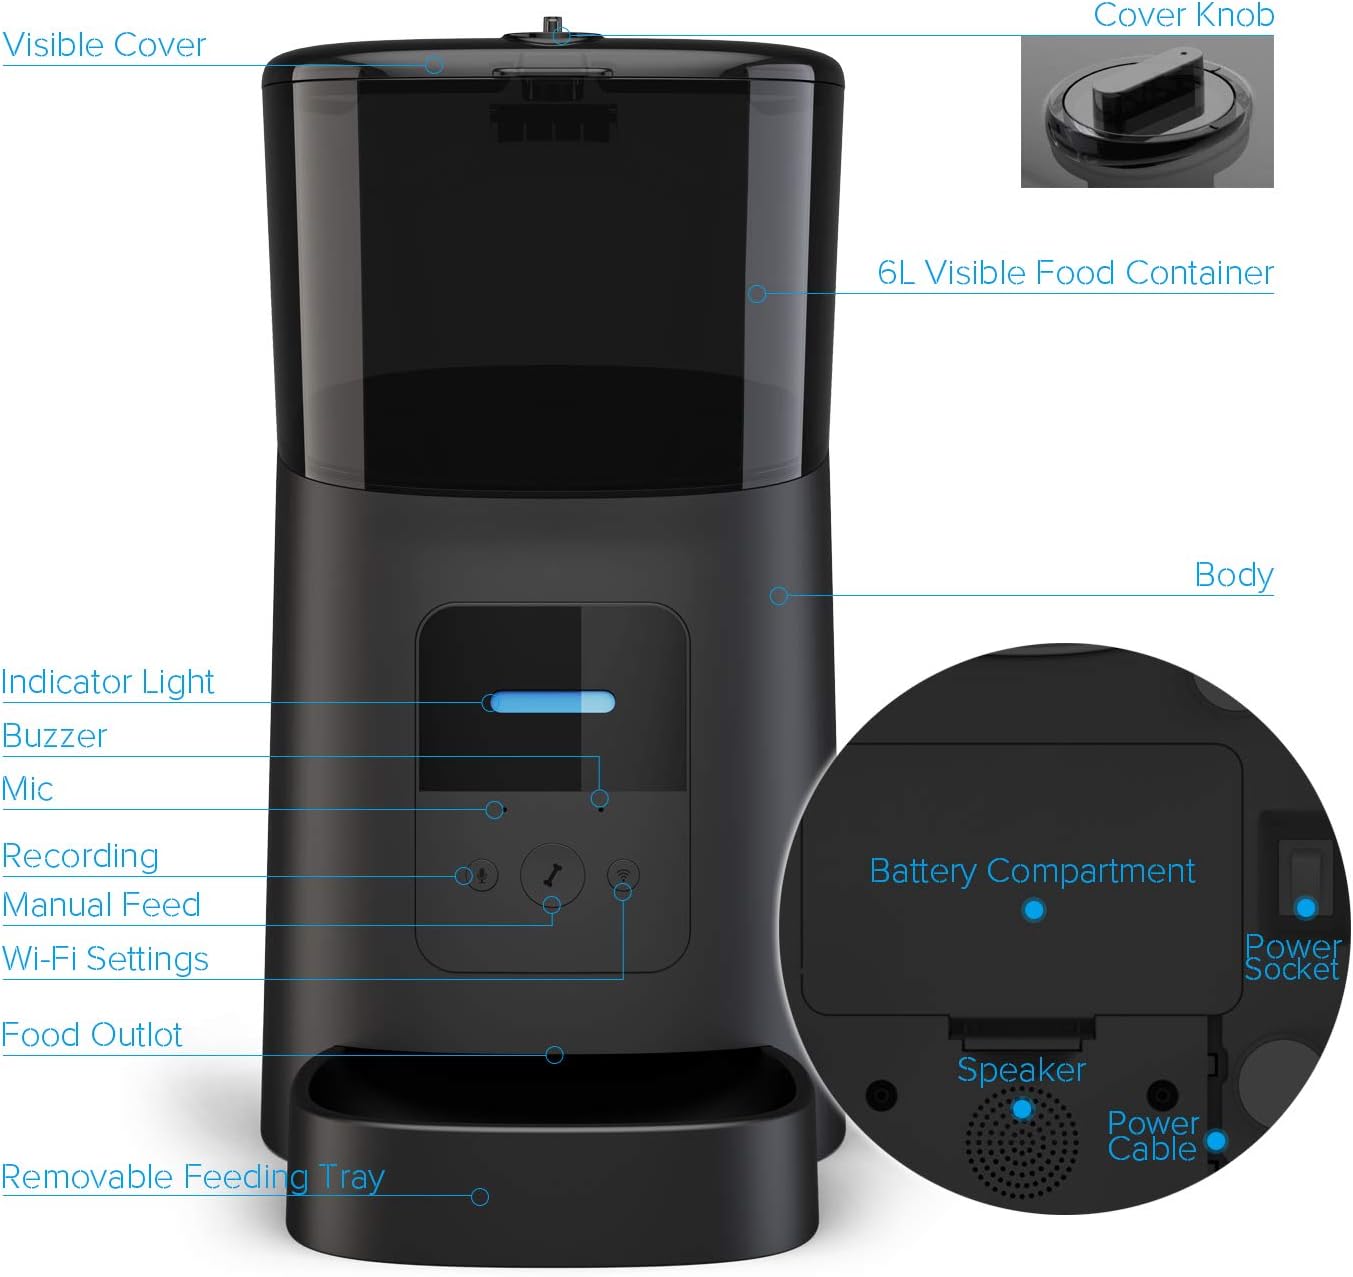
Figure 4.1: Illustration of the dual power protection system, showing the DC power supply connection and the battery compartment for 3 D-cell batteries.
- Primary Power: Connect the 5V DC power adapter to the power socket on the feeder and plug it into a wall outlet.
- Backup Power (Optional but Recommended): Open the battery compartment and insert 3 D-cell alkaline batteries (not included). This ensures continuous operation during power outages.
4.3 Filling the Food Container
- Open the visible cover on top of the feeder.
- Pour dry pet food into the 6L food container. Ensure the food kibble size is suitable (up to 15mm diameter).
- Close the cover securely.
4.4 App Installation and Wi-Fi Connection
The MYPIN Smart Pet Feeder requires the "Pet Zero" app for full functionality.

Figure 4.2: Visual guide for downloading the "Pet Zero" app and initiating the Wi-Fi connection process, showing the feeder's indicator light changing from red to green upon successful connection.
- Download the App: Search for "Pet Zero" in the App Store (iOS) or Google Play Store (Android), or scan the QR code provided in the quick start guide. You can also use this link: Pet Zero App Download.
- Register/Login: Open the app and create a new account or log in with an existing one.
- Add Device: Tap "Add Device" or the "+" icon. Select "Add Manually" and choose "Pet Feeder Wi-Fi".
- Wi-Fi Pairing (EZ Mode):
- Check if the feeder's LED indicator is blinking red twice per second. If yes, tap "Indicator blinks quickly" in the app.
- If not, press and hold the Wi-Fi Settings button on the feeder for 3 seconds until you hear a beep and the LED indicator blinks rapidly.
- Enter your 2.4GHz Wi-Fi network password in the app and tap "Confirm".
- The feeder will attempt to connect. Once connected, the indicator light will turn solid green. Tap "Done" in the app.
- Alternative Pairing: If EZ Mode fails, the app may offer AP Mode or Auto Scan Mode. Follow the on-screen instructions for these methods.
5. Operating Instructions
5.1 Manual Feeding
- Via Feeder Button: Press the "Manual Feed" button on the feeder to dispense one portion of food immediately.
- Via App: Open the "Pet Zero" app, select your feeder, and tap the "Manual Feed" option to dispense food remotely.
5.2 Setting Up Feeding Schedules

Figure 5.1: The "Pet Zero" app interface demonstrating how to set feeding schedules and review feeding records.
- Open the "Pet Zero" app and select your feeder.
- Navigate to the scheduling section.
- Add new feeding times. You can set up to 15 meals per day.
- For each meal, specify the time and the number of portions (each portion is approximately 10g).
- Save your schedule. The feeder will automatically dispense food at the programmed times.
5.3 Voice Recording
You can record a 10-second voice message that will play at each scheduled feeding time to call your pet.
- Press and hold the "Recording" button on the feeder.
- Speak your message into the microphone.
- Release the button when finished. The message will be saved.
- You can also manage voice recordings through the "Pet Zero" app.
5.4 Low Food Alarm
The feeder is equipped with an infrared sensor to detect low food levels. When the food level is low, you will receive a notification via the "Pet Zero" app.
5.5 Anti-Jamming Mechanism

Figure 5.2: An illustration showing the internal gear structure and the auto-reversal function that prevents food from getting stuck during dispensing.
The feeder features an upgraded hard gear structure with an intelligent auto-reversal mechanism. If food becomes stuck during dispensing, the mechanism will automatically reverse to clear the obstruction and ensure smooth food delivery.
6. Maintenance and Cleaning
Regular cleaning is essential for hygiene and optimal performance of your pet feeder.
Figure 6.1: The pet feeder disassembled into its main components (food container, main body, feeding tray) for easy cleaning.
- Disassembly: Unplug the feeder and remove any remaining food. Detach the food container and the feeding tray from the main unit.
- Cleaning Removable Parts: Wash the food container and feeding tray with mild soap and water. Rinse thoroughly and dry completely before reassembly.
- Cleaning Main Unit: Wipe the main unit with a soft, damp cloth. Do not immerse the main unit in water.
- Reassembly: Once all parts are dry, reassemble the feeder.
7. Troubleshooting
| Problem | Possible Cause | Solution |
|---|---|---|
| Feeder not powering on. | Power adapter not connected; no backup batteries; batteries depleted. | Ensure power adapter is plugged in. Check if backup batteries are installed and charged. |
| Cannot connect to Wi-Fi. | Incorrect Wi-Fi password; 5GHz network used; feeder too far from router; incorrect pairing mode. | Verify Wi-Fi password. Ensure you are using a 2.4GHz network. Move feeder closer to router. Try AP Mode if EZ Mode fails. |
| Food not dispensing. | Food container empty; food stuck; dispensing mechanism blocked; schedule not set correctly. | Refill food container. Check for food jams and clear them. Ensure food kibble size is appropriate. Verify feeding schedule in the app. |
| Low food alarm constantly active. | Food level is genuinely low; sensor obstruction. | Refill food container. Clean the area around the infrared sensor to ensure no debris is blocking it. |
| Voice recording not playing. | No recording saved; volume too low. | Re-record your message. Check app settings for volume control. |
8. Specifications
- Brand: MYPIN
- Model: Smart Pet Feeder 6L
- Capacity: 6 Liters
- Material: Polyethylene Terephthalate, Stainless Steel
- Color: Black
- Connectivity: Wi-Fi (2.4GHz only)
- Power Source: 5V DC Adapter (included), 3 x D-cell alkaline batteries (not included)
- Recommended Food Type: Dry pet food, kibble size up to 15mm
- Max Meals per Day: Up to 15
- Portion Size: Approximately 10g per portion
- Voice Recording: 10 seconds
- Dimensions: Approximately 19.5cm (W) x 36.2cm (H) x 35.8cm (D) (7.7in x 14.3in x 14.1in)

Figure 8.1: Detailed dimensions of the MYPIN Smart Pet Feeder, showing height, width, and depth measurements.
9. Warranty and Support
For warranty information or technical support, please refer to the contact details provided with your purchase or visit the official MYPIN website. Keep your proof of purchase for warranty claims.