
1. Introduction
This manual provides detailed instructions for the assembly, use, and care of your Ozark Trail 22-Piece Camping Tent Combo. This comprehensive set is designed for camping and outdoor recreation, accommodating up to 4 persons. Please read all instructions carefully before setting up and using the product.
2. Package Contents
Your Ozark Trail 22-Piece Camping Tent Combo includes the following items:
- 1 x Camping Tent (4-person capacity)
- 1 x Rainfly
- 8 x Tent Stakes
- 2 x Sleeping Bags
- 2 x Pillows
- 2 x Sleeping Pads
- 2 x Folding Camping Chairs
- 1 x LED Camping Lantern
- 2 x Dry Bags
- 1 x Carry Bag (for the entire combo)

Image 1: The 4-person camping tent, featuring a gray and orange design with a mesh window and door. This is the primary shelter component of the combo.

Image 2: Two gray and orange Ozark Trail folding camping chairs. These chairs provide portable seating for outdoor activities.

Image 3: An orange sleeping bag, shown both unrolled and compactly rolled. Two such sleeping bags are included for overnight comfort.

Image 4: Two gray sleeping pads, shown rolled and unrolled. These provide insulation and cushioning for sleeping inside the tent.

Image 5: A silver and green LED camping lantern. This provides illumination for the tent or campsite.
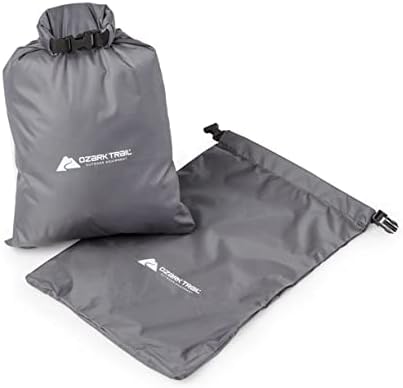
Image 6: Two gray dry bags with the Ozark Trail logo. These bags are designed to keep personal items protected from moisture.
3. Setup Instructions
3.1. Tent Assembly
- Choose a Site: Select a flat, clear area free of sharp objects and debris.
- Unpack: Remove the tent and all components from the carry bag. Lay the tent body flat on the ground with the floor side down.
- Assemble Poles: Connect the shock-corded tent poles by inserting each section fully into the next.
- Insert Poles: Slide the assembled poles through the fabric sleeves on the tent body.
- Secure Poles: Insert the ends of the poles into the pins located at the corners of the tent. Lift the tent to form its dome shape.
- Attach Tent Clips: Secure the tent body to the poles using the plastic clips.
- Position Rainfly: Drape the rainfly over the tent, ensuring the door and window openings align.
- Secure Rainfly: Attach the rainfly buckles or ties to the corresponding points on the tent corners.
- Stake Down: Use the provided tent stakes to secure the tent corners and rainfly guylines firmly to the ground. Ensure all lines are taut to prevent wind damage.
3.2. Chair Setup
- Remove chairs from their individual carry bags.
- Grasp the top and bottom of the chair frame and pull apart until the chair fully extends and locks into place.
3.3. Sleeping Bag and Pad Setup
- Unroll the sleeping pads and place them inside the tent for insulation.
- Unroll the sleeping bags and place them on top of the sleeping pads.
3.4. Lantern Preparation
- Open the battery compartment (usually at the base).
- Insert the required batteries (not included, typically AA or D cells) according to the polarity markings.
- Close the battery compartment securely.
4. Operating Instructions
4.1. Tent Use
- Entry/Exit: Use the tent's zippered door for entry and exit. Ensure zippers are fully closed to keep insects out.
- Ventilation: Utilize the mesh window and door for airflow. Open or close as needed to manage condensation and temperature.
- Rainfly: Keep the rainfly properly secured during rain or heavy dew to ensure waterproofing.
4.2. Chair Use
- Use chairs on stable, level ground.
- Do not exceed the weight capacity of the chair (refer to specifications if available).
4.3. Sleeping Bag Use
- Zip up the sleeping bag fully for maximum warmth.
- Adjust the zipper for ventilation if too warm.
4.4. Lantern Operation
- Press the power button or rotate the dial to turn the lantern on/off and adjust brightness (if applicable).
4.5. Dry Bag Use
- Place items inside the dry bag.
- Roll down the top closure at least three times.
- Secure the buckle to create a watertight seal.
5. Maintenance
5.1. Cleaning
- Tent & Rainfly: Hand wash with mild soap and water. Do not machine wash or use harsh detergents. Air dry completely before packing.
- Sleeping Bags & Pads: Spot clean with mild soap and water. For thorough cleaning, follow specific care instructions on the product label. Ensure completely dry before storage.
- Chairs: Wipe down fabric and frame with a damp cloth.
- Lantern: Wipe exterior with a dry or slightly damp cloth.
5.2. Storage
- Ensure all components are completely dry before packing to prevent mildew and damage.
- Fold the tent and rainfly neatly to fit into the carry bag.
- Store the entire combo in a cool, dry place away from direct sunlight.
5.3. General Care
- Inspect zippers regularly for smooth operation. Clean any debris and apply a zipper lubricant if necessary.
- Check tent poles for bends or cracks. Replace damaged poles promptly.
- Avoid exposing the tent fabric to open flames or extreme heat.
6. Troubleshooting
| Problem | Possible Cause | Solution |
|---|---|---|
| Tent leaks during rain | Rainfly not properly positioned or secured; seam leakage. | Ensure rainfly covers the tent completely and is taut. Apply seam sealer to tent seams if leakage persists. |
| Tent is unstable or sways in wind | Tent not properly staked or guylines are loose. | Ensure all tent stakes are firmly driven into the ground and guylines are taut. Adjust tension as needed. |
| Zipper gets stuck or is difficult to operate | Fabric caught in zipper; dirt or debris in zipper teeth. | Gently pull fabric away from the zipper. Clean zipper teeth with a brush and apply a silicone-based zipper lubricant. |
| LED Lantern does not turn on | Dead or incorrectly inserted batteries. | Check battery polarity and replace with fresh batteries. Ensure battery compartment is securely closed. |
7. Specifications
- Product Name: Ozark Trail 22-Piece Camping Tent Combo
- Occupancy: 4 Person
- Seasons: All Seasons
- Tent Design: Camping Tent (Dome style)
- Installation Type: Free Standing
- Floor Length: 108 Inches
- Maximum Height: 52 Inches
- Floor Area: 63 Square Feet
- Water Resistance Technology: 600 Inch (Waterproof)
- Tent Fabric Type: Mesh (for ventilation)
- Pole Material Type: Steel (Alloy Steel)
- Closure Type: Zipper
- Product Care Instructions: Hand Wash
- Assembly Required: Yes
8. Warranty and Support
Specific warranty information for the Ozark Trail 22-Piece Camping Tent Combo is not available in this document. Please refer to the product packaging or contact the retailer/manufacturer directly for details regarding warranty coverage and customer support.


