1. Introduction
Thank you for choosing the Zapco Z-150.2 SP 2-Channel 550-Watt Super Power Class AB Amplifier. This amplifier is engineered to deliver high-quality audio performance in automotive environments. It features a robust design with advanced cooling technology, ensuring stable operation even under demanding conditions. This manual provides essential information for proper installation, operation, and maintenance of your amplifier.
Key features include:
- 2-Channel Street Power competition amplifier
- Wide range dual crossovers allowing band-pass filtering
- Variable bass boost and subsonic filter
- Proprietary gold panel mount RCA Connectors
- Space-age technology for cooler output devices and ducted air fan cooling system

Figure 1: Front view of the Zapco Z-150.2 SP amplifier, showcasing its robust chassis and branding.
2. Safety Information
Please read all safety instructions carefully before installing and operating your amplifier. Failure to follow these guidelines may result in injury, damage to the amplifier, or damage to your vehicle.
- Professional Installation Recommended: Installation of car audio components requires experience with electrical wiring and automotive systems. If you are unsure, consult a qualified professional.
- Disconnect Battery: Always disconnect the vehicle's negative battery terminal before starting any electrical work to prevent short circuits.
- Proper Wiring: Ensure all power, ground, and speaker wires are of appropriate gauge and securely connected. Loose connections can cause overheating and damage.
- Fusing: Always use the correct fuse rating as specified. Do not replace fuses with higher amperage fuses.
- Ventilation: Mount the amplifier in a location that allows for adequate airflow to prevent overheating. Do not cover the amplifier's cooling fins or fans.
- Avoid Moisture: Do not expose the amplifier to moisture or water.
- Volume Levels: Prolonged exposure to high volume levels can cause hearing damage.
3. Setup and Installation
3.1. Unpacking
Carefully remove the amplifier from its packaging. Verify that all components are present:
- Zapco Z-150.2 SP Amplifier
- Owner's Manual (this document)
- Mounting hardware (if included)
- Dash mount remote gain control (available separately or included depending on package)
3.2. Mounting the Amplifier
Choose a mounting location that provides adequate ventilation and protection from moisture. Common locations include under a seat, in the trunk, or behind a panel.
- Ensure the mounting surface is solid and secure.
- Allow at least 2-3 inches of clearance around the amplifier for proper heat dissipation, especially around the cooling fins and fan vents.
- Avoid mounting the amplifier upside down, as this can impede cooling.
- Use the provided mounting hardware to secure the amplifier firmly.
3.3. Wiring Connections
Refer to the diagrams below for proper wiring connections. Ensure all connections are tight and insulated to prevent short circuits.
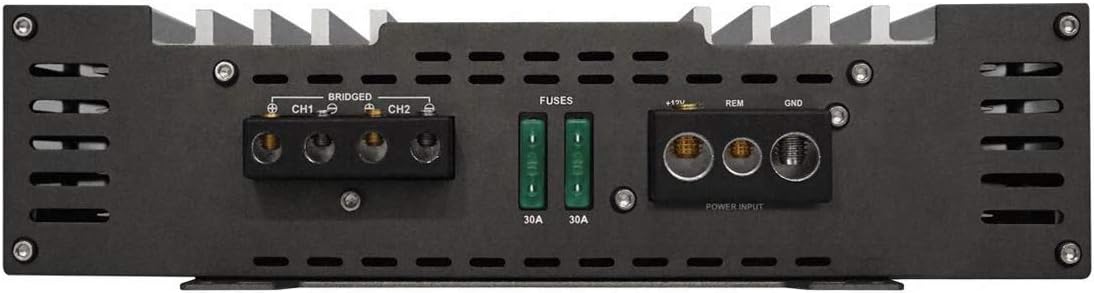
Figure 2: Rear panel of the Zapco Z-150.2 SP amplifier, showing power input terminals, fuses, and speaker output terminals.
3.3.1. Power Input (Figure 2)
- +12V (Power): Connect a heavy gauge wire (e.g., 4 AWG or 8 AWG depending on total system power) directly from the vehicle's positive battery terminal. Install an inline fuse (not supplied) within 18 inches of the battery.
- GND (Ground): Connect a heavy gauge wire of the same size as the +12V wire to a clean, unpainted metal surface on the vehicle chassis. Ensure a good electrical connection.
- REM (Remote Turn-On): Connect a thin gauge wire (e.g., 18 AWG) from the remote turn-on output of your head unit. This wire turns the amplifier on and off with your stereo.
3.3.2. Speaker Output (Figure 2)
Connect your speakers to the CH1 and CH2 terminals. Observe correct polarity (+ to + and - to -).
- Stereo Mode: Connect one speaker to CH1 (+/-) and another to CH2 (+/-). The amplifier supports 2-ohm stereo loads per channel.
- Bridged Mode: For higher power output to a single speaker (e.g., a subwoofer), bridge the channels. Connect the speaker's positive terminal to CH1+ and the negative terminal to CH2-. Ensure the speaker impedance is suitable for bridged operation (typically 4 ohms minimum). The amplifier supports 4-ohm bridged loads.
3.3.3. Signal Input (Figure 3)

Figure 3: Front panel of the Zapco Z-150.2 SP amplifier, detailing RCA inputs, gain controls, crossover settings, bass boost, and remote port.
- RCA Inputs (INPUT CH1/CH2): Connect RCA cables from your head unit's pre-amp outputs to the corresponding RCA inputs on the amplifier.
- RCA Outputs (OUTPUT): These provide a pass-through signal for connecting additional amplifiers.
3.3.4. Fuses (Figure 2)
The amplifier is equipped with two 30A blade-type fuses. These fuses protect the amplifier from electrical overloads. If a fuse blows, replace it only with a fuse of the same rating (30A). Never use a higher rated fuse, as this can cause severe damage to the amplifier or vehicle.
4. Operating the Amplifier
Once installed, the amplifier's performance can be optimized using the controls on the front panel (refer to Figure 3).
4.1. Controls and Adjustments (Figure 3)
- GAIN (Input Sensitivity): This control matches the amplifier's input sensitivity to the output voltage of your head unit. Start with the gain set to minimum (fully counter-clockwise). Play a familiar track at about 75% of your head unit's maximum volume. Slowly increase the amplifier's gain until you hear slight distortion, then back off slightly.
- X-OVER Scale: This switch selects the frequency range for the High-Pass Filter (HPF) and Low-Pass Filter (LPF). Options are typically 15Hz-500Hz or 150Hz-5000Hz (with x10 multiplier).
- HPF (High-Pass Filter): This filter allows frequencies above the set point to pass through to the speakers. Use this for full-range speakers or tweeters to prevent low frequencies from damaging them.
- LPF (Low-Pass Filter): This filter allows frequencies below the set point to pass through. Use this for subwoofers to prevent high frequencies from playing.
- FULL: Bypasses both HPF and LPF, allowing the full frequency range to pass through.
- MULTIPLIER (x1 / x10): Extends the range of the HPF/LPF frequency controls. When set to x10, the frequency knob's value is multiplied by 10.
- BASS BOOST: Provides an adjustable boost to bass frequencies (0-12dB). Use sparingly to avoid distortion and speaker damage.
- SUBSONIC FILTER: Filters out extremely low frequencies that are inaudible and can waste amplifier power or damage subwoofers. Typically set below the LPF frequency for subwoofers.
- REMOTE: Port for connecting an optional dash-mount remote gain control.
4.2. Power Indicators (Figure 3)
- PWR (Green LED): Illuminates when the amplifier is powered on and operating normally.
- PRT (Red LED): Illuminates when the amplifier enters protection mode due to overheating, short circuit, or low voltage. If this light comes on, turn off your audio system, identify and resolve the issue, then restart.
5. Maintenance
The Zapco Z-150.2 SP amplifier is designed for reliable operation with minimal maintenance.
- Cleaning: Periodically wipe the amplifier's exterior with a soft, dry cloth. Do not use harsh chemicals or abrasive cleaners. Ensure cooling fins are free of dust and debris.
- Connections: Occasionally check all power, ground, and speaker connections to ensure they remain tight and free of corrosion.
- Ventilation: Ensure that the amplifier's cooling vents are not obstructed by objects or debris.
6. Troubleshooting
If you experience problems with your amplifier, consult the following troubleshooting guide before contacting technical support.
| Problem | Possible Cause | Solution |
|---|---|---|
| No Power (PWR LED off) |
|
|
| Protection Mode (PRT LED on) |
|
|
| No Sound Output |
|
|
| Distorted Sound |
|
|
7. Specifications
The following are the technical specifications for the Zapco Z-150.2 SP amplifier:
| Feature | Value |
|---|---|
| Channels | 2 |
| Power @ 4 Ohms | 2 x 165 watts |
| Power @ 2 Ohms | 2 x 275 watts |
| Power @ 4 Ohms Bridged | 1 x 550 watts |
| THD @ Rated Power | 0.05% |
| Signal to Noise Ratio | 104dB |
| Channel Separation | 60dB |
| Frequency Response | 10Hz to 30000Hz (±1dB) |
| Input Sensitivity | 0.25V to 8V |
| Dimensions (W x H x D) | 9.48" x 2.44" x 12.91" |
| Item Weight | 6 pounds |
8. Warranty and Support
Zapco products are designed and manufactured to the highest quality standards. For information regarding warranty coverage, terms, and conditions, please refer to the warranty card included with your product or visit the official Zapco website.
For technical support or service inquiries, please contact your authorized Zapco dealer or the Zapco customer service department. Keep your purchase receipt as proof of purchase for warranty claims.


