Introduction
Thank you for choosing the PPLEE CR1018 Digital LED Mirror Alarm Clock. This manual provides essential information for the proper setup, operation, and maintenance of your new alarm clock. Please read it thoroughly before use and retain it for future reference.
Package Contents
Ensure all items are present in the package:
- PPLEE CR1018 Digital LED Mirror Alarm Clock
- Power Adapter
- CR2032 Coin Cell Battery (pre-installed for backup)
- User Manual
Product Overview
Familiarize yourself with the alarm clock's components and controls.

Figure 1: Front view of the alarm clock with its large 8.7-inch LED mirror display.

Figure 2: Top view showing control buttons for Dimmer, Hour, Minute, Time 12H/24H, Snooze, Alarm 1, Alarm 2, Volume/DST, and Alarm Off.

Figure 3: Rear view with DC IN 5V port, two 5V 1A USB charging ports, and the CR2032 battery compartment.
Setup
- Power Connection: Connect the provided power adapter to the DC IN 5V port on the back of the alarm clock and plug it into a standard wall outlet. The display will light up.
- Battery Backup: A CR2032 coin cell battery is pre-installed. This battery serves as a backup to retain time and alarm settings during a power outage. The display will go blank and alarms will not sound during battery backup mode. Ensure the plastic pull tab is removed from the battery compartment if present.
Operating Instructions
Setting the Time
- Press and hold the "SET TIME" button until the hour digits begin to flash.
- Use the "HOUR" and "MINUTE" buttons to adjust the time.
- Press "SET TIME" again to confirm and exit time setting mode.
Setting Alarms (Dual Alarms)
The clock supports two independent alarms (ALARM 1 and ALARM 2).
- Press and hold the "ALARM 1" button until the hour digits for Alarm 1 begin to flash.
- Use the "HOUR" and "MINUTE" buttons to set the desired alarm time.
- Press "ALARM 1" again to confirm and activate Alarm 1. A small alarm icon will appear on the display.
- Repeat steps 1-3 for "ALARM 2" if a second alarm is desired.

Figure 4: Dual alarm functionality allows setting two separate wake-up times.
Snooze Function
When an alarm sounds, press the large "SNOOZE" button to temporarily silence the alarm for 9 minutes. The alarm will sound again after 9 minutes. To turn off the snooze mode, press the "ALARM OFF" button.
Adjusting Brightness (Dimmer)
The display brightness can be adjusted to 8 levels. Press the "DIMMER" button repeatedly to cycle through the brightness levels. If you want a dark mode, switch the clock dimmer to "OFF", and the red indicator on top will stay on.
Adjusting Volume
The alarm volume can be adjusted from 90-110 dB, with 7 levels. Press the "VOLUME" button repeatedly to cycle through the volume levels.

Figure 5: Visual representation of adjustable brightness and volume levels.
12/24H Mode & DST Function
Press the "12/24H" button to switch between 12-hour and 24-hour time formats. Press the "DST" button to activate or deactivate Daylight Saving Time (DST) mode.

Figure 6: Switching between 12-hour, 24-hour, and DST display modes.
USB Charging Ports
The alarm clock is equipped with two 5V 1A USB charging ports on the back. You can use these ports to charge your mobile phone or other USB-powered devices.
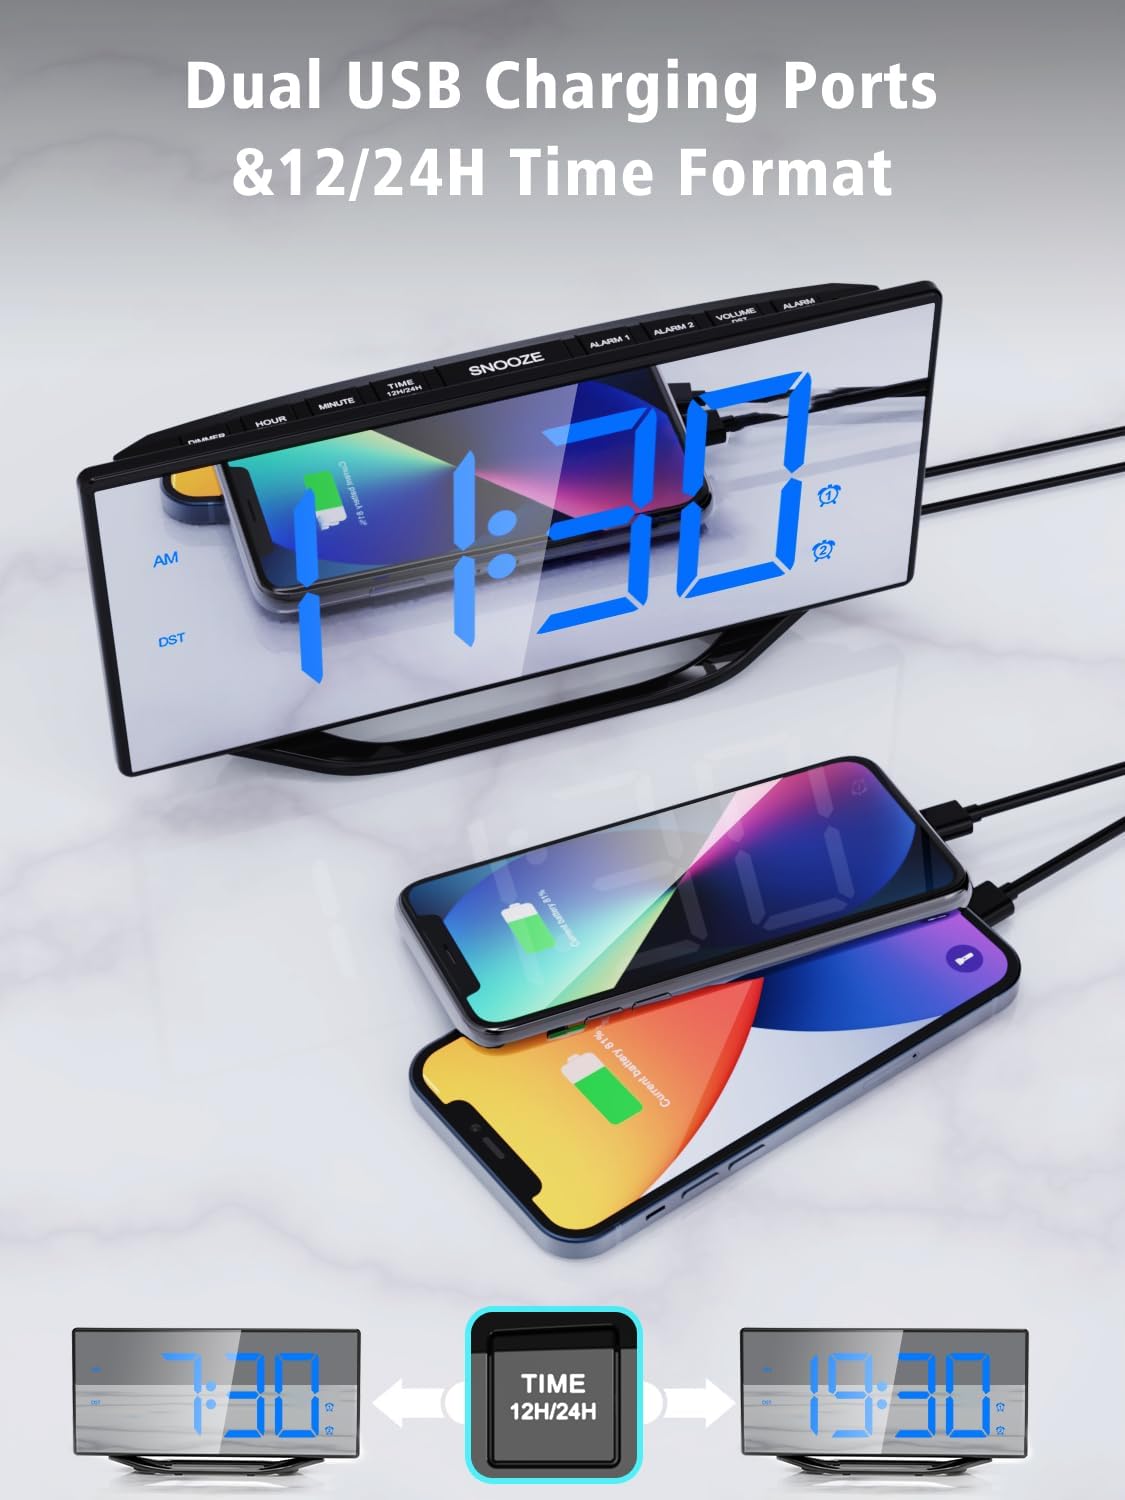
Figure 7: Utilizing the dual USB charging ports for convenience.
Maintenance
- Cleaning: Wipe the mirror display and body with a soft, dry cloth. Avoid abrasive cleaners or solvents.
- Battery Replacement: If the backup battery needs replacement, open the battery compartment on the back, remove the old CR2032 battery, and insert a new one with the correct polarity.
- Storage: If storing the alarm clock for an extended period, disconnect it from power and remove the backup battery.
Troubleshooting
| Problem | Possible Cause | Solution |
|---|---|---|
| Display is blank | No power or power outage. | Ensure the power adapter is securely connected and plugged into a working outlet. If there's a power outage, the backup battery will maintain settings but the display will be off. |
| Alarm does not sound | Alarm is not activated or volume is too low. | Check if the alarm icon is displayed. If not, set the alarm again. Adjust the volume using the "VOLUME" button. |
| Time is incorrect | Time not set correctly or backup battery is depleted. | Reset the time using the "SET TIME" button. Replace the CR2032 backup battery if necessary. |
Specifications
| Feature | Detail |
|---|---|
| Model Number | CR1018 |
| Display Type | Digital LED Mirror |
| Display Size | 8.7 inches |
| Product Dimensions | 7.79"W x 4.02"H |
| Power Source | AC Powered (Adapter included) |
| Battery Backup | 1 x CR2032 (included) |
| USB Charging Ports | 2 x 5V 1A |
| Brightness Levels | 8 levels |
| Volume Levels | 7 levels (90-110 dB) |
| Time Format | 12H/24H |
| Special Features | Dual Alarms, Snooze, DST Function |
Official Product Video
Video: Overview of the PPLEE Dual Digital Alarm Clock, highlighting its large number display, backup battery, and USB charger port. This video demonstrates key features and functionality.
Warranty and Support
PPLEE provides a 1-year warranty, 90-day money-back guarantee, and 24-hour response service. If you have any questions or require support regarding your product, please contact us via Amazon. We are committed to providing prompt assistance.


