Introduction
Thank you for choosing the PPLEE 8.7” Mirror Digital Alarm Clock. This manual provides detailed instructions for setting up and operating your new alarm clock. Please read it carefully to ensure proper use and to fully utilize all its features.
Package Contents
- 1 x PPLEE 8.7” Mirror Digital Alarm Clock
- 1 x AC Adapter
- 1 x CR2032 Cell Coin Battery (pre-installed for backup)
- 1 x User Manual

Image: The alarm clock unit, AC adapter, and user manual are included in the package.
Product Overview
Top Panel Controls
- DIMMER: Adjusts display brightness.
- HOUR: Sets the hour.
- MINUTE: Sets the minute.
- TIME 12H/24H: Switches between 12-hour and 24-hour time formats.
- SNOOZE: Activates snooze function for alarms.
- ALARM 1: Sets Alarm 1.
- ALARM 2: Sets Alarm 2.
- VOLUME DST: Adjusts alarm volume and activates/deactivates Daylight Saving Time.
- ALARM OFF: Turns off active alarms.
Rear Panel Ports
- DC IN 5V: Power input port for the AC adapter.
- =5V 1A CHARGING PORT (x2): Dual USB ports for charging external devices.

Image: Rear view of the alarm clock highlighting the power input and USB charging ports.
Setup
1. Power Connection
- Connect the provided AC adapter to the 'DC IN 5V' port on the rear of the alarm clock.
- Plug the AC adapter into a standard wall outlet. The display will illuminate.
2. Battery Backup
The alarm clock comes with a pre-installed CR2032 cell coin battery. This battery serves as a backup to retain time and alarm settings during a power outage. The display will go blank and alarms will not trigger when operating on battery backup only.

Image: Illustration of the alarm clock's AC power connection and battery backup feature.
Operating Instructions
1. Setting the Time
- Press and hold the 'TIME 12H/24H' button until the hour digits begin to flash.
- Press the 'HOUR' button to adjust the hour.
- Press the 'MINUTE' button to adjust the minute.
- Press the 'TIME 12H/24H' button again to confirm and exit time setting mode.
- To switch between 12-hour and 24-hour formats, short press the 'TIME 12H/24H' button.
2. Setting Alarms (Dual Alarms)
This alarm clock supports two independent alarms (Alarm 1 and Alarm 2).
- Press and hold 'ALARM 1' or 'ALARM 2' button until the hour digits begin to flash.
- Press the 'HOUR' button to adjust the alarm hour.
- Press the 'MINUTE' button to adjust the alarm minute.
- Press 'ALARM 1' or 'ALARM 2' button again to confirm and activate the alarm. An alarm icon will appear on the display.
- To deactivate an alarm, press the corresponding 'ALARM 1' or 'ALARM 2' button until the alarm icon disappears.
3. Snooze Function
When an alarm sounds, press the 'SNOOZE' button to temporarily silence it for 9 minutes. The alarm will sound again after 9 minutes. To turn off the alarm completely, press the 'ALARM OFF' button.

Image: Illustration of the dual alarm feature and snooze function.
4. Adjusting Display Brightness
The display has 8 levels of brightness. Press the 'DIMMER' button repeatedly to cycle through the brightness levels (L7 to L0, where L7 is brightest and L0 is off). Select the desired brightness for your environment.
5. Adjusting Alarm Volume
The alarm volume has 7 levels. Press the 'VOLUME DST' button repeatedly to cycle through the volume levels (V7 to V1, where V7 is loudest and V1 is softest). Select the desired volume for your alarm.

Image: Visual representation of brightness and volume adjustment levels.
6. Daylight Saving Time (DST) Function
To activate or deactivate DST, press and hold the 'VOLUME DST' button. The time will adjust forward or backward by one hour accordingly.

Image: The alarm clock showing different time display modes including DST.
7. USB Charging Ports
The alarm clock features two 5V 1A USB charging ports on the rear. You can use these ports to conveniently charge your smartphone or other USB-powered devices.

Image: Two smartphones connected to the alarm clock's USB charging ports.
Features Overview
- 8.7” Large LED Mirror Display: Clear, easy-to-read digits with a reflective surface.
- Dual Alarms: Set two independent alarms for different schedules.
- 9-Minute Snooze: Provides extra sleep time before the alarm sounds again.
- 8-Level Brightness Adjustment: Customize display intensity for day or night.
- 7-Level Volume Adjustment: Control the loudness of the alarm.
- Dual USB Charging Ports: Conveniently charge two devices simultaneously.
- AC Powered with Battery Backup: Ensures time and settings are maintained during power outages.
- 12/24H Mode & DST Function: Flexible time display options and automatic Daylight Saving Time adjustment.

Image: A visual summary of the alarm clock's key features.
Maintenance
- Cleaning: Use a soft, dry cloth to clean the mirror display. Avoid abrasive cleaners or solvents.
- Storage: If storing the clock for an extended period, disconnect it from power and remove the backup battery.
Troubleshooting
- Display is blank: Ensure the AC adapter is securely plugged into both the clock and the wall outlet. Check the 'DIMMER' setting; it might be set to L0 (off).
- Alarm does not sound: Verify that the alarm is activated (alarm icon visible on display) and the volume is not set to V0.
- Time/settings reset after power outage: The CR2032 backup battery may need replacement.
- USB charging not working: Ensure the clock is connected to AC power. USB charging ports are not active when running on battery backup.
Specifications
| Brand | PPLEE |
| Model Number | CR1018 |
| Display Type | Digital LED |
| Display Size | 8.7 inches |
| Power Source | AC Powered |
| Battery Backup | 1 x CR2032 (included) |
| USB Charging Ports | 2 x 5V 1A |
| Product Dimensions | 7.79"W x 4.02"H |
| Item Weight | 6.9 ounces |
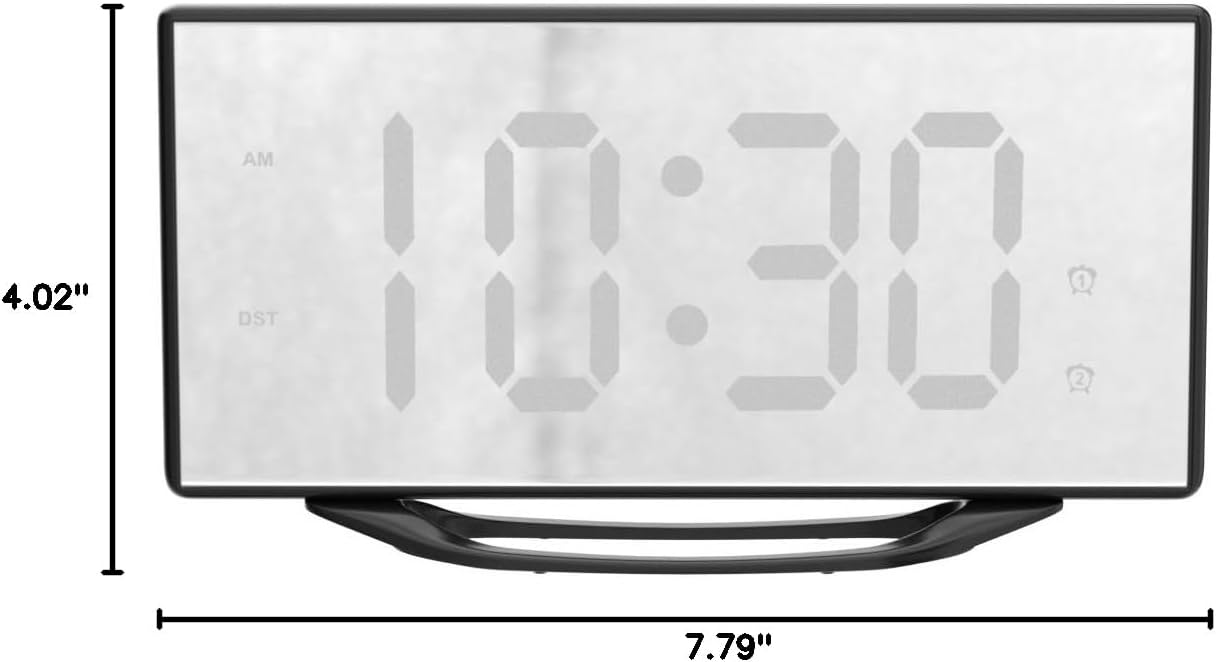
Image: Detailed dimensions of the alarm clock.
Warranty and Support
PPLEE provides a 1-year warranty for this product, along with a 90-day money-back guarantee. For any questions or support, please contact us via Amazon. Our customer service team is available for a 24-hour response.
Video: An official product video demonstrating the features and setup of the PPLEE Digital Alarm Clock.


