1. Overview
This manual provides instructions for the Pearl Flute PF200 Belsona Student C-Flute. The Belsona series is designed for students, offering durable construction and a responsive playing experience. This instrument features an open and free-blowing headjoint, smooth key design, and a robust mechanism, all finished with high nickel content plating for durability and aesthetic appeal.
The Pearl Flute PF200 is a C-flute with silver-plated body, foot, and head joints, featuring an Offset G and Closed Hole key system.

Figure 1: The Pearl Flute PF200 Belsona Student C-Flute, fully assembled.
2. Setup
2.1 Unpacking the Flute
Your Pearl Flute PF200 comes securely packaged in a stackable ABS hard case. Carefully open the case to reveal the flute components and accessories.
- Flute Headjoint
- Flute Body
- Flute Footjoint
- Cleaning Rod
- ABS Hard Case

Figure 2: Flute components and cleaning rod neatly arranged within the protective ABS hard case.
2.2 Assembling the Flute
- Attach the Body to the Footjoint: Hold the flute body by the barrel (the part without keys) and the footjoint by its barrel. Gently twist and push the footjoint onto the body. Align the rod on the footjoint with the center of the lowest key on the body. Avoid gripping the keys directly during assembly.
- Attach the Headjoint: Hold the flute body by the barrel and gently twist and push the headjoint onto the body. The embouchure hole (lip plate) should be aligned with the first key on the body. Adjust the headjoint rotation slightly for comfortable playing posture.
Ensure all connections are snug but do not force them. Proper alignment is crucial for the flute's mechanism to function correctly.
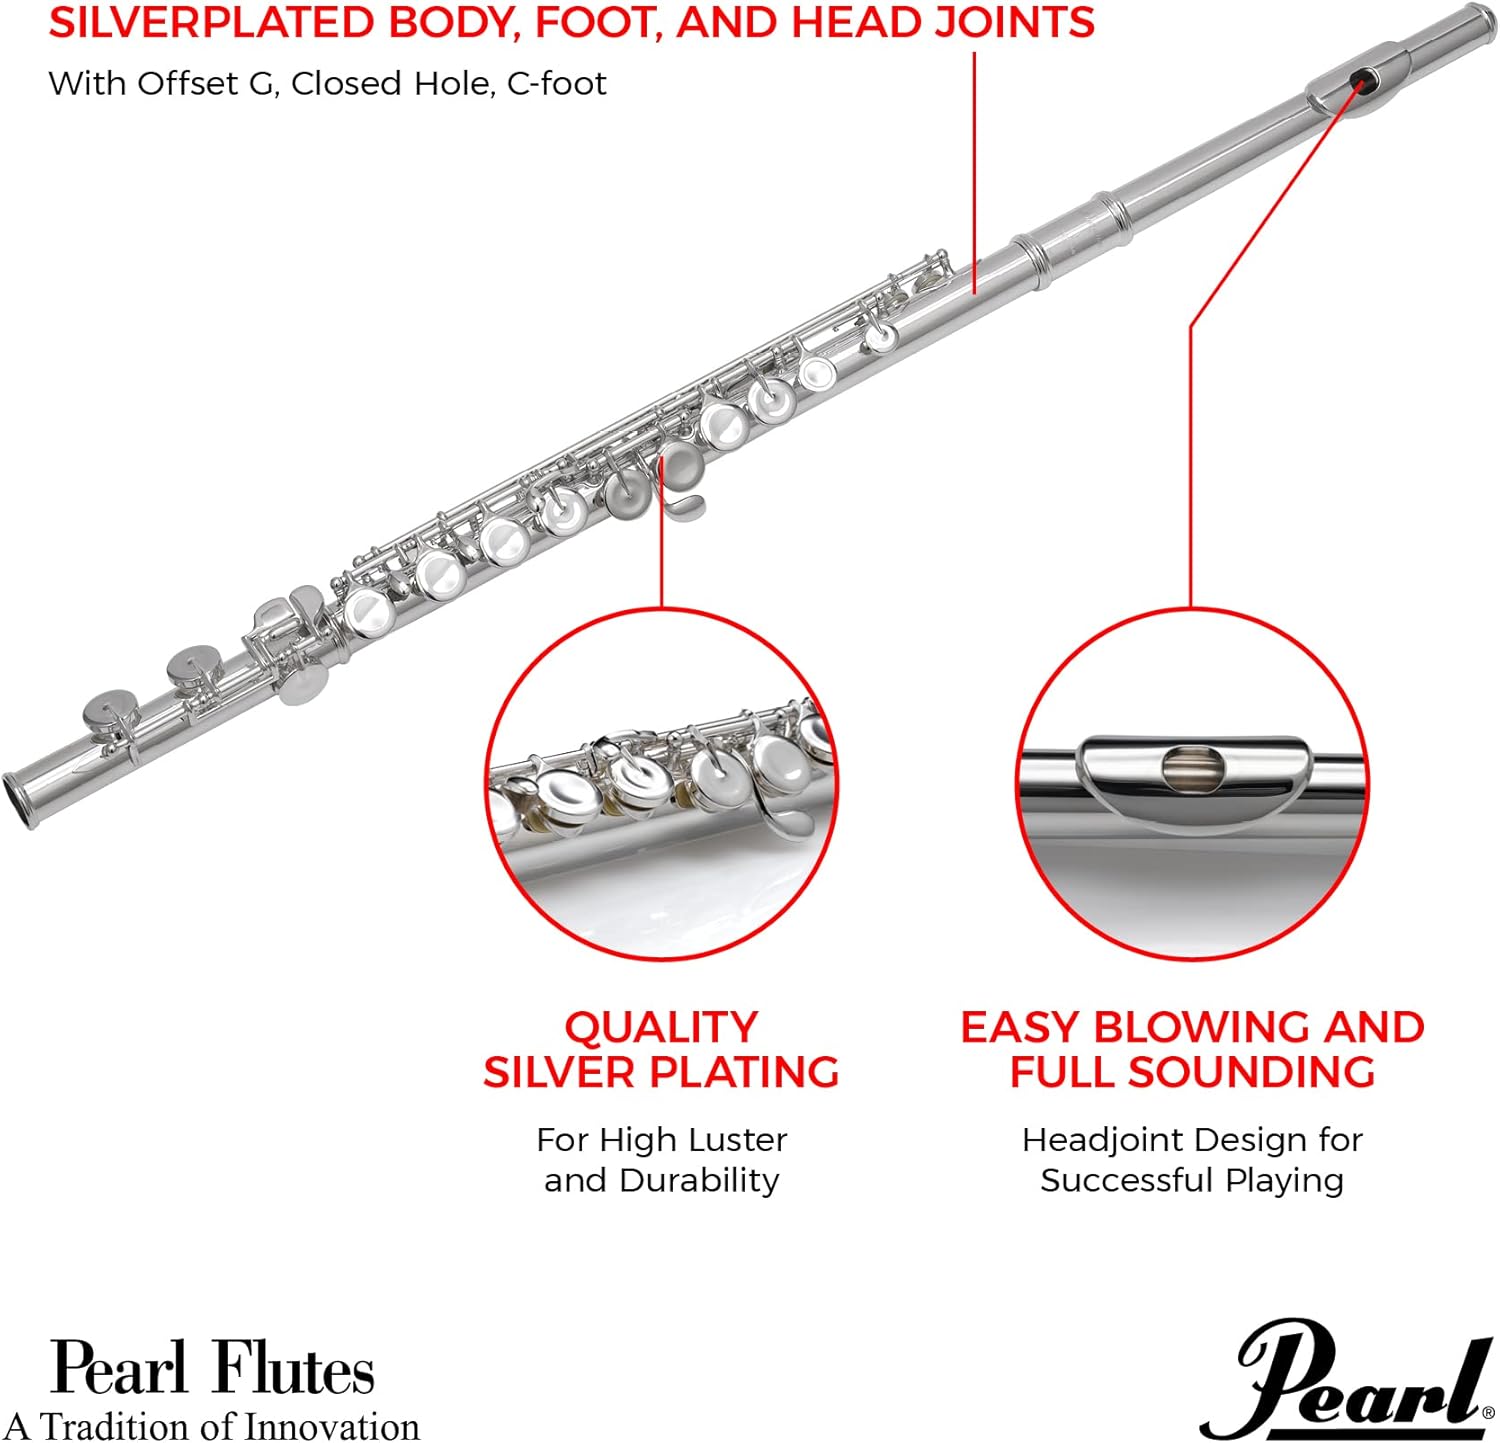
Figure 3: Key features of the Pearl Flute PF200, highlighting the silver-plated components and headjoint design.
3. Operation
3.1 Holding the Flute
Hold the flute horizontally. Your left hand supports the flute near the headjoint, with your index finger resting on the B key. Your right hand supports the flute near the footjoint, with your thumb underneath for balance. Ensure your fingers are curved and relaxed, ready to cover the keys.
3.2 Producing Sound (Embouchure)
Place the lip plate of the headjoint against your chin, just below your lower lip. Form a small aperture (opening) with your lips, directing a focused stream of air across the embouchure hole. Experiment with the angle and speed of your air stream to produce a clear tone. The Pearl Flute PF200 features an easy-blowing headjoint design to assist in tone production.
3.3 Key System
The PF200 features a Closed Hole key system, meaning all tone holes are covered by pads. This design is often preferred by beginners as it simplifies finger placement. The Offset G key design provides a more ergonomic hand position for many players, reducing strain.
4. Maintenance
Regular maintenance is essential to keep your Pearl Flute PF200 in optimal playing condition and to preserve its appearance.
4.1 Cleaning After Each Use
- Swabbing the Interior: Thread a clean, lint-free cloth (such as a silk swab) through the eye of the cleaning rod. Gently insert the rod and cloth into each section of the flute (headjoint, body, footjoint) and twist to remove moisture.
- Wiping the Exterior: Use a soft, dry polishing cloth to wipe down the exterior of the flute, removing fingerprints and oils. Pay attention to the keys and silver-plated surfaces.
- Pad Care: If pads become damp, gently place a piece of cigarette paper or a specialized pad-drying paper under the pad and press the key down lightly to absorb moisture. Do not use excessive force.
4.2 Storing the Flute
Always disassemble the flute after cleaning and store it in its original ABS hard case. The case is designed with a form-fitted microfiber padded lining to protect the instrument from damage. Ensure the flute is dry before placing it in the case to prevent tarnishing and pad damage.

Figure 4: The durable ABS hard case included with the Pearl Flute PF200, designed for secure storage and transport.
4.3 Preventing Tarnish
The high nickel content plating provides durability, but silver-plated instruments can still tarnish over time. Storing the flute in its case with an anti-tarnish strip (not included) can help slow this process. Avoid exposing the flute to extreme temperatures or humidity.
5. Troubleshooting
Here are some common issues and basic solutions for your Pearl Flute PF200:
| Problem | Possible Cause | Solution |
|---|---|---|
| No Sound or Weak Sound | Improper embouchure, air leak, or incorrect finger placement. | Review embouchure technique. Check that all keys are fully closed and pads are sealing. Ensure fingers are covering tone holes completely. |
| Keys are Sticky | Moisture or residue on pads. | Use pad-drying paper to absorb moisture from under the sticky pad. If residue is present, a professional cleaning may be needed. |
| Flute Sections are Difficult to Assemble/Disassemble | Dirt or slight bending of the joint. | Ensure joints are clean. Apply a very small amount of cork grease (if applicable, though flutes typically don't use cork grease on metal joints) or consult a technician if resistance persists. Never force assembly. |
| Tarnishing on Silver-Plated Surfaces | Exposure to air and moisture. | Regularly wipe the flute with a soft polishing cloth. Store in the case with an anti-tarnish strip. For heavy tarnish, consult a professional. |
For issues not listed here or for complex repairs, it is recommended to contact a qualified instrument technician.
6. Specifications
| Feature | Detail |
|---|---|
| Model Number | PF200 |
| Instrument Key | C |
| Body Material | Silverplate (High Nickel Content) |
| Key System | Closed Hole, Offset G |
| Color | Nickel (Silver-plated appearance) |
| Item Weight | 2.3 pounds (approx.) |
| Product Dimensions (Case) | 16.45 x 4.9 x 3.45 inches (approx.) |
| Included Accessories | ABS Hard Case, Cleaning Rod |

Figure 5: Dimensions of the Pearl Flute PF200 case, indicating its compact size for transport.
7. Warranty & Support
7.1 Warranty Information
The Pearl Flute PF200 Belsona Student C-Flute is backed by Pearl's 5-year Warranty. This warranty covers manufacturing defects and ensures the quality of your instrument. Please retain your proof of purchase for warranty claims.
For detailed warranty terms and conditions, please refer to the official Pearl Flutes website or contact their customer service.
7.2 Customer Support
For technical assistance, parts, or service inquiries, please contact Pearl Flutes customer support. You can typically find contact information on the official Pearl Flutes website or through your authorized dealer.
Pearl Flutes Official Website: www.pearlflutes.com (This is a placeholder link, please verify the actual official website for Pearl Flutes for accurate support information.)


