1. Introduction
This user manual provides comprehensive instructions for the safe and effective operation of your Retevis RT45P Waterproof Two-Way Radio. Please read this manual thoroughly before using the device and retain it for future reference. The RT45P is designed for reliable communication in various outdoor and challenging environments, featuring IP67 waterproofing, NOAA weather alerts, and emergency functions.

Figure 1: Retevis RT45P Two-Way Radio and included accessories.
2. Package Contents
Verify that all items are present in your package:
- 2 x RT45P IP67 Waterproof Walkie Talkies
- 6 x 1000mAh AA Rechargeable NiMH Batteries
- 1 x 2-in-1 USB-C Cable
- 2 x Belt Clips
- 1 x User Manual
3. Product Overview
The Retevis RT45P is built for durability and ease of use, featuring a robust design and essential communication functions.
3.1 Key Features
- IP67 Waterproof and Dust-proof: Designed to withstand immersion in water up to 1 meter for 30 minutes, suitable for marine and wet environments.
- 22 FRS Channels: Standard Family Radio Service channels for general use.
- NOAA Weather Alert: Access to 11 NOAA channels for real-time weather updates and alerts.
- SOS Emergency Alarm: Local and remote alarm with an integrated LED flashlight for emergency situations.
- VOX Hands-Free: Voice-activated transmission with adjustable sensitivity (0-5 levels).
- CTCSS/DCS Codes: Sub-codes for enhanced privacy and reduced interference.
- Long Battery Life: Powered by 3 AA 1000mAh rechargeable NiMH batteries, offering up to 60 hours standby time.
- USB-C Charging: Convenient charging via a USB Type-C port.
- Adjustable Volume: 0 to 7 levels, with real-time display.
3.2 Component Identification

Figure 2: Front and side view of the RT45P with labeled components.
- Antenna: For transmitting and receiving signals.
- Headset Jack: For connecting an external headset (not included).
- LED Light: Integrated flashlight.
- PTT Button (Push-to-Talk): Press and hold to transmit your voice.
- MENU/Power Button: Press to access menu, hold to power on/off.
- Lock Button: Locks the keypad to prevent accidental changes.
- Volume/Channel Up/Down Buttons: Adjust volume or navigate channels/menu options.
- Microphone: Captures your voice during transmission.
- MON Button (Monitor): Temporarily disables squelch to listen for weak signals.
- SCAN Button: Initiates channel scanning.
- LED Torch Button: Activates the built-in flashlight.
- USB-C Charging Port: For charging the device.
4. Setup
4.1 Battery Installation
- Ensure the radio is powered off.
- Locate the battery compartment cover on the back of the radio.
- Open the cover.
- Insert the 3 AA 1000mAh rechargeable NiMH batteries, observing the correct polarity (+/-) as indicated inside the compartment.
- Close the battery compartment cover securely to maintain IP67 water resistance.

Figure 3: Battery installation and USB-C charging port.
4.2 Charging the Batteries
- Connect the provided 2-in-1 USB-C cable to the USB-C charging port on the side of the radio.
- Connect the other end of the USB-C cable to a compatible USB power adapter (not included) or a computer USB port.
- The battery icon on the display will indicate charging status.
- Charging typically takes several hours. Disconnect the cable once charging is complete.
4.3 Attaching the Belt Clip
Align the belt clip with the designated slots on the back of the radio and slide it down until it clicks securely into place.
5. Operating Instructions
5.1 Power On/Off
To power on the radio, press and hold the MENU/Power button until the display illuminates. To power off, press and hold the MENU/Power button again until the display turns off.
5.2 Adjusting Volume
Press the UP or DOWN arrow buttons to adjust the listening volume from level 0 to 7. The current volume level will be displayed on the screen.
5.3 Channel Selection
- With the radio powered on, press the MENU button once. The channel number will flash on the display.
- Use the UP or DOWN arrow buttons to select your desired channel (1-22).
- Press the MENU button again to confirm your selection and exit the channel setting mode.
5.4 Transmitting and Receiving
To communicate, ensure all radios are set to the same channel. The maximum talking range is approximately 1.5 km (1 mile) in open environments.
- To Transmit: Press and hold the PTT button on the side of the radio. Speak clearly into the microphone. Release the PTT button to stop transmitting.
- To Receive: Ensure the PTT button is not pressed. The radio will automatically receive transmissions on the selected channel.

Figure 4: Clear sound and squelch system for effective communication.
5.5 VOX Hands-Free Operation
VOX (Voice Operated Exchange) allows you to transmit without pressing the PTT button. This feature is adjustable from 0 (off) to 5 (most sensitive) levels.
- Press the MENU button multiple times until the VOX icon appears on the display.
- Use the UP or DOWN arrow buttons to select the desired VOX sensitivity level.
- Press the MENU button to confirm and exit.
5.6 CTCSS/DCS Codes
CTCSS (Continuous Tone-Coded Squelch System) and DCS (Digitally Coded Squelch) codes help filter out unwanted transmissions from other users on the same channel. To communicate, both radios must have the same channel and CTCSS/DCS code selected.
- Press the MENU button multiple times until the CTCSS or DCS icon appears on the display.
- Use the UP or DOWN arrow buttons to select the desired code.
- Press the MENU button to confirm and exit.
5.7 NOAA Weather Alert
The RT45P can receive NOAA Weather Alerts on 11 dedicated channels, keeping you informed of severe weather conditions.
- Press and hold the MON button to enter the weather forecast receiving mode.
- Use the UP or DOWN arrow buttons to adjust the volume.
- Press the MENU key to select NOAA channel CH1-CH11.
- Press the MENU key again, then use UP or DOWN to turn on/off the automatic receiving function.

Figure 5: NOAA Weather Alert system for safety.
5.8 Emergency Alarm and LED Flashlight
In an emergency, the radio offers a local and remote alarm function along with a built-in LED flashlight.
- Emergency Alarm: Press the dedicated SOS button (often located on the side or front, refer to Figure 2) to activate the alarm. This will alert other radios within range.
- LED Flashlight: Press the LED Torch button (refer to Figure 2) to turn the flashlight on or off.
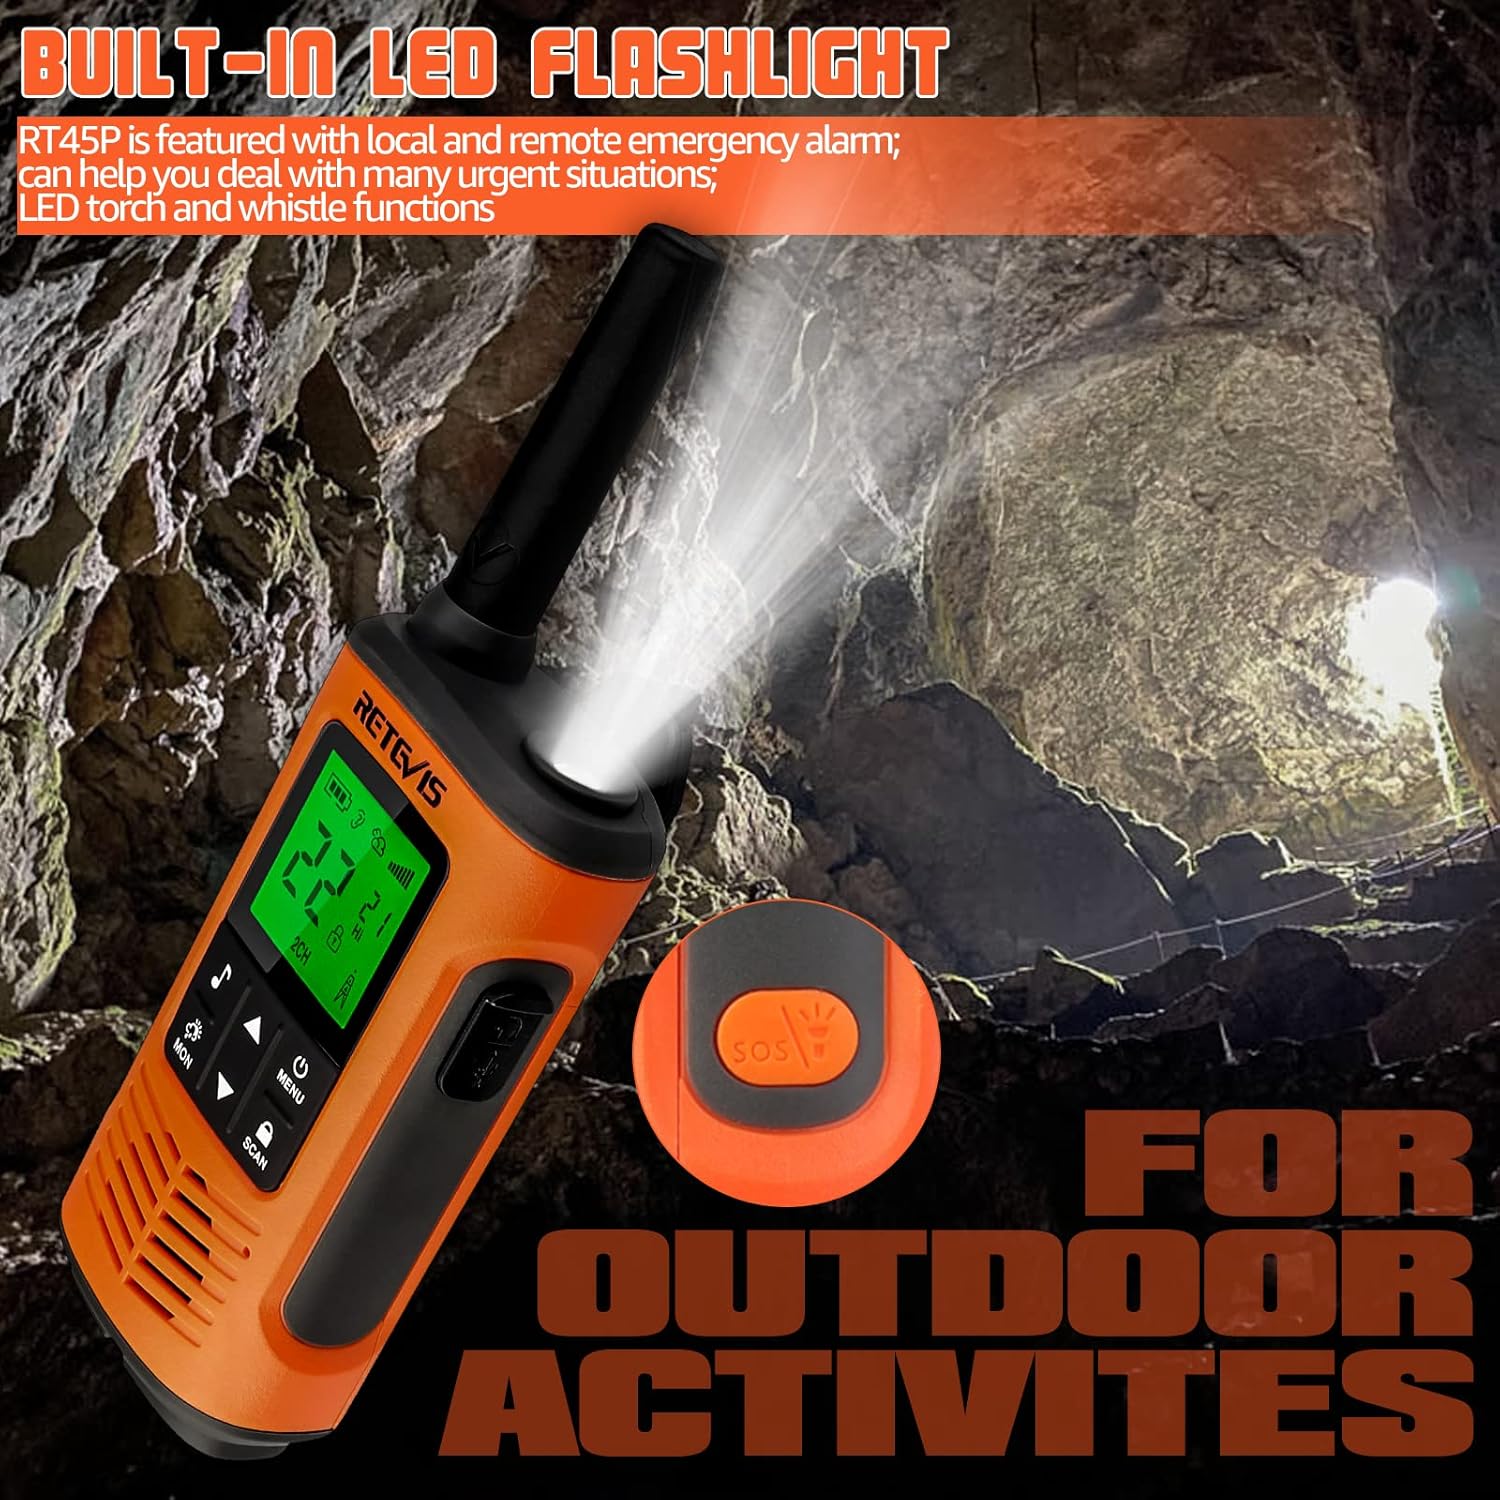
Figure 6: Built-in LED flashlight for visibility in low-light conditions.

Figure 7: SOS Emergency function for urgent situations.
6. Maintenance
6.1 Cleaning
Clean the radio's exterior with a soft, damp cloth. Do not use harsh chemicals or abrasive cleaners. Ensure the USB-C port cover is securely closed after cleaning to maintain water resistance.
6.2 Battery Care
To maximize battery life, fully charge the batteries before first use and after extended periods of non-use. Avoid overcharging or completely draining the batteries regularly. Store the radio and batteries in a cool, dry place.
6.3 Water Resistance (IP67)
The RT45P is rated IP67, meaning it is protected from dust and can withstand immersion in 1 meter of water for up to 30 minutes. Ensure the battery compartment cover and USB-C port cover are properly sealed before exposing the radio to water.

Figure 8: IP67 Waterproof feature in action.
7. Troubleshooting
- No Power: Check battery installation and charge level. Ensure batteries are correctly inserted and fully charged.
- Cannot Transmit or Receive: Verify both radios are on the same channel and CTCSS/DCS code. Ensure the PTT button is fully pressed when transmitting and released when receiving. Check for obstructions or excessive distance.
- Poor Audio Quality: Adjust volume. Check for interference from other electronic devices. Ensure microphone and speaker are clear of debris.
- NOAA Weather Alert Not Working: Ensure you are in an area with NOAA signal coverage. Try switching between the 11 NOAA channels manually.
- Short Range: Range is affected by terrain, buildings, and other obstructions. For optimal range, use in open areas with clear line of sight.
8. Specifications
| Feature | Specification |
|---|---|
| Model Number | RT45P |
| Item Weight | 7.8 ounces (220 Grams) |
| Product Dimensions | 2.36 x 1.34 x 7.24 inches |
| Batteries | 6 AA batteries required (included) - 1000mAh NiMH rechargeable |
| Display Type | LCD |
| Number of Channels | 22 |
| Water Resistance Level | IP67 Waterproof |
| Frequency Range | 462.5500 - 467.7125 MHz |
| Talking Range Maximum | 1.5 Kilometer (approx. 1 mile) |
| Voltage | 3.6 Volts |
| Special Features | Emergency Alarm, Integrated Flashlight, Rechargeable, Weather Alert |
9. Official Product Videos
Retevis RT45P MUST KNOW for kitesurfing and beach!
This video provides a brief overview of the Retevis RT45P's features, specifically highlighting its suitability for water sports like kitesurfing and beach activities due to its waterproof design. (Duration: 0:25)
How about Retevis RT45P walkie talkies?
This video offers a general review and demonstration of the Retevis RT45P walkie-talkies, showcasing their design and basic functionality. (Duration: 2:11)
10. Warranty and Support
Retevis provides a 2-year warranty for the radio body and a 1-year warranty for accessories. A 30-day no-reason return policy is also offered. For service beyond the warranty period, corresponding costs may apply.
For any inquiries or support, please contact Retevis customer service on Amazon. They aim to reply within 12 hours.


