1. Introduction
The Arturia MiniFuse 1 is a compact USB audio interface designed to facilitate high-quality audio recording and production. This manual provides essential information for setting up, operating, maintaining, and troubleshooting your MiniFuse 1 device. It is suitable for various applications including recording vocals, instruments, podcasting, and music production.
2. Product Overview and Components
The MiniFuse 1 is built with robust and reliable materials, engineered for durability and consistent performance. It features a sleek design suitable for any studio or portable setup.

Figure 2.1: Front view of the Arturia MiniFuse 1, showcasing its input, gain control, 48V phantom power button, monitor level, direct monitor button, and headphone output.

Figure 2.2: Labeled front view of the MiniFuse 1, highlighting the Combo XLR - 1/4" jack input, Instrument level switch, 48V phantom power switch, and Monitor mix control.
Key Features:
- High-Quality Sound: Best-in-class audio specifications for sharp sound quality in recordings.
- Versatile Connectivity: 1 combo Mic/Inst/Line XLR input with 48V phantom power, 2 1/4" TRS balanced line outputs, 1 headphone output with volume control, and 1 USB Type A hub (250mA).
- MIDI Integration: 5-pin MIDI input and output connections for syncing with MIDI gear.
- Loopback Feature: Easily capture voiceovers alongside in-app or in-game audio.
- Durable Construction: Engineered with robust materials and subjected to over 200 reliability tests.
3. Setup Instructions
Follow these steps to set up your Arturia MiniFuse 1 audio interface.
3.1 Connecting to Your Computer
The MiniFuse 1 connects to your computer via a USB-C cable. Ensure your computer has a compatible USB port (USB-C or USB-A with an appropriate adapter).
- Connect one end of the provided USB-C cable to the USB-C port on the back of your MiniFuse 1.
- Connect the other end of the USB-C cable to an available USB port on your computer.
- The device is bus-powered, meaning it draws power directly from your computer via the USB connection.
3.2 Software Installation
The MiniFuse 1 comes bundled with creative software. To access and install this software:
- Visit the official Arturia website and register your MiniFuse 1 using its serial number.
- Follow the instructions on the website to download and install the included software bundle (e.g., Ableton Live Lite, Analog Lab Intro, Native Instruments GUITAR RIG 6 LE, Arturia FX, Auto-Tune Unlimited, Splice Creator Plan).
- Install any necessary drivers for your operating system (Windows or macOS) as prompted by the installation process.
Video 3.1: Official Arturia video demonstrating how to connect your studio equipment to the MiniFuse audio interface, including computer and other devices.
4. Operating Instructions
Understand the various controls and connections on your MiniFuse 1 for optimal performance.
4.1 Front Panel Controls
- Input (Combo XLR/1/4" Jack): Connect microphones (XLR) or instruments/line-level sources (1/4" jack).
- Gain Knob: Adjusts the input level for the connected microphone or instrument. Monitor the LED indicators to avoid clipping (red light).
- Instrument Level Switch: Engages high-impedance mode for direct instrument connection (e.g., electric guitar).
- 48V Phantom Power Switch: Activates 48V phantom power for condenser microphones. Only enable if your microphone requires it.
- Monitor Level Knob: Controls the overall output volume to your studio monitors.
- Direct Monitor Button: Enables direct monitoring, allowing you to hear your input signal directly through headphones with minimal latency. Disable when mixing or listening to computer playback to avoid double monitoring.
- Headphone Output & Volume Knob: Connect headphones and adjust their independent volume level.
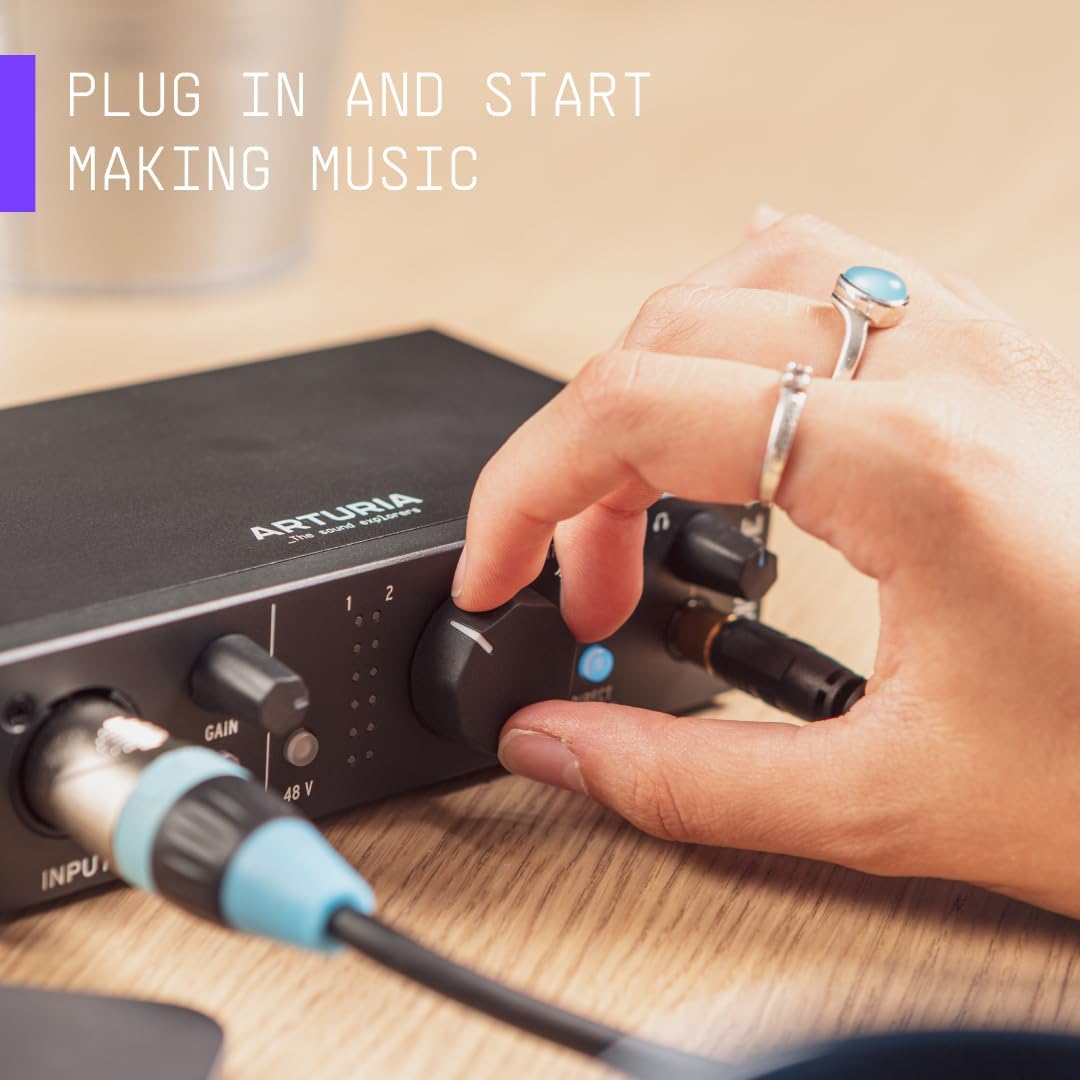
Figure 4.1: A hand adjusting the main monitor knob on the Arturia MiniFuse 1, illustrating the ease of use for controlling output levels.
4.2 Rear Panel Connections
- USB-C Port: Main connection to your computer for data and power.
- MIDI In/Out: 5-pin DIN connectors for connecting MIDI keyboards, controllers, and other MIDI-compatible devices.
- Main Outputs (1/4" TRS): Balanced outputs for connecting to studio monitors or other audio playback systems.
- USB Type A Hub: Provides additional USB connectivity for other devices.
Video 4.1: Official Arturia video demonstrating the process of recording a guitar using the MiniFuse audio interface.
Video 4.2: Official Arturia video demonstrating the process of recording vocals using the MiniFuse audio interface.
Video 4.3: Official Arturia video demonstrating how to produce a track using the MiniFuse audio interface and associated software.
5. Maintenance
Proper maintenance ensures the longevity and optimal performance of your MiniFuse 1.
- Cleaning: Use a soft, dry cloth to clean the exterior of the device. Avoid abrasive cleaners or solvents.
- Storage: Store the MiniFuse 1 in a cool, dry place away from direct sunlight, extreme temperatures, and humidity when not in use.
- Handling: Handle the device with care to prevent physical damage to knobs, ports, and the casing.
6. Troubleshooting
If you encounter issues with your MiniFuse 1, try the following troubleshooting steps:
- No Power: Ensure the USB-C cable is securely connected to both the interface and your computer. Verify your computer's USB port is functioning correctly.
- No Audio Input: Check that your microphone or instrument is properly connected to the input. Adjust the gain knob to an appropriate level. For condenser microphones, ensure 48V phantom power is enabled. Verify that the correct input is selected in your recording software.
- No Audio Output: Check connections to your studio monitors or headphones. Adjust the Monitor Level and Headphone Volume knobs. Ensure the correct output device (MiniFuse 1) is selected in your computer's sound settings and recording software.
- Latency Issues: If experiencing delay, ensure Direct Monitor is enabled during recording. In your recording software, adjust the buffer size settings to a lower value (this may increase CPU load).
- Software Not Recognizing Device: Reinstall the latest drivers from the Arturia website. Restart your computer and the MiniFuse 1.
7. Specifications
| Specification | Value |
|---|---|
| Item Weight | 11.8 ounces |
| Product Dimensions | 5.98 x 4.02 x 1.65 inches |
| Item Model Number | 800101 |
| Color Name | Black |
| Compatible Devices | Laptop, Personal Computer |
| Connector Type | USB Type C |
| Hardware Interface | USB |
| Supported Software | Ableton Live Lite, Analog Lab Intro, Native Instruments GUITAR RIG 6 LE, Arturia FX, Auto-Tune Unlimited, and other compatible software |
| Size | MiniFuse 1 |
| Operating System | Windows, macOS |
| Connectivity Technology | USB |
| Number of Channels | 1 |
8. Warranty and Support
The Arturia MiniFuse 1 comes with an extensive 5-year warranty, reflecting its high build quality and durability. This warranty covers defects in materials and workmanship under normal use.
For Support:
- Visit the official Arturia website for product registration, software downloads, and access to the latest user manuals and support resources.
- Contact Arturia customer support directly for technical assistance or warranty claims.


