1. Introduction
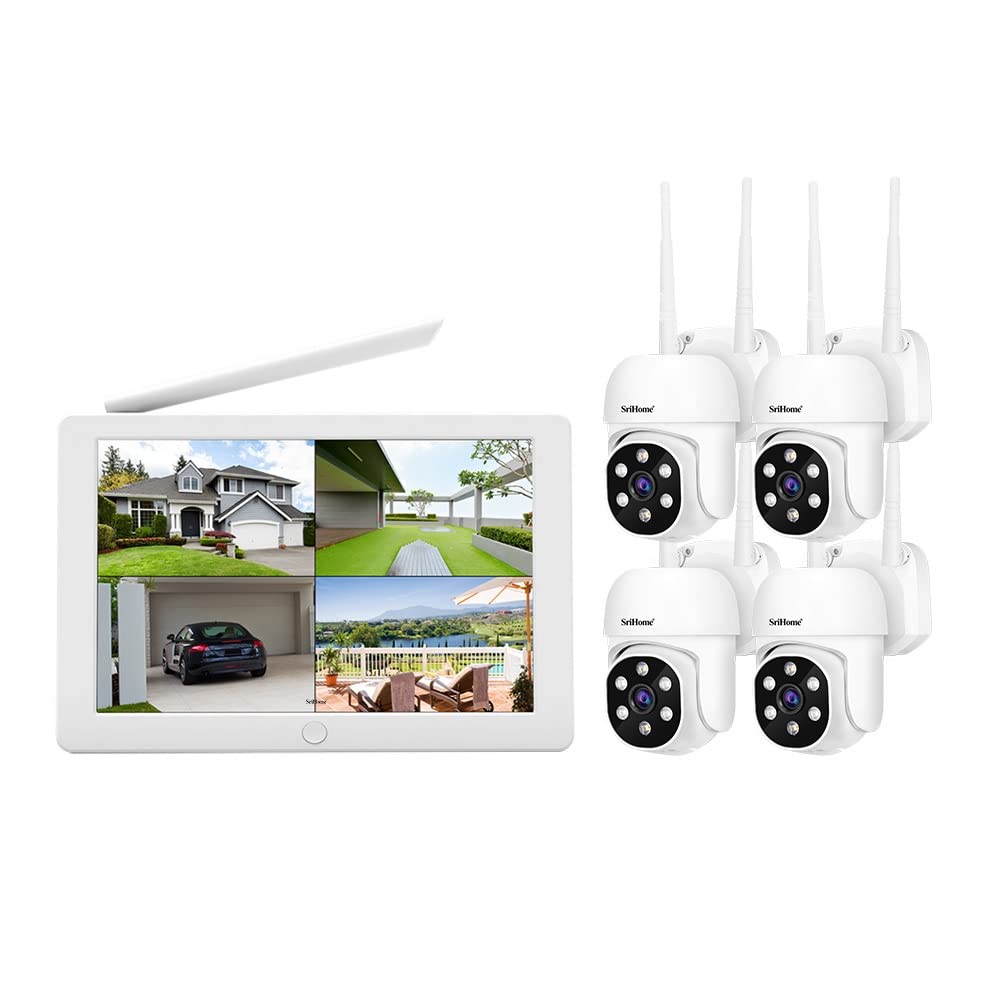
Image: The SriHome NVS009 NVR system, showing the 10.1-inch LCD monitor NVR unit alongside four wireless IP cameras.
This user manual provides detailed instructions for the installation, operation, and maintenance of your SriHome NVS009 NVR 4 Channel Wireless IP Camera System. Please read this manual thoroughly before using the product to ensure proper setup and optimal performance. Keep this manual for future reference.
The SriHome NVS009 system features a 10.1-inch LCD screen NVR, supporting 1080P/960P/720P wireless network video recording. It includes a built-in dedicated wireless WIFI module for stable signal transmission and strong anti-interference capabilities. The system supports up to 8 wireless cameras and offers plug-and-play functionality, displaying images immediately upon power-on without the need for WIFI pairing. It also supports wired and wireless mixed use, up to 8TB hard disk storage, P2P remote access, and a wireless bridge mode with a range of up to 60 meters.

Image: An infographic summarizing key features of the SriHome NVS009 system, including 10.1-inch display, WiFi connection, FHD (1920x1080), Plug & Play, H.265+ compression, Motion Detection, Two-Way Audio, Remote Playback, 8TB HDD support, and Mobile Remote View.
2. Safety Information
- Ensure the power supply voltage matches the product requirements to prevent damage.
- Do not expose the NVR or cameras to extreme temperatures, humidity, or dust.
- Avoid placing the NVR in direct sunlight or near heat sources.
- Do not disassemble or modify the product. Unauthorized modifications will void the warranty.
- Keep cables organized to prevent tripping hazards and ensure proper ventilation.
- Use only the provided power adapters.
- For outdoor cameras, ensure proper installation to protect against weather elements as per IP66 rating.
3. Package Contents
Please check the package contents carefully upon unboxing. If any items are missing or damaged, contact your retailer.

Image: Overview of the SriHome NVS009 NVR system's packing list, showing the NVR, WiFi cameras, reset pin, adapters, LAN cable, USB mouse, screws, and quick guide.
- 1x 4CH Wi-Fi NVR with Monitor
- 4x SP030 Wireless IP Cameras
- 1x Reset Pin
- 1x NVR Power Adapter
- 4x Camera Power Adapters
- 1x 1M LAN Cable
- 1x USB Mouse
- 3x Screws
- 1x User Manual / Quick Guide
4. Product Overview
4.1 NVR (Network Video Recorder) with Integrated Monitor

Image: The SriHome NVS009 NVR unit featuring a built-in 10.1-inch LCD monitor, illustrating its compact design as an integrated NVR and display solution.
The NVS009 NVR unit integrates a 10.1-inch LCD monitor, providing a compact and convenient solution for viewing and managing your security footage without an external display. It features a high-gain antenna for stable wireless connections.

Image: Detailed view of the SriHome NVS009 NVR's rear panel, highlighting various ports including Audio Output, HDMI, VGA, LAN, USB, and 12V Power Port, along with its dimensions.
NVR Ports and Features:
- HDD Bay: For installing an internal hard disk drive (up to 8TB, not included).
- Audio Output Port: For connecting external speakers.
- HDMI Port: For connecting to an external monitor or TV.
- VGA Port: For connecting to an external monitor.
- LAN Port: For wired network connection.
- USB Ports: For connecting a USB mouse or external storage.
- 12V Power Port: For connecting the NVR power adapter.
4.2 Wireless IP Cameras (SP030)

Image: Detailed view of the SriHome SP030 wireless IP camera, showing its components such as antennas, lens, infrared lights, white light, reset button, speaker, and power port, along with its dimensions.
The included SP030 wireless IP cameras are designed for both indoor and outdoor use, featuring IP66 waterproofing. They come with dual antennas for enhanced wireless signal reception.
- Lens: Captures 1080P Full HD video.
- Infrared Lights: For night vision capabilities.
- White Light: For color night vision or deterrence.
- Antennas: For wireless connectivity to the NVR.
- Speaker: For two-way audio communication.
- Reset Button: To reset the camera to factory settings.
- Power Port: For connecting the camera power adapter.

Image: Illustrates the IP66 waterproof rating of the SriHome camera, showing its resilience in various weather conditions (sunny, snow, thunder shower), and the NVR's audio output capabilities via built-in speaker, AUX port, and HDMI.
5. Setup Guide
5.1 Hard Disk Drive (HDD) Installation (Optional)
The NVR system does not include a hard disk drive. An HDD is required for recording and playback. The NVR supports up to 8TB HDD.
- Unscrew the cover of the NVR unit.
- Connect the SATA power and data cables from the NVR to the HDD.
- Secure the HDD to the NVR chassis using the provided screws.
- Replace the NVR cover and secure it with screws.
- After powering on, navigate to the NVR settings to format the newly installed HDD.
5.2 Initial System Setup
- Connect NVR: Connect the NVR power adapter to the 12V Power Port and plug it into an electrical outlet. The NVR will power on and the integrated LCD screen will display the boot-up sequence.
- Connect USB Mouse: Plug the USB mouse into one of the USB ports on the NVR.
- Power On Cameras: Connect the power adapters to each wireless IP camera and plug them into electrical outlets.
- Automatic Pairing: The cameras are pre-paired with the NVR. Once powered on, the camera feeds should automatically appear on the NVR's screen within a few moments. No manual WIFI pairing is required.
- Network Connection (Optional): For remote access and advanced features, connect the NVR to your router using the provided LAN cable.

Image: Diagram illustrating the "Plug and Play" setup of the SriHome system, showing cameras wirelessly connecting to the NVR, and a "Wireless Bridge" diagram demonstrating extended range capabilities through camera-to-camera relay.
The system supports a wireless bridge mode, allowing cameras to extend the wireless range by relaying signals, with a range of up to 60 meters depending on environmental factors like walls and obstacles.
6. Operation
6.1 Live View and Basic Navigation
Once the system is powered on, the live view of all connected cameras will be displayed on the NVR's integrated screen. Use the USB mouse to navigate the NVR's interface.
- Right-click: Access the main menu.
- Left-click: Select options and navigate menus.
- Double-click on a camera feed: Enlarge a single camera view. Double-click again to return to multi-camera view.
6.2 Recording and Playback
Ensure an HDD is installed and formatted for recording functionality.
- Recording Settings: From the main menu, navigate to "Record Settings" to configure continuous recording, schedule recording, or motion-triggered recording for each camera.
- Playback: From the main menu, select "Playback". Choose the date, time, and camera channel to review recorded footage.
6.3 Motion Detection and Alerts
Configure motion detection to trigger recordings and alerts.
- Enable Motion Detection: In the NVR settings, go to "Alarm" or "Motion Detection" settings. Select the desired camera(s) and enable motion detection.
- Adjust Sensitivity: Set the sensitivity level to minimize false alarms.
- Define Detection Area: Draw specific areas on the camera's view where motion should be detected.
- Alarm Triggers: Configure actions upon motion detection, such as recording, sending notifications (if connected to internet), or triggering an alarm sound.
6.4 Remote Access via SriHome App
The SriHome system supports remote access and control via the SriHome app on Android and Apple mobile phones/tablets.
- Download App: Search for "SriHome" in your device's app store (Google Play Store for Android, Apple App Store for iOS) and install it.
- Register Account: Open the app and register a new user account.
- Add Device: Ensure your NVR is connected to the internet via the LAN port. In the app, select "Add Device" or scan the QR code displayed on the NVR's screen (usually found in network settings or device info).
- One-Click Configuration: The app supports one-click configuration for easy internet access. Follow the on-screen prompts in the app.
- Remote Viewing: Once added, you can view live feeds, play back recordings, and manage settings remotely from your mobile device.
6.5 Pan & Tilt Rotation (for compatible cameras)
If your SP030 cameras support Pan & Tilt (PTZ) functionality, you can control their movement through the NVR interface or the SriHome app.
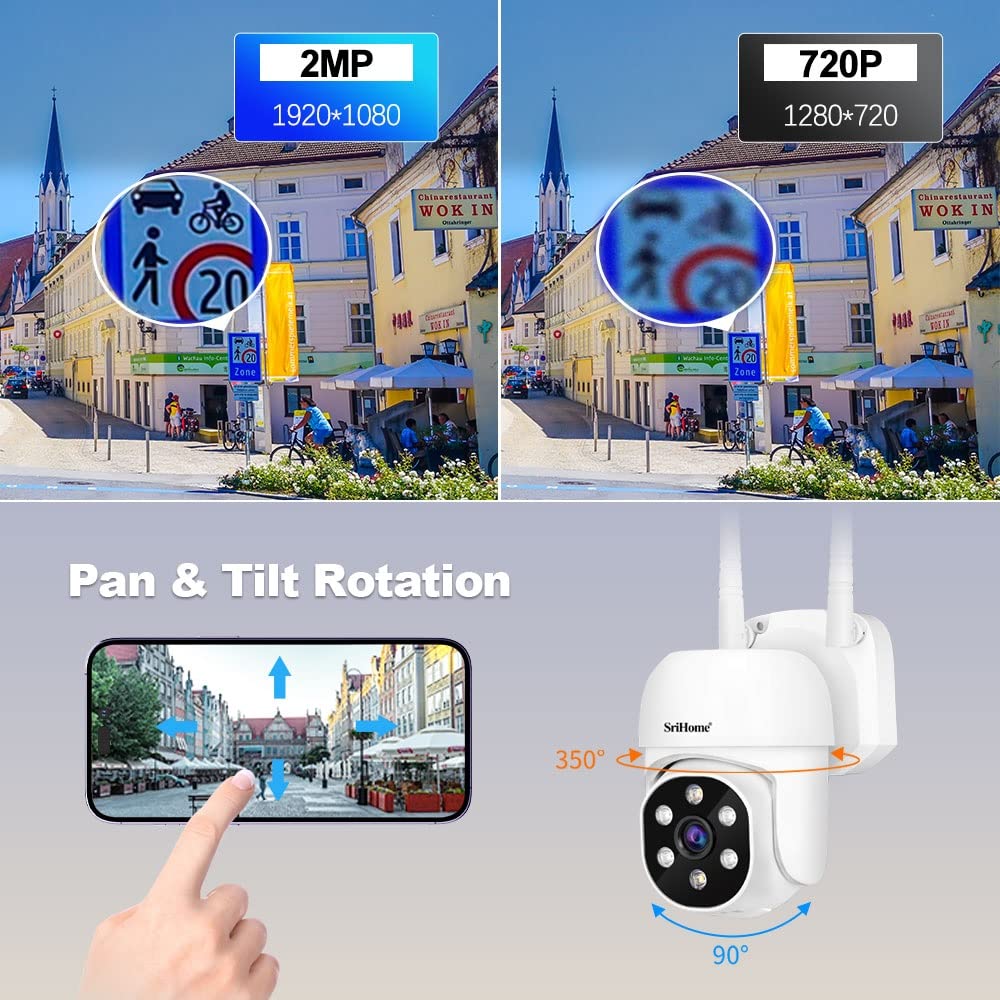
Image: Demonstrates the Pan & Tilt rotation capability of the SriHome camera (350° horizontal, 90° vertical) and provides a visual comparison between 2MP (1920x1080) and 720P (1280x720) video resolutions, highlighting the clarity difference.
- NVR Control: In the live view, select the camera you wish to control. Look for PTZ controls on the screen (often represented by arrow icons).
- App Control: In the SriHome app, select the camera and use the on-screen joystick or arrow controls to adjust the camera's pan (horizontal) and tilt (vertical) angles.
7. Maintenance
- Cleaning: Use a soft, dry cloth to clean the NVR screen and camera lenses. Do not use liquid cleaners or abrasive materials.
- Firmware Updates: Periodically check the SriHome official website or the SriHome app for available firmware updates. Keeping your system updated ensures optimal performance and security. Follow the instructions provided with the firmware update carefully.
- Hard Disk Management: Regularly check the status of your HDD in the NVR settings. If the HDD is full, configure the NVR to overwrite old footage or manually back up important recordings and format the drive.
- Environmental Conditions: Ensure the NVR is in a well-ventilated area and the cameras are protected from extreme weather conditions, even with their IP66 rating, to prolong their lifespan.
8. Troubleshooting
| Problem | Possible Cause | Solution |
|---|---|---|
| No image on NVR screen. | NVR not powered on; Power adapter faulty. | Check power connection and adapter. Ensure the NVR is plugged into a working outlet. |
| Camera not displaying on NVR. | Camera not powered; Out of range; Interference; Camera not paired (unlikely for pre-paired). | Check camera power. Move camera closer to NVR. Reduce interference sources. If issues persist, try resetting the camera and re-pairing (refer to advanced settings in NVR manual for pairing process if needed). |
| No recording or playback. | No HDD installed; HDD not formatted; Recording schedule not set. | Install and format an HDD. Configure recording settings (continuous, schedule, motion). |
| Remote access not working. | NVR not connected to internet; App not configured correctly; Network issues. | Ensure NVR is connected to router via LAN cable. Check network status in NVR settings. Verify app configuration and internet connection on your mobile device. |
| Poor image quality. | Dirty lens; Low light conditions; Resolution settings. | Clean camera lens. Ensure adequate lighting for optimal image. Check NVR display resolution settings. |
9. Specifications
| Feature | Detail |
|---|---|
| Brand | Srihome |
| Model Number | SriHome NVS009 |
| Connectivity Technology | Wireless |
| Video Capture Resolution | 1080p |
| Number of Channels | 4 (supports up to 8 wireless cameras) |
| Memory Storage Capacity | Up to 8 TB (HDD not included) |
| NVR Display Size | 10.1-inch LCD screen |
| Color | Black, White |
| Power Source | Corded Electric |
| Item Dimensions (L x W x H) | 26 x 21 x 12 Centimeters |
| Operating System (App) | Android, Apple iOS |
| Signal Format | Digital |
| Low Light Technology | Night Color |
| Recording Mode | Continuous HD video |
| Optical Sensor Technology | CMOS |
| Total USB Ports | 1 |
| Hardware Interface | 802.11 ac/b/g/n |
| Lens Type | Fixed (Cameras may support Pan & Tilt) |
| Video Input | HDMI, VGA |
| Item Weight | 2 kg |
| Waterproof Rating (Cameras) | IP66 |
| Wireless Bridge Range | Up to 60 meters |
10. Warranty and Support
The product comes with a 6 Month Warranty as per the manufacturer's terms. For warranty claims or technical support, please contact the seller or manufacturer directly.
Manufacturer: Shenzhen Sricctv Technology Co., Ltd
Importer/Packer: Megaa Electronics, megaaelectronics@gmail.com
For further assistance, refer to the official SriHome website or contact their customer support channels.


