1. Introduction
This manual provides essential information for setting up, operating, and maintaining your Beelink EQR6 Mini PC. Please read it thoroughly to ensure proper usage and to maximize the performance and longevity of your device.
2. What's in the Box
- 1 x Beelink EQR6 Mini PC
- 1 x HDMI Cable
- 1 x Power Adapter
- 1 x User Manual

Figure 2.1: Beelink EQR6 Mini PC and its accessories, including the power adapter, HDMI cable, and user manual.
3. Product Overview
3.1. Interfaces and Ports

Figure 3.1: Front and rear panels of the Beelink EQR6 Mini PC, highlighting various input/output ports.
The Beelink EQR6 Mini PC features a comprehensive set of ports for versatile connectivity:
- Front Panel: Power Button, Power Indicator Light, CLR CMOS button, 3x USB 3.2 (10Gbps), 1x USB-C (Data 10Gbps), 1x 3.5mm Audio Jack (Two-in-one).
- Rear Panel: 2x HDMI (Max 4K 60Hz), 2x 1000Mbps Ethernet LAN (RJ-45), 1x AC Jack.
3.2. Internal Structure

Figure 3.2: Exploded view illustrating the internal components of the Beelink EQR6 Mini PC, including the CPU, heat pipe, silent fan, SSD heatsink, and M.2 PCIe4.0 slots.
The internal design of the EQR6 Mini PC focuses on efficient performance and thermal management. Key components include:
- CPU: AMD Ryzen 7 6800U Processor.
- Memory: LPDDR5 RAM.
- Storage: M.2 2280 NVMe SSD (PCIe Gen4.0).
- Cooling System: Features a heat pipe, heat dissipation fins, and a silent fan for effective heat management.
- Wireless: WiFi 6 (AX200) and Bluetooth 5.2 module.
4. Setup
4.1. Initial Connection
To begin using your Beelink EQR6 Mini PC, follow these steps:
- Connect your monitor(s) to the HDMI ports on the rear panel.
- Connect your keyboard and mouse to the available USB ports.
- Connect the power adapter to the AC Jack on the rear panel and plug it into a power outlet.
- Press the Power Button on the front panel to turn on the Mini PC.

Figure 4.1: The Beelink EQR6 Mini PC with essential peripherals connected, ready for use.
4.2. Operating System Setup (Windows 11)
Your Beelink EQR6 Mini PC comes with Windows 11 Pro pre-installed. If you need to reinstall or perform a clean installation of Windows 11, follow these steps:
- Prepare a blank USB drive (minimum 8GB) and back up any important data.
- Download the Windows 11 Installation Media Creation Tool from the Microsoft website.
- Run the tool, select 'USB flash drive' as the media type, and follow the on-screen instructions to create a bootable USB drive.
- Insert the bootable USB drive into your Mini PC.
- Power on the PC and repeatedly press F7 (or the designated key for your model) to enter the boot menu.
- Select your USB drive as the boot option and press Enter.
- Follow the Windows Setup prompts to select language, edition (Windows 11 Pro), accept license terms, and choose 'Custom: Install Windows only (advanced)'.
- Select the unallocated space (or delete existing partitions after backing up data) and click 'Next' to begin installation.
- The PC will restart during the process. Complete the basic Windows settings to enter the OS.
Video 4.2: Detailed guide on how to install Windows 11 on your Beelink Mini PC using a USB flash drive.
4.3. Driver Installation
After Windows 11 is installed, you may need to install specific drivers for optimal performance. These can typically be found on the Beelink support website:
- Visit the official Beelink support website.
- Navigate to the 'Drivers & Downloads' section.
- Search for your model (EQR6) and download the appropriate driver package.
- Unzip the downloaded drivers to a convenient location (e.g., Desktop).
- Open Device Manager (search in Windows).
- Locate any devices with missing or outdated drivers (often marked with a yellow exclamation mark).
- Right-click on the device, select 'Update driver', then 'Browse my computer for drivers', and point to the unzipped driver folder.
- Repeat for all necessary drivers.
5. Operating Instructions
5.1. General Usage
The Beelink EQR6 Mini PC is designed for a wide range of tasks, from office productivity to home entertainment. Its powerful AMD Ryzen 7 6800U processor and AMD Radeon 680M graphics ensure smooth operation for:
- Office applications and multitasking.
- 4K@60Hz video playback and streaming.
- Light gaming and content creation.

Figure 5.1: The Mini PC handling various applications, demonstrating its capability for both work and entertainment.
5.2. Storage Expansion
The Beelink EQR6 Mini PC supports storage expansion. You can replace the existing M.2 NVMe SSD or add an additional 2.5-inch SATA drive (if a bay is available and not pre-populated) to increase your storage capacity up to 4TB for M.2 and potentially more for SATA, depending on the model variant.
Video 5.2: A tutorial demonstrating the process of replacing or upgrading the SSD in a Beelink Mini PC.
For detailed instructions on replacing or adding an SSD, please refer to the provided video tutorial or consult the Beelink support website.
6. Maintenance
Regular maintenance helps ensure the optimal performance and longevity of your Mini PC:
- Software Updates: Regularly check for and install Windows updates and driver updates from the Beelink support website.
- Cleaning: Keep the Mini PC clean and free of dust. Use a soft, dry cloth for external cleaning. For internal cleaning (e.g., fan, heatsink), it is recommended to consult a professional or refer to specific disassembly guides if you are comfortable with hardware.
- Ventilation: Ensure proper airflow around the device. Do not block the ventilation holes.
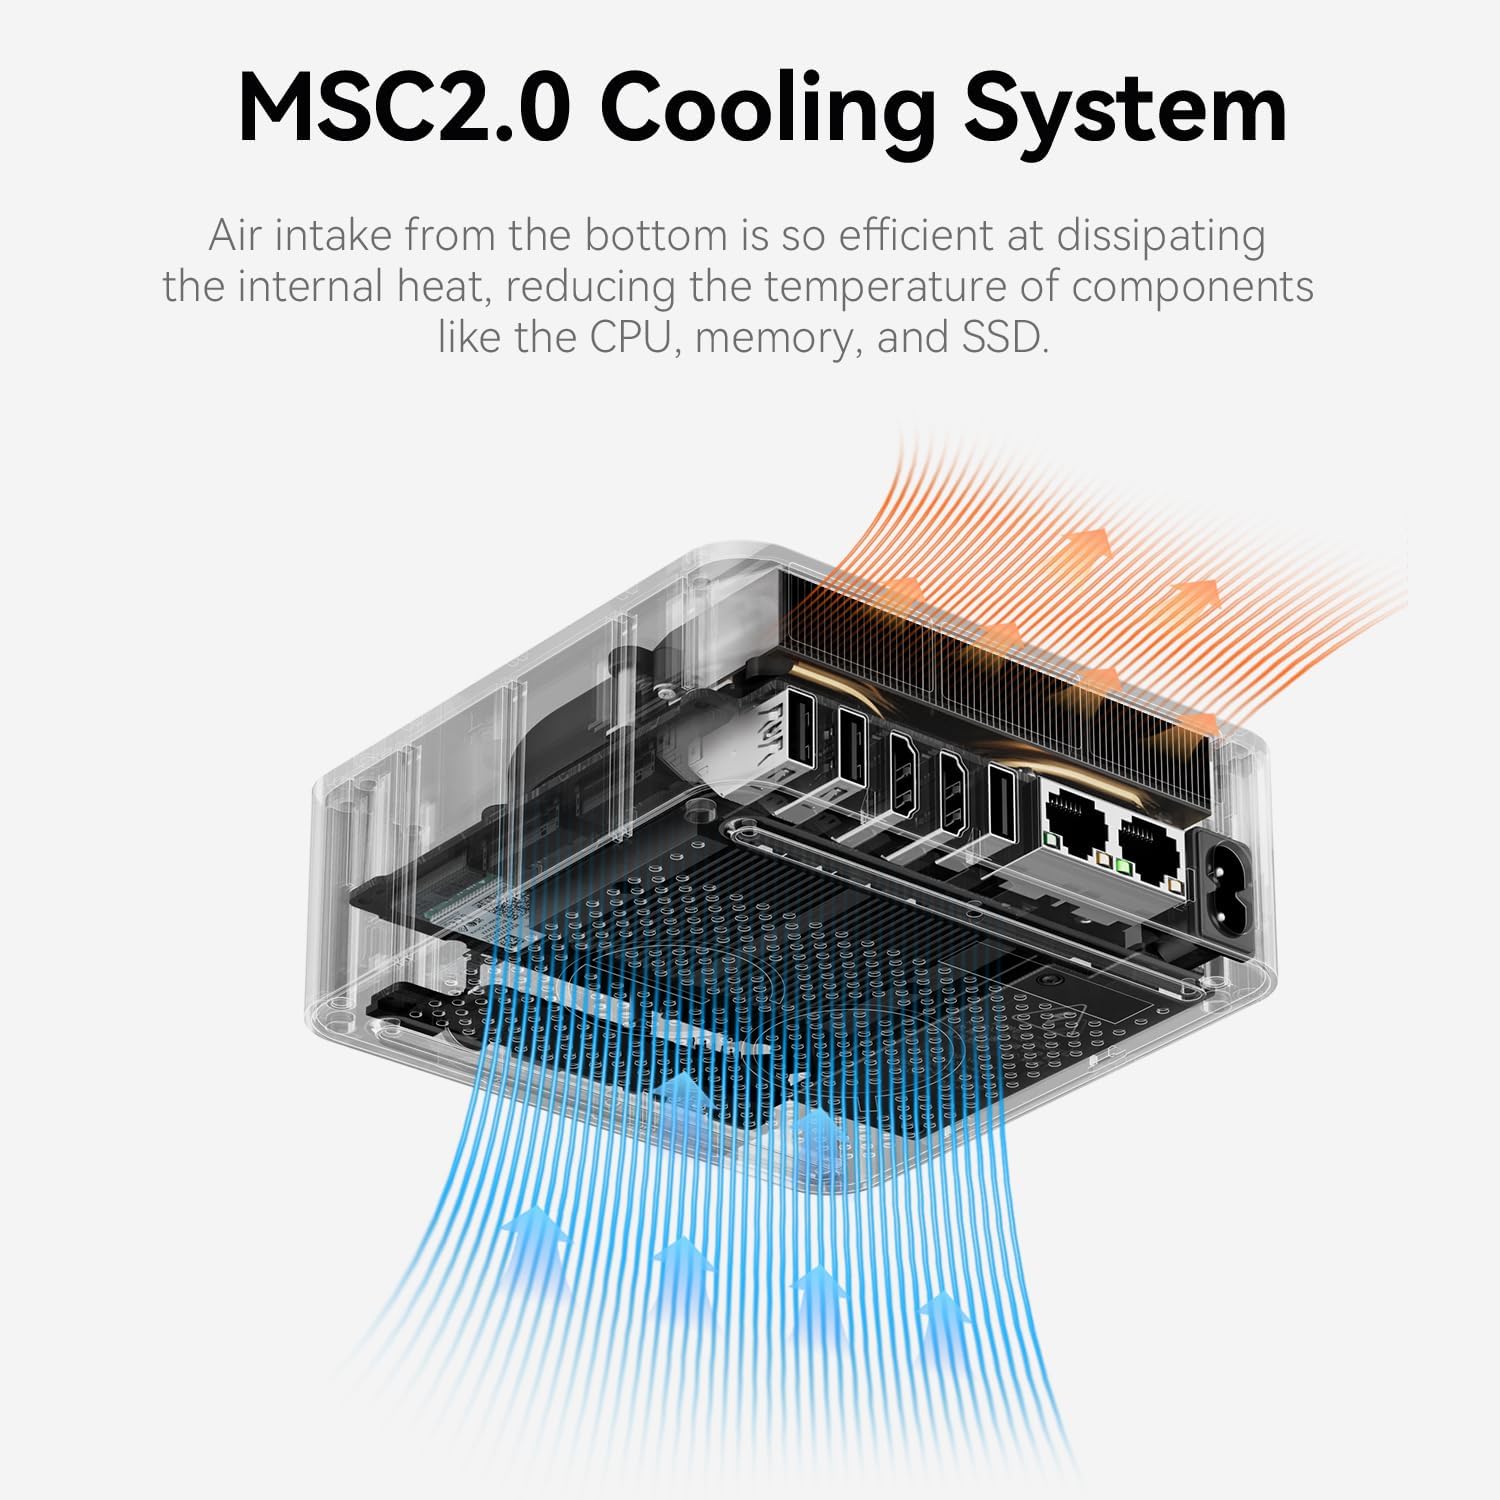
Figure 6.1: Illustration of the MSC2.0 Cooling System in the Beelink EQR6 Mini PC, showing air intake and heat dissipation.

Figure 6.2: Detailed view of the cooling components, including the heat pipe, heat dissipation fins, silent fan, and SSD heatsink.
7. Troubleshooting
If you encounter issues with your Beelink EQR6 Mini PC, consider the following common troubleshooting steps:
- No Power: Ensure the power adapter is securely connected to both the PC and the power outlet. Try a different power outlet.
- No Display: Check HDMI cable connections to both the PC and the monitor. Try a different HDMI cable or monitor. Ensure the monitor is set to the correct input source.
- Operating System Issues: If Windows is not booting correctly, try accessing the BIOS/UEFI settings (usually by pressing F7 or DEL during startup) to check boot order or perform a system restore/reinstallation.
- Driver Problems: If a device is not functioning, check Device Manager for driver issues and reinstall/update drivers as described in Section 4.3.
- Overheating: Ensure the ventilation holes are clear and the fan is not obstructed. Reduce heavy workloads if the device feels excessively hot.
For persistent issues, please contact Beelink customer support.
8. Specifications
| Feature | Detail |
|---|---|
| Processor | AMD Ryzen 7 6800U (8C/16T, up to 4.7GHz) |
| Graphics | AMD Radeon 680M (12core 2200 MHz) |
| RAM | 24 GB LPDDR5 |
| Storage | 500 GB PCIe4.0 NVMe SSD (Dual M.2 PCIe Gen4.0, Max 4TB) |
| Operating System | Windows 11 Pro |
| Video Output | 2x HDMI (Max 4K@60Hz) |
| Wireless Connectivity | WiFi 6 (802.11ax), Bluetooth 5.2 |
| Ethernet | Dual 1000Mbps LAN (RJ-45) |
| USB Ports | 3x USB 3.2 (10Gbps), 1x USB 2.0, 1x USB-C (Data 10Gbps) |
| Audio | 1x 3.5mm Phone Jack (Two-in-one) Realtek ALC897 |
| Power Supply | Built-in 85W PSU (Input: 100-240V AC, 50/60Hz) |
| Dimensions (LxWxH) | 4.96 x 4.4 x 1.57 inches |
| Weight | 2.11 pounds |
9. Safety Information
Please observe the following safety guidelines:
- Do not connect to a network or Wi-Fi until the operating system is fully running to avoid potential setup issues.
- Avoid filling in email addresses during initial setup; this step can be skipped for normal machine operation.
- Ensure proper ventilation to prevent overheating.
- Use only the provided power adapter.
10. Warranty and Support
Beelink is committed to providing excellent customer service and product support:
- Warranty: All Beelink Mini PCs come with a 1-Year-free warranty.
- Technical Support: Lifetime technical support is provided.
- After-Sales Service: 24/7 after-sales service is available.
- Certifications: All products have obtained FCC, RoHS, and CE Certifications.
If you have any questions or require assistance, please do not hesitate to contact Beelink customer service. We are guaranteed to solve your problems.
Video 10.1: Instructions on how to contact Beelink customer support for assistance.


