
New brothread SA431+SA432+SA434
New brothread Embroidery Machine Hoop 3 in 1 Set Instruction Manual
Brand: New brothread | Model: SA431+SA432+SA434
1. Introduction
This manual provides essential information for the proper use and care of your New brothread Embroidery Machine Hoop 3 in 1 Set. This set includes three distinct hoop sizes (SA431, SA432, SA434) designed to enhance your embroidery projects with precision and versatility. Please read this manual thoroughly before using the product.

Image 1.1: Overview of the New brothread 3 in 1 Embroidery Machine Hoop Set.
2. Product Features
- High Quality Construction: New brothread embroidery machine hoops are manufactured to be strong and accurate, providing reliable performance for your embroidery needs.
- Multi-Functional Hoops: The set includes three different hoop sizes for various applications:
- SA431 (EF61): Small Monogramming Hoop (1" x 2.5" / 25mm x 60mm) - Ideal for small embroidery designs, monograms, and intricate details on collars, cuffs, and infant wear.
- SA432 (EF62): Medium Embroidery Hoop (4" x 4" / 100mm x 100mm) - Suitable for the most common embroidery sizes.
- SA434 (EF71): Large Three-Stage Hoop (4" x 6.75" / 100mm x 170mm) - Used for larger patterns, combining multiple designs, and character patterns.
- Clear Grids for Accurate Alignment: Each embroidery machine hoop is equipped with a matching embroidery grid sheet. These grids facilitate accurate alignment and precise marking of your design.
- Adjustable Fabric Clamp: A metal screw on each hoop allows for firm clamping of a wide range of fabric thicknesses, ensuring stability during embroidery.

Image 2.1: Detailed view of the three hoop sizes with their respective dimensions.
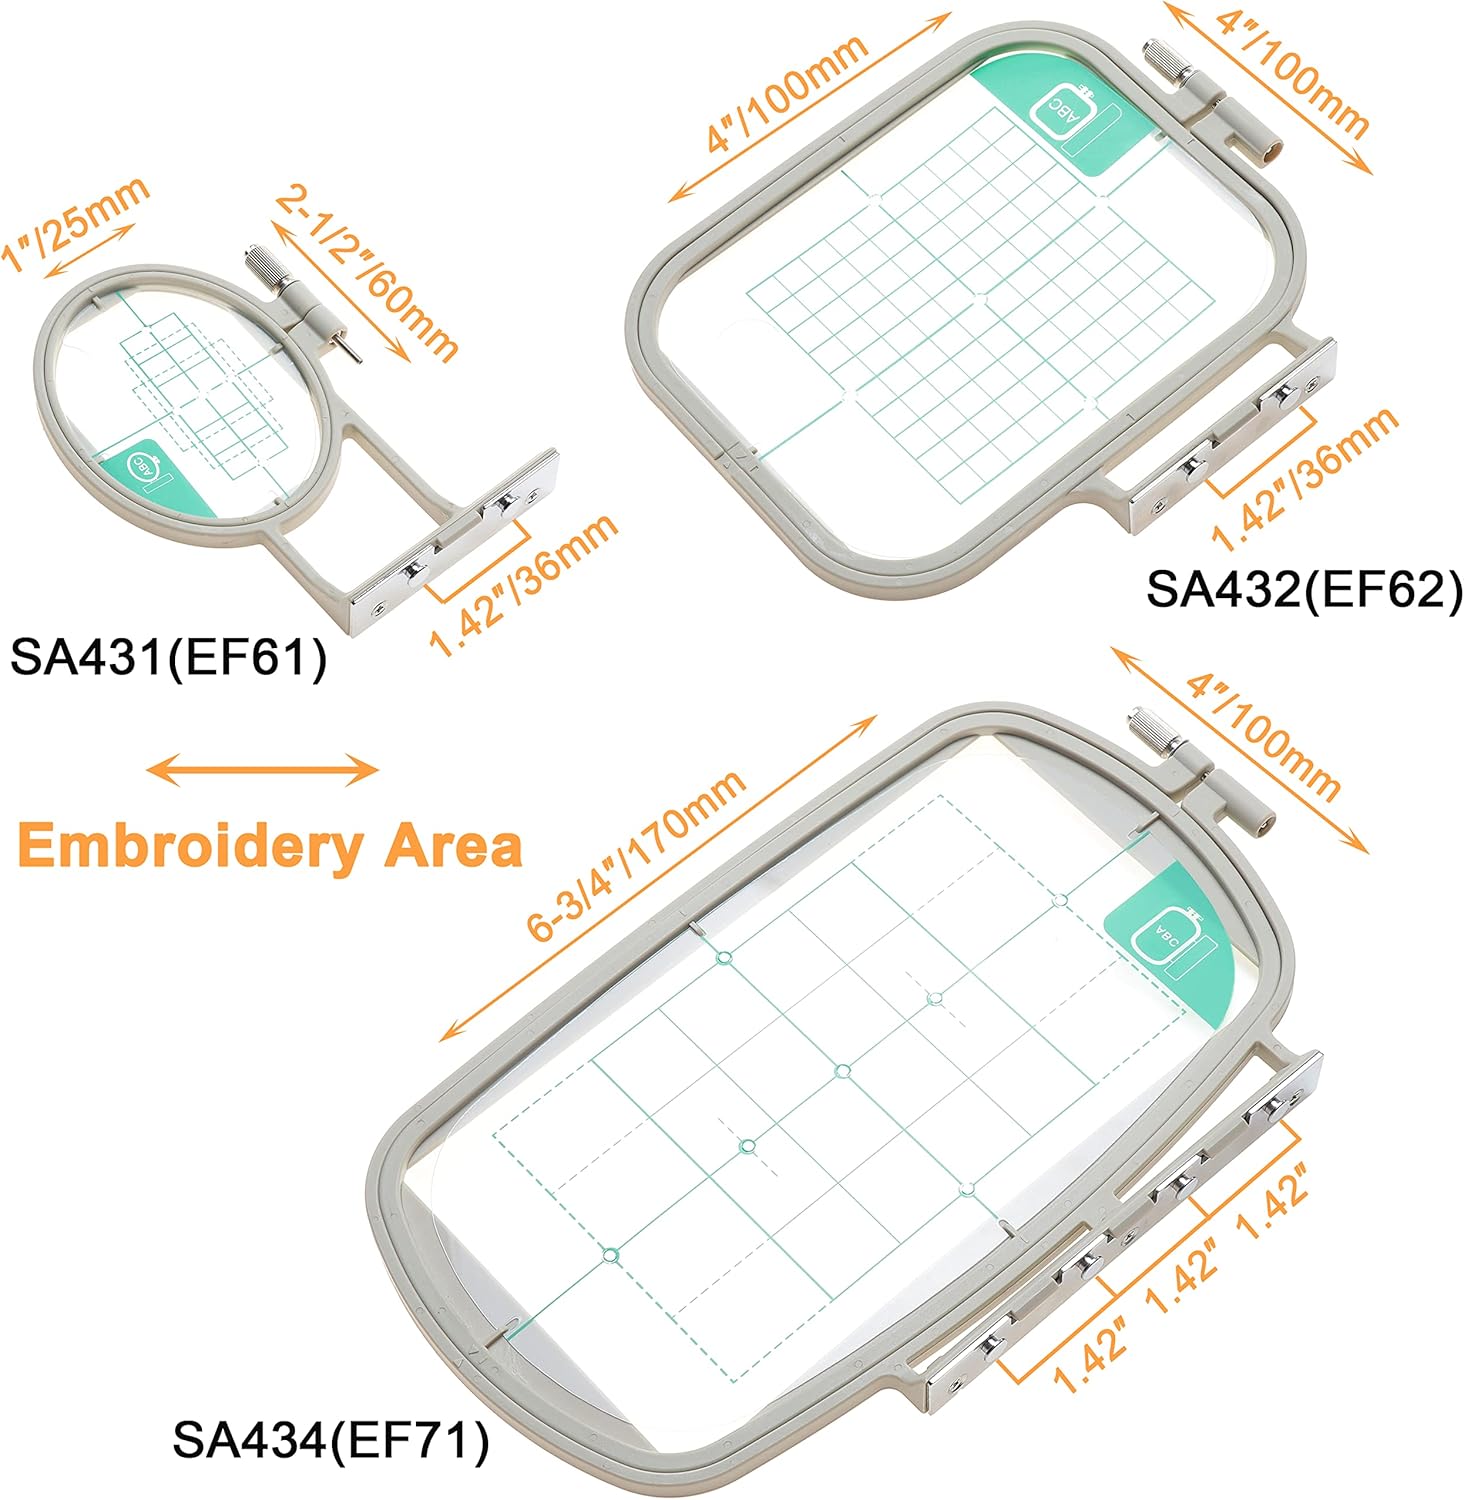
Image 2.2: The clear grid sheets provided for precise design alignment.
3. Compatibility
This embroidery machine hoop set is compatible with a wide range of Brother and Baby Lock embroidery machines. Before purchasing or using, please verify that your machine model is listed below or refer to the 'Included and Optional Accessories' section of your machine's manual.

Image 3.1: Visual guide for checking the correct connection part for compatibility.

Image 3.2: A comprehensive list of compatible Brother and Baby Lock embroidery machine models.
Compatible Machine Models:
- Brother SE725, SE700, SE630, SE625, SE600, SE425, SE400, SE350, SE270D
- Brother PE570, PE550D, PE545, PE540D, PE535, PE525, PE500, PE460L, PE430, PE400D, PE300S, PE270D
- Brother Innov-ís 990D, 980D, 955, 950D, 900D, 500D, NV960DL, NV900, NV180, NV18E, NS1850D, M380D, M280D, M230E, 97E
- Brother LB7000BNDL, LB7000PRW, LB7000, LB6800THRD, LB6800PRW, LB6800, LB6770PRW, LB6770, LB5000
- Brother HE300, HE-240, HE-120, HE1
- Brother SB7500, SB7050E
- Brother NS1750D
- Baby Lock Verve, Sofia 2
4. Setup and Installation
Proper setup of the embroidery hoop is crucial for successful embroidery. Follow these steps to prepare your hoop for use:
- Select the Correct Hoop: Choose the appropriate hoop size (SA431, SA432, or SA434) based on your design and fabric.
- Prepare Fabric and Stabilizer: Place your fabric and the necessary stabilizer (if required) over the inner hoop.
- Secure the Outer Hoop: Gently press the outer hoop over the inner hoop, ensuring the fabric and stabilizer are taut and wrinkle-free. Tighten the metal screw on the hoop to firmly secure the material.
- Use Grid Sheets for Alignment: Utilize the clear grid sheets provided with each hoop to accurately align your design within the embroidery area. This helps in precise placement on your fabric.
- Attach to Machine: Insert the assembled hoop into your compatible embroidery machine according to your machine's specific instructions.
Setup Demonstration Video:
Video 4.1: This video demonstrates the unboxing, identification of hoop sizes, proper use of grid sheets for alignment, and how to assemble the hoops. It also shows the hoops being used with an embroidery machine.
5. Operating Instructions
Once the hoop is properly set up and attached to your embroidery machine, you can begin your embroidery project. The hoops are designed to hold your fabric securely, allowing the machine to stitch designs accurately.
- Design Selection: Select your desired embroidery design on your machine's interface.
- Start Embroidery: Initiate the embroidery process. The machine will move the hoop as needed to stitch the design.
- Monitoring: Monitor the embroidery process to ensure the fabric remains taut and the machine operates smoothly.
- Completion: Once the embroidery is complete, carefully remove the hoop from the machine and then remove the fabric from the hoop.
For detailed operating procedures specific to your embroidery machine, always refer to your machine's instruction manual.

Image 5.1: Example of organized storage for embroidery hoops when not in use.
6. Maintenance
To ensure the longevity and optimal performance of your New brothread embroidery hoops, follow these maintenance guidelines:
- Cleaning: After each use, wipe down the hoops with a soft, dry cloth to remove any fabric fibers or dust. Avoid using harsh chemicals or abrasive cleaners.
- Storage: Store the hoops in a clean, dry place away from direct sunlight and extreme temperatures. Keeping them organized can prevent damage and make them easier to find.
- Inspect Regularly: Periodically inspect the hoops for any signs of wear, cracks, or damage. Ensure the metal screws are functioning correctly and can securely tighten the fabric.
7. Troubleshooting
If you encounter issues while using your embroidery hoops, consider the following common solutions:
- Fabric Slipping: If the fabric is not held securely, ensure the metal screw on the hoop is tightened sufficiently. Also, check that the fabric and stabilizer are properly layered and positioned within the hoop.
- Design Misalignment: Double-check that you have used the clear grid sheets for accurate placement and that the hoop is correctly inserted into the machine. Refer to your machine's manual for calibration or alignment procedures.
- Hoop Not Fitting Machine: Verify that your embroidery machine model is listed in the compatibility section (Section 3). If it's not listed, the hoop may not be compatible.
For issues related to your embroidery machine's operation, always consult your machine's specific instruction manual or contact the machine manufacturer's support.
8. Specifications
| Attribute | Value |
|---|---|
| Brand | New brothread |
| Model Number | SA431+SA432+SA434 |
| Hoop Sizes (Embroidery Area) | SA431: 1" x 2.5" (25mm x 60mm) SA432: 4" x 4" (100mm x 100mm) SA434: 4" x 6.75" (100mm x 170mm) |
| Material | Metal |
| Color | Silver |
| Item Weight | 1.1 pounds (0.5 Kilograms) |
| Product Dimensions | 4 x 4 x 0.04 inches (overall package/product dimensions) |
| UPC | 641837473478 |
| ASIN | B09HBGGSLC |
9. Warranty and Support
New brothread is committed to providing high-quality products. For any questions, concerns, or support regarding your embroidery machine hoop set, please contact New brothread customer service. Please retain your proof of purchase for warranty claims.
Ask a question about this manual
Ask about setup, troubleshooting, compatibility, parts, safety, or missing instructions. Manuals+ will review the question and use this page’s manual context to help answer it.