Introduction
This manual provides detailed instructions for the setup, operation, and maintenance of your NexiGo Q500 Elite Wireless Controller. Please read this manual thoroughly before using the product to ensure proper functionality and to maximize your gaming experience.
The NexiGo Q500 Elite Wireless Controller is designed for multi-platform compatibility, supporting PlayStation 4, iOS, Android, and PC devices. It features programmable back buttons, turbo function, dual vibration, and a 6-axis gyro sensor for an immersive gaming experience.
Product Overview
Familiarize yourself with the various components and controls of your NexiGo Q500 Elite Wireless Controller.

Figure 1: Front and back view of the NexiGo Q500 Elite Wireless Controller, highlighting the main buttons and the two programmable back buttons (Fn1 and Fn2).
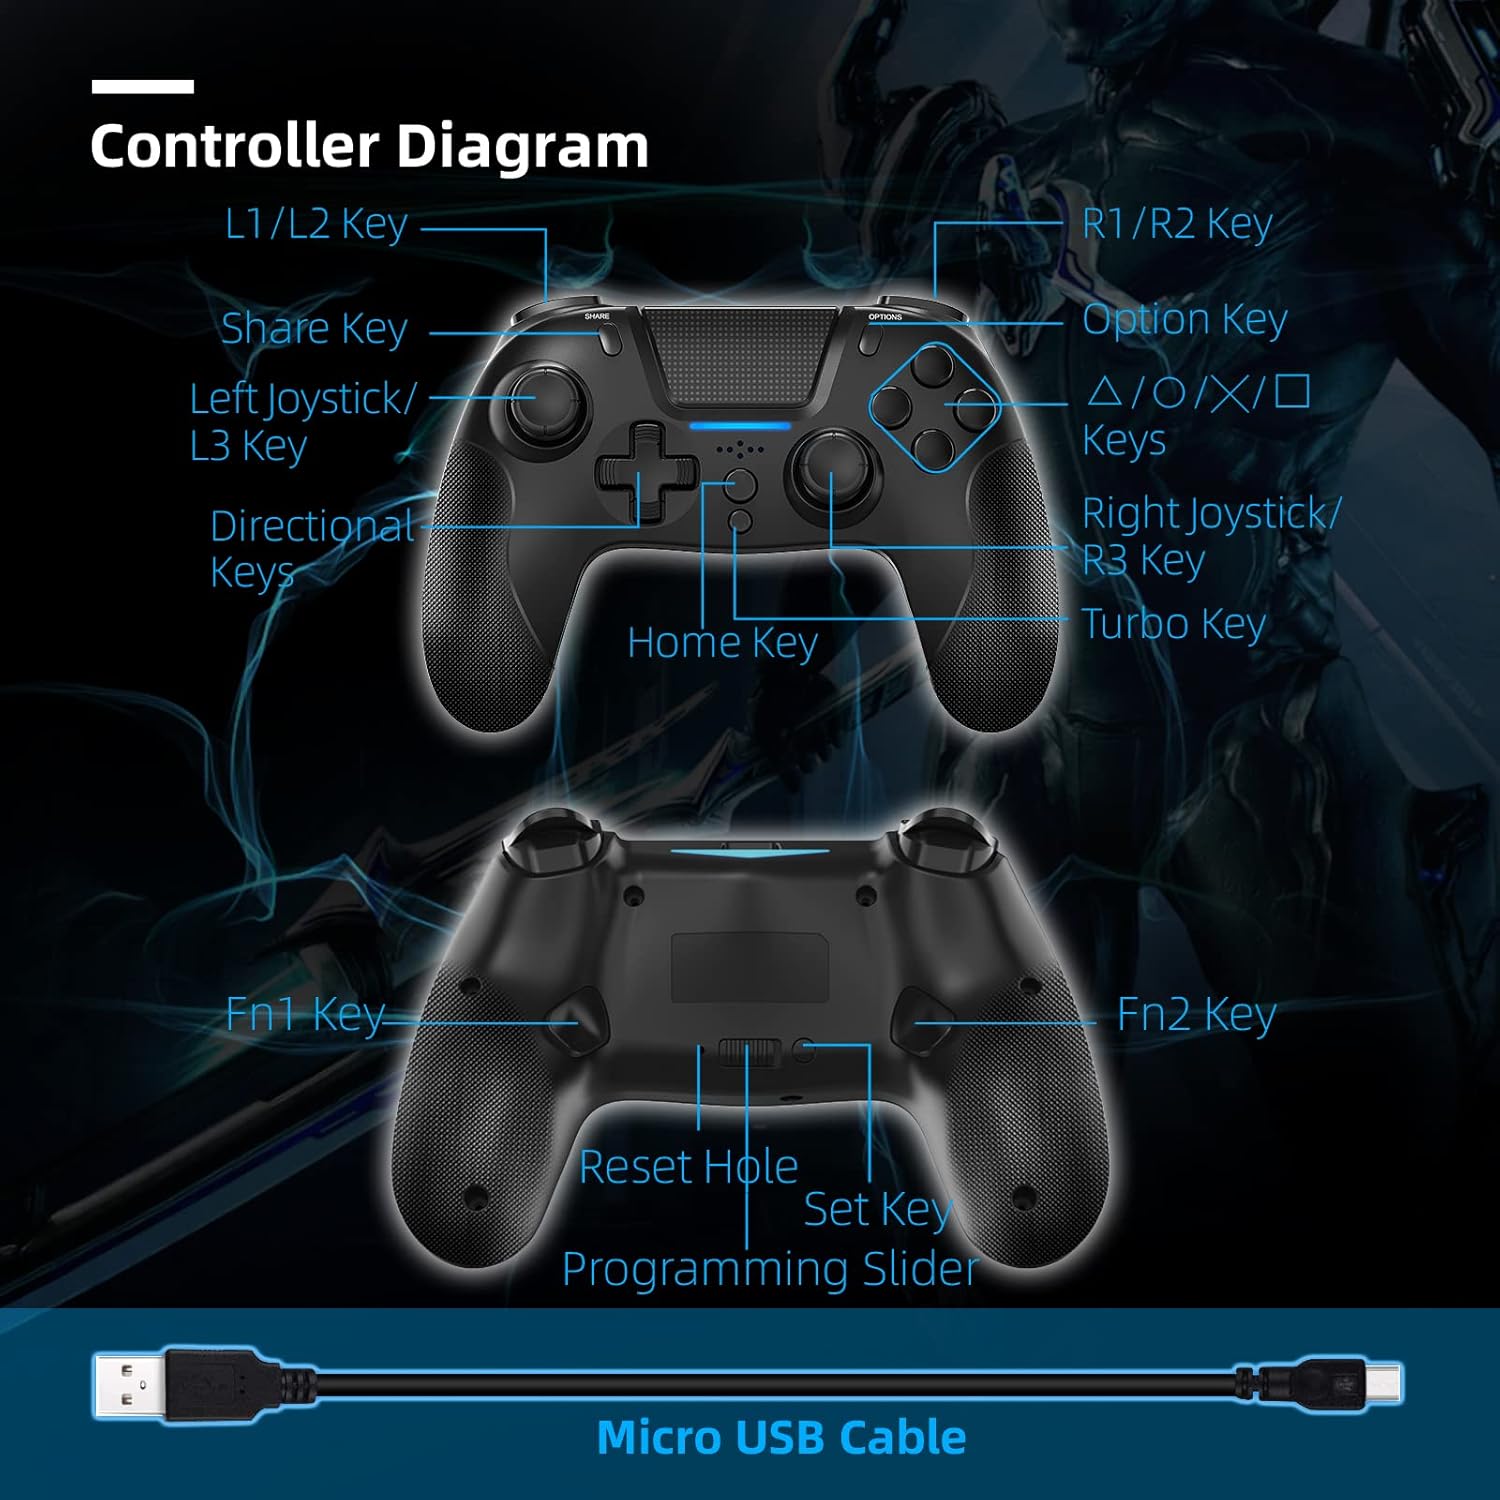
Figure 2: Detailed diagram of the NexiGo Q500 Elite Wireless Controller, labeling all keys including L1/L2, R1/R2, Share, Option, Directional Keys, Left/Right Joysticks, Home Key, Turbo Key, Fn1, Fn2, Reset Hole, Set Key, and Programming Slider. A Micro USB Cable is also shown.
Key Components:
- L1/L2 Keys: Left shoulder and trigger buttons.
- R1/R2 Keys: Right shoulder and trigger buttons.
- Share Key: Used for sharing content on PlayStation.
- Option Key: Used for in-game menus and options.
- Directional Keys: For precise directional input.
- Left Joystick/L3 Key: For movement and L3 button press.
- Right Joystick/R3 Key: For camera control and R3 button press.
- Home Key: PlayStation button for system functions.
- Turbo Key: Activates continuous firing for assigned buttons.
- Fn1/Fn2 Keys: Programmable back buttons.
- Reset Hole: For factory reset.
- Set Key: Used for programming Fn1/Fn2.
- Programming Slider: Enables/disables programming mode for back buttons.
- Micro USB Port: For charging and wired connection.
- 3.5mm Headset Jack: For connecting a headset.
- Built-in Speaker: For audio output.
Setup and Connection
Connecting to PlayStation 4 (PS4)
Step 1: Connect the controller to your PS4 console using the provided Micro USB cable.

Figure 3: Illustration of connecting the controller to a PS4 console using the USB cable.
Step 2: Press the Home button on the controller.
Figure 4: Illustration showing the Home button being pressed on the controller.
Step 3: The controller will sync with the PS4. It will be ready for use and will automatically reconnect wirelessly after this initial setup is complete.
Figure 5: Illustration of the controller successfully connected and ready for use with the PS4.
Note: After the first wired connection, the controller will automatically connect wirelessly to the PS4 in subsequent uses.
Connecting to iOS 14.0 / Android Devices
Step 1: Press and release the Share button on the controller.
Figure 6: Illustration showing the Share button being pressed on the controller.
Step 2: Hold the Home button for three seconds. If performed correctly, the LED on the controller will flash continuously until it is paired.
Figure 7: Illustration showing the Home button being held for 3 seconds.
Step 3: On your device (iOS or Android), navigate to Settings > Bluetooth and select "DualShock 4 Wireless Controller" or "Wireless Controller" from the list of available devices to pair.
Figure 8: Illustration of a mobile device's Bluetooth settings screen, showing the controller ready for pairing.
Connecting to PC
For PC connection, you can use either a wired connection via the Micro USB cable or a wireless Bluetooth connection. For Bluetooth, follow the iOS/Android pairing steps and ensure your PC has Bluetooth capabilities. The controller may appear as "DualShock 4 Wireless Controller" or "Wireless Controller" in your PC's Bluetooth settings.
Operating Instructions
Charging the Controller
The controller has a built-in 550mAh battery. To charge:
- Connect the controller to a USB power source (e.g., PS4 console, PC, or USB wall adapter) using the provided Micro USB cable.
- The charging time is approximately 3 hours for a full charge.
- A full charge provides up to 8 hours of usage time.

Figure 9: Visual representation of the controller's battery life and charging specifications, including 3 hours to fully charge, 8 hours of playing time, 500mAh battery capacity, and 32ft wireless connection distance.
Programming Back Buttons (Fn1/Fn2)
The NexiGo Q500 Elite controller features two programmable back buttons (Fn1 and Fn2) that can be mapped to any of the 18 primary buttons for enhanced control.

Figure 10: Image highlighting the two multi-functional, mappable back buttons (Fn1 and Fn2) on the controller.
- Ensure the Programming Slider (located on the back of the controller) is in the "ON" position.
- Press and hold the "Set" key (also on the back) until the indicator light starts flashing.
- Press the Fn1 or Fn2 button you wish to program.
- Press the primary button (e.g., X, O, Square, Triangle, L1, R1, etc.) you want to map to the selected Fn button.
- Press the "Set" key again to save the mapping. The indicator light will stop flashing.
- Repeat for the other Fn button if desired.
- To disable programming, slide the Programming Slider to the "OFF" position.
Using the Turbo Function
The Turbo function allows for continuous rapid input of a button press without repeatedly pressing the button.
- Press and hold the "Turbo" key.
- While holding "Turbo", press the button you wish to apply the turbo function to (e.g., X, Square, R1).
- Release both keys. The selected button will now activate continuously when held down.
- To disable Turbo for a specific button, repeat the process: hold "Turbo" and press the button again.
Headset and Speaker Functionality
The controller is equipped with a 3.5mm headset jack and a built-in speaker.

Figure 11: Image showing the 3.5mm headset jack on the controller, with icons for headset and microphone, indicating audio input and output capabilities.
- Plug any standard 3.5mm headset into the jack for private audio and microphone use.
- The built-in speaker will output game audio or chat audio if no headset is connected or if configured in system settings.
Features and Specifications
Key Features:
- Multi-Platform Compatibility: PS4, iOS (14.0+), Android, PC.
- Programmable Back Buttons: Two multi-function buttons (Fn1, Fn2) for custom mapping.
- Turbo Function: For rapid, continuous button input.
- Dual Vibration Feedback: Enhances immersion with haptic feedback.
- 6-Axis Gyro Sensor: Provides enhanced dynamic motion control.
- Built-in Speaker: For direct audio output from the controller.
- 3.5mm Headset Jack: For connecting external audio devices.
- Ergonomic Design: Comfortable grip for extended gaming sessions.
- Long Battery Life: Up to 8 hours of playtime on a single charge.

Figure 12: Image illustrating the 6-axis gyroscope for enhanced dynamic feel and dual motors for powerful haptic feedback within the controller.

Figure 13: Image showing the controller in use, with icons representing its compatibility with PS4, iOS, Android, and PC platforms.
Technical Specifications:
| Specification | Detail |
|---|---|
| Model | Q500 |
| Input Voltage | DC5V/500mA |
| Battery Capacity | 550mAh |
| Charging Time | Approximately 3 hours |
| Usage Time | Up to 8 hours |
| Wireless Connection Distance | Up to 10 meters (32 feet) |
| Connectivity | Bluetooth |
| Dimensions (L x W x H) | 14.99 x 10.92 x 3.51 cm |
| Weight | 181.44 g (0.4 lbs) |
| Compatible Platforms | PlayStation 4, iOS 14.0+, Android, PC |
Maintenance and Care
- Keep the controller away from extreme temperatures, direct sunlight, and moisture.
- Clean the controller with a soft, dry cloth. Do not use harsh chemicals or abrasive materials.
- Avoid dropping the controller or subjecting it to strong impacts.
- When not in use for extended periods, store the controller in a cool, dry place.
Troubleshooting
Controller not connecting/pairing:
- Ensure the controller is sufficiently charged.
- For PS4: Try connecting via USB cable first to establish the initial connection.
- For Bluetooth devices: Ensure Bluetooth is enabled on your device and the controller is in pairing mode (LED flashing).
- Try resetting the controller: Locate the small reset hole on the back of the controller (near the Fn buttons). Use a thin, pointed object (like a paperclip) to press the reset button inside for 3-5 seconds.
- Remove previous pairings from your device's Bluetooth settings and attempt to pair again.
Input lag or unresponsiveness:
- Ensure the controller is within the wireless connection distance (up to 10 meters/32 feet).
- Minimize interference from other wireless devices.
- Try connecting the controller via USB cable to see if the issue persists.
- Ensure your console/PC operating system and game are up to date.
Buttons not responding or sticking:
- Clean around the buttons with a soft, dry cloth to remove any debris.
- Perform a controller reset using the reset hole.
Battery not charging:
- Ensure the Micro USB cable is securely connected to both the controller and the power source.
- Try a different Micro USB cable or a different USB power source.
Warranty and Support
For warranty information and technical support, please refer to the official NexiGo website or contact their customer service directly. Keep your purchase receipt as proof of purchase.
Website: www.nexigo.com
Email: support@nexigo.com


