Introduction
Thank you for purchasing the Circrane Wireless Weather Station. This device features a high-performance VA-LCD full-color display, providing clear and vibrant readings of indoor and outdoor temperature and humidity, weather forecasts, atomic time (WWVB RCC), moon phases, and barometric pressure trends. This manual provides detailed instructions for setup, operation, maintenance, and troubleshooting to ensure optimal performance of your weather station.

Image: The Circrane Wireless Weather Station main display unit and its accompanying remote sensor.
What's in the Box
Please check the package contents to ensure all items are present and in good condition:
- 1 x VA-LCD Weather Station (Main Unit)
- 1 x Wireless Sensor (Remote Sensor/Transmitter)
- 1 x Type-C Power Cord (3.25FT)
- 1 x AC Adaptor
- 1 x User Manual (this document)

Image: A visual representation of the weather station's dimensions and the complete packing list.
Product Overview
The Circrane Weather Station consists of a main display unit and a remote wireless sensor. The main unit features a VA-LCD screen that displays all relevant weather data and time information. The remote sensor collects outdoor temperature and humidity data and transmits it wirelessly to the main unit.
Main Unit Display Layout

Image: Detailed breakdown of the main unit's display, highlighting each data point and its location.
Main Unit Buttons and Ports
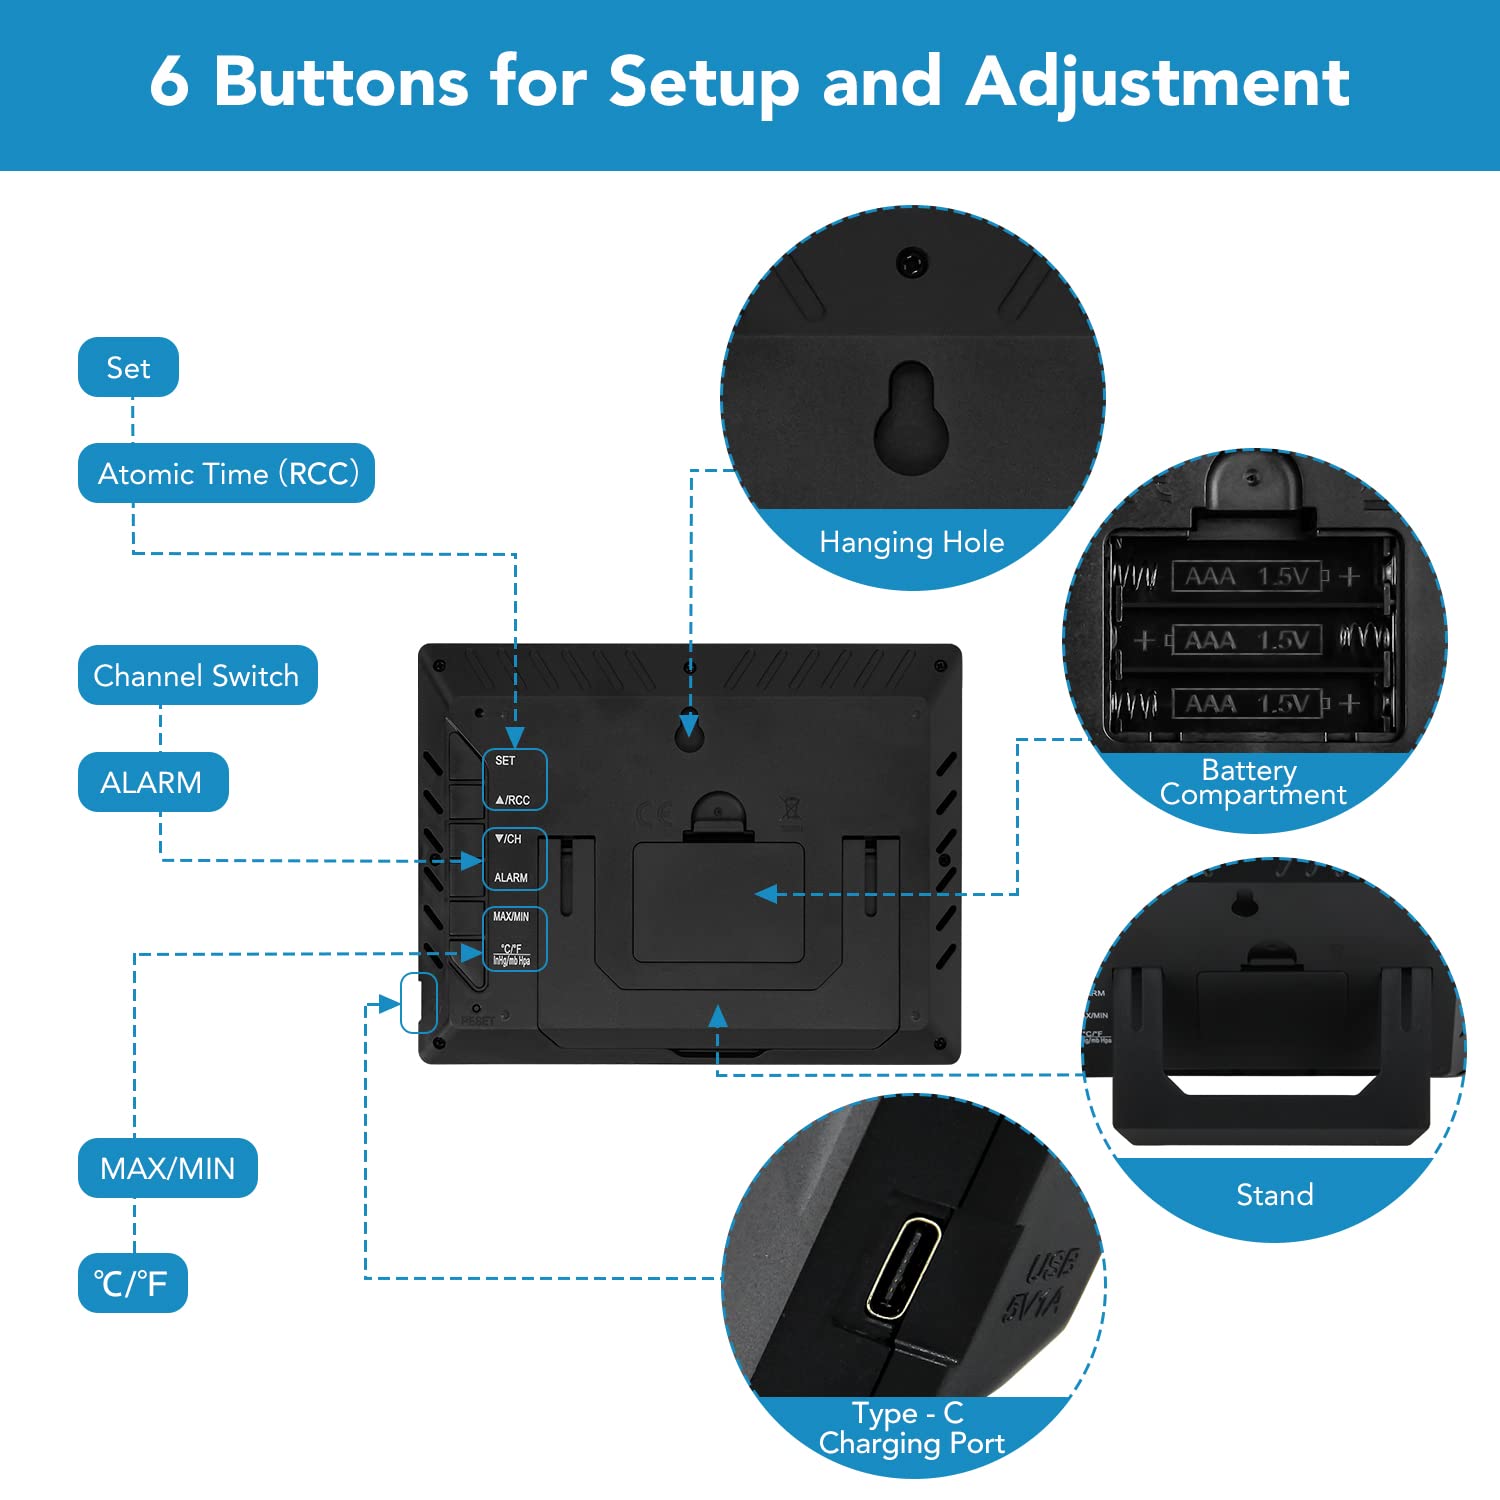
Image: Rear view of the main unit, illustrating the location and function of its buttons, battery compartment, hanging hole, stand, and Type-C charging port.
- SET Button: Enters setting mode.
- RCC Button: Manually initiates Atomic Time (WWVB RCC) synchronization.
- CHANNEL Switch: Cycles through remote sensor channels (CH1, CH2, CH3).
- ALARM Button: Sets and activates the alarm.
- MAX/MIN Button: Displays maximum and minimum temperature/humidity records.
- °C/°F Button: Toggles between Celsius and Fahrenheit temperature units.
- Hanging Hole: For wall mounting.
- Battery Compartment: For backup batteries (2 x AAA, not included).
- Stand: For tabletop placement.
- Type-C Charging Port: For primary power supply.
Setup
Follow these steps to set up your Circrane Wireless Weather Station:
1. Powering the Main Unit
- Insert 2 x AAA batteries (not included) into the battery compartment of the main unit. These batteries serve as a backup to prevent data loss during power outages.
- Connect the Type-C power cord to the main unit's charging port and plug the AC adaptor into a standard power outlet. The display will light up.
Note: For optimal display brightness and continuous operation, the weather station needs to be kept plugged into the power outlet. Battery mode is primarily for backup and supports operation for up to 60 hours.

Image: The weather station connected to a power source, emphasizing the importance of continuous power for display functionality.
2. Setting Up the Remote Sensor
- Open the battery compartment of the remote sensor and insert 2 x AAA batteries (not included), observing polarity.
- Select a channel (1, 2, or 3) on the remote sensor using the small switch inside the battery compartment. Ensure this channel matches the one selected on the main unit if you plan to use multiple sensors.
- Place the remote sensor outdoors in a shaded, dry location, protected from direct sunlight and precipitation, for accurate readings. The maximum transmission distance is 200 feet in open areas.
3. Pairing the Sensor
The main unit should automatically connect to the remote sensor within a few minutes. If the outdoor readings do not appear, press and hold the 'CHANNEL' button on the main unit to initiate a manual search for the sensor.
4. Initial Settings (Time, Date, Units)
- Atomic Time (WWVB RCC): The weather station will attempt to synchronize with the WWVB atomic clock signal automatically. This process may take several hours. You can manually initiate synchronization by pressing the 'RCC' button.
- Manual Time/Date Setting: If atomic time is unavailable, press and hold the 'SET' button to enter manual setting mode. Use the 'MAX/MIN' and 'CHANNEL' buttons to adjust values and 'SET' to confirm and move to the next setting (e.g., 12/24 hour format, hour, minute, year, month, day, time zone, Daylight Saving Time).
- Temperature Units: Press the '°C/°F' button to switch between Celsius and Fahrenheit.
Operating Instructions
Understanding the Display
The VA-LCD display provides a comprehensive overview of current weather conditions and time. Its wide viewing angle and high contrast ensure readability from various positions.
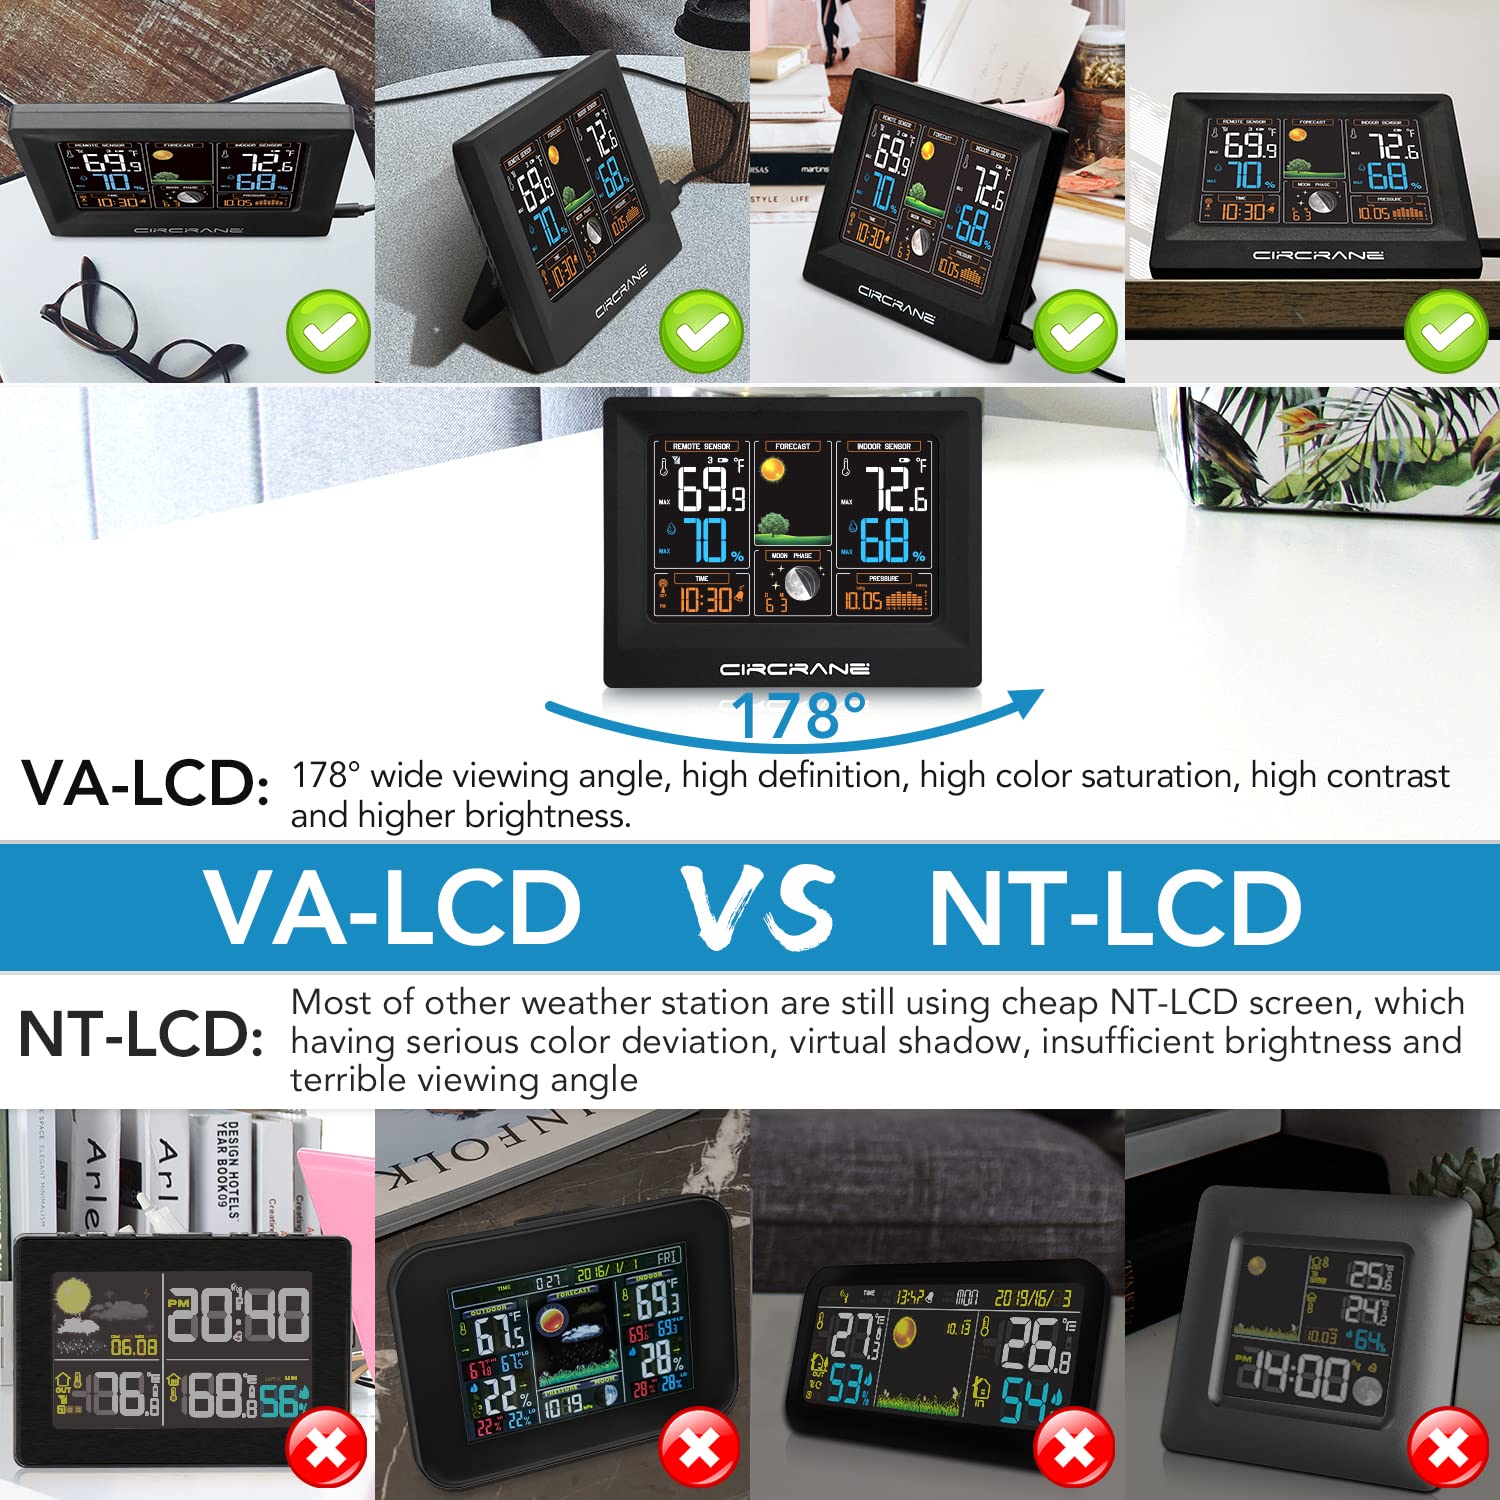
Image: A visual comparison demonstrating the superior display quality of VA-LCD technology compared to traditional NT-LCD.
Weather Forecast
The weather station predicts future weather conditions based on changes in barometric pressure. The display shows one of four forecast modes: sunny, partly cloudy, cloudy, or rainy.
Temperature and Humidity
- Current Readings: Indoor and outdoor temperature and humidity are displayed prominently.
- MAX/MIN Records: Press the 'MAX/MIN' button to view the highest and lowest recorded indoor/outdoor temperature and humidity since the last reset. Press again to cycle through the records. To clear records, press and hold 'MAX/MIN' while viewing them.
Barometric Pressure Trend
The weather station records the barometric trend over the past 24 hours, displayed as a graph on the screen. This helps in understanding pressure changes and their impact on weather forecasts.
Moon Phase and Calendar
The display includes a moon phase indicator and a calendar, providing additional useful information.
Alarm Function
Press the 'ALARM' button to view or set the alarm time. Press and hold 'ALARM' to enter alarm setting mode. Use the 'MAX/MIN' and 'CHANNEL' buttons to adjust the hour and minute, and 'ALARM' to confirm. Press 'ALARM' again to activate or deactivate the alarm.
Multiple Remote Sensors (Optional)
The weather station supports up to three remote sensors. To view data from different sensors, press the 'CHANNEL' button to cycle through CH1, CH2, and CH3. Ensure each remote sensor is set to a unique channel.

Image: Overview of advanced features including weather forecast icons, multi-sensor support, barometric pressure trend graph, and moon phase display.
Maintenance
- Battery Replacement: Replace batteries in both the main unit (backup) and remote sensor when the low battery indicator appears on the display. Use only fresh AAA alkaline batteries.
- Cleaning: Wipe the display and unit surfaces with a soft, damp cloth. Do not use abrasive cleaners or solvents.
- Placement: Ensure the remote sensor is placed in a location that is protected from direct weather elements but allows for accurate outdoor temperature and humidity readings. Avoid placing the main unit near heat sources or direct sunlight, which can affect indoor readings.
Troubleshooting
| Problem | Possible Cause | Solution |
|---|---|---|
| No display on main unit | Power adapter not connected or faulty; batteries depleted. | Ensure AC adapter is securely plugged in. Replace backup batteries. |
| Outdoor readings not displayed or inaccurate | Remote sensor out of range; sensor batteries depleted; interference; sensor not paired. | Move sensor closer to main unit. Replace sensor batteries. Avoid placing near electronic devices. Press and hold 'CHANNEL' button on main unit to re-pair. |
| Time not synchronizing (RCC) | Weak signal; interference; incorrect time zone. | Place unit near a window. Avoid electronic interference. Manually set time zone. Try manual RCC synchronization. |
| Inaccurate indoor temperature/humidity | Unit placed near heat source, direct sunlight, or vent. | Relocate the main unit to a stable environment away from extreme temperature fluctuations. |
Specifications
- Product Dimensions (Main Unit): 6.5" L x 1" W x 5" H
- Product Dimensions (Remote Sensor): 1.75" L x 0.75" W x 4.75" H
- Power Source (Main Unit): AC/DC Adapter (Type-C Power Cord), 2 x AAA batteries (backup)
- Power Source (Remote Sensor): 2 x AAA batteries
- Connectivity Technology: Proprietary Wireless
- Wireless Transmission Range: Up to 200 FT (in open areas)
- Special Features: VA-LCD Full Color Display, Atomic Time (WWVB RCC), Weather Forecast, Moon Phase, Barometric Trend, Max/Min Records
- Color: Black
Warranty and Support
Circrane weather stations are supported by Amazon's 30-day return policy. Additionally, we provide an extra 12-month warranty from the date of purchase and lifetime technical support for your product. If you encounter any issues or have questions, please contact Circrane customer service for assistance.
For technical support, please refer to the contact information provided with your purchase or visit the official Circrane website.
