1. Introduction
Thank you for purchasing the Sound Town PAC360-6 Commercial Power Amplifier. This amplifier is designed for multi-zone public address (PA) applications, offering 360W RMS power output across 6 zones with individual volume control. It supports both 70V/100V constant voltage and 4-16 Ohm low impedance speaker systems. Featuring versatile input options including RCA, microphone, USB, FM radio, and Bluetooth connectivity, the PAC360-6 is suitable for various commercial environments such as restaurants, lounges, bars, schools, and warehouses. Please read this manual thoroughly before operation to ensure proper setup and safe use.
2. Safety Instructions
- Power Source: Connect the unit only to an AC 110V/230V 50/60Hz power source as indicated on the rear panel.
- Grounding: Ensure the unit is properly grounded to prevent electric shock.
- Ventilation: Do not block ventilation openings. Maintain adequate space around the unit for proper airflow to prevent overheating.
- Moisture: Do not expose the unit to rain or moisture. Avoid placing liquid-filled objects on the amplifier.
- Heat: Keep the unit away from heat sources such as radiators, heat registers, stoves, or other heat-producing appliances.
- Servicing: Do not attempt to service this unit yourself. Refer all servicing to qualified service personnel.
- Cleaning: Unplug the unit from the power outlet before cleaning. Use a dry cloth for cleaning.
3. Package Contents
Verify that all items are present in the package:
- Sound Town PAC360-6 Commercial Power Amplifier
- Power Cable
- Remote Control
- FM Antenna
- User Manual (this document)
4. Product Overview
4.1 Front Panel Controls
The front panel provides access to all primary controls and indicators for the amplifier.
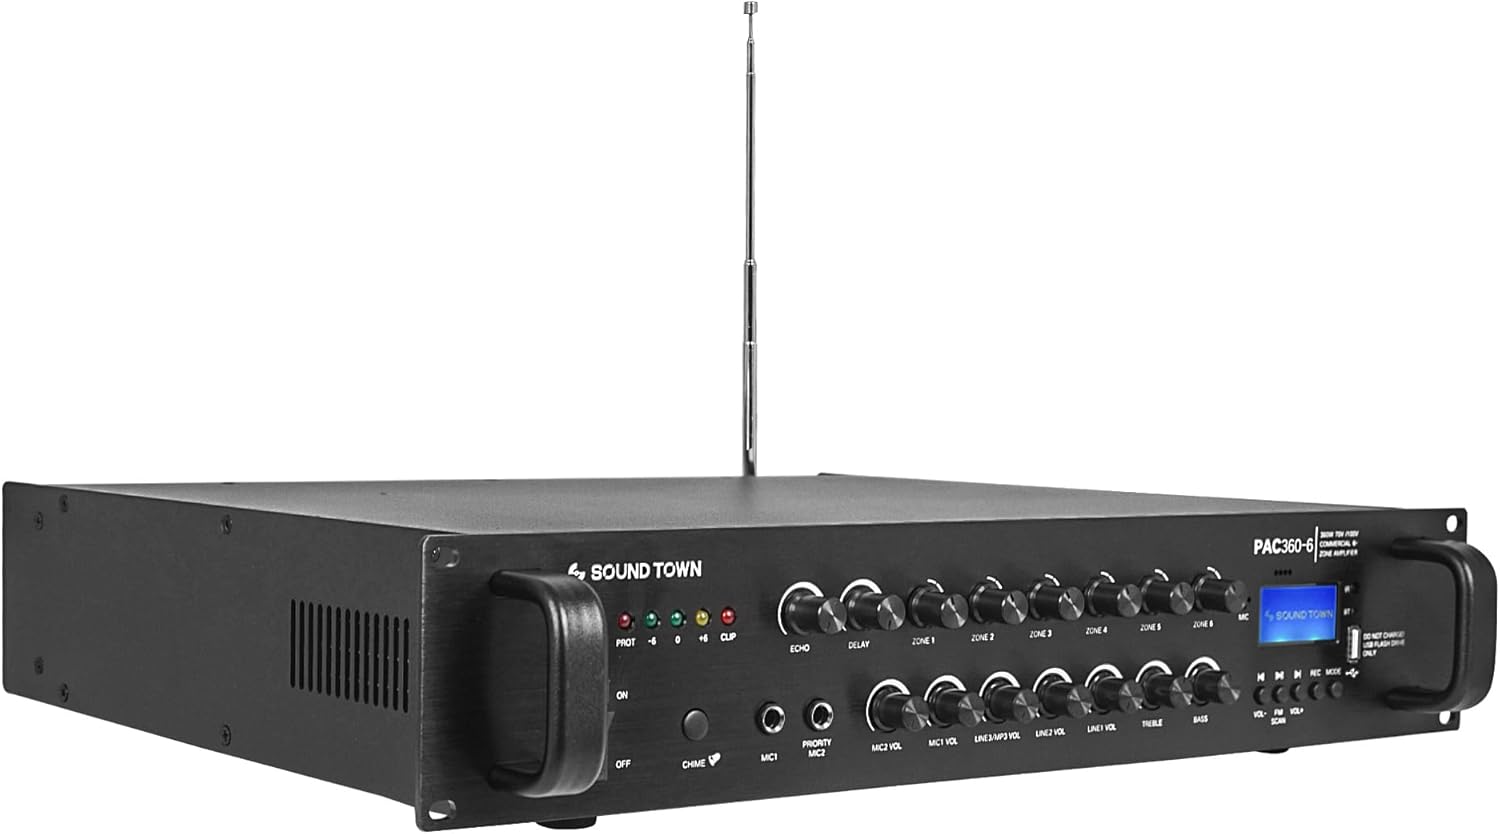
Image: Front view of the Sound Town PAC360-6 amplifier, showcasing its controls and the included remote control.

Image: Detailed view of the front panel controls, including power switch, input selectors, volume knobs, and display.
- POWER Switch: Turns the amplifier on or off.
- Indicators (PROT, CLIP, +6, +10): Display protection status, signal clipping, and output levels.
- ECHO/DELAY Controls: Adjust echo and delay effects for microphone inputs.
- ZONE 1-6 Volume Controls: Individual volume adjustments for each of the six output zones.
- MIC 1/MIC 2 Inputs: 1/4-inch (6.35mm) jack inputs for microphones. MIC 1 is a priority input.
- MIC VOL/MP3 VOL/LINE VOL Controls: Adjust volume levels for microphone, USB/Bluetooth/FM, and line inputs respectively.
- TREBLE/BASS Controls: Adjust the high and low frequency response of the overall output.
- MASTER VOL: Controls the overall output volume of the amplifier.
- MODE Button: Selects input source (Bluetooth, USB, FM, Line).
- Display Screen: Shows current mode, track information, or FM frequency.
- USB Port: For playing audio files from a USB drive.
- Playback Controls: Play/Pause, Previous/Next track buttons for USB/Bluetooth/FM.
4.2 Rear Panel Connections
The rear panel houses all input and output connections for the amplifier.
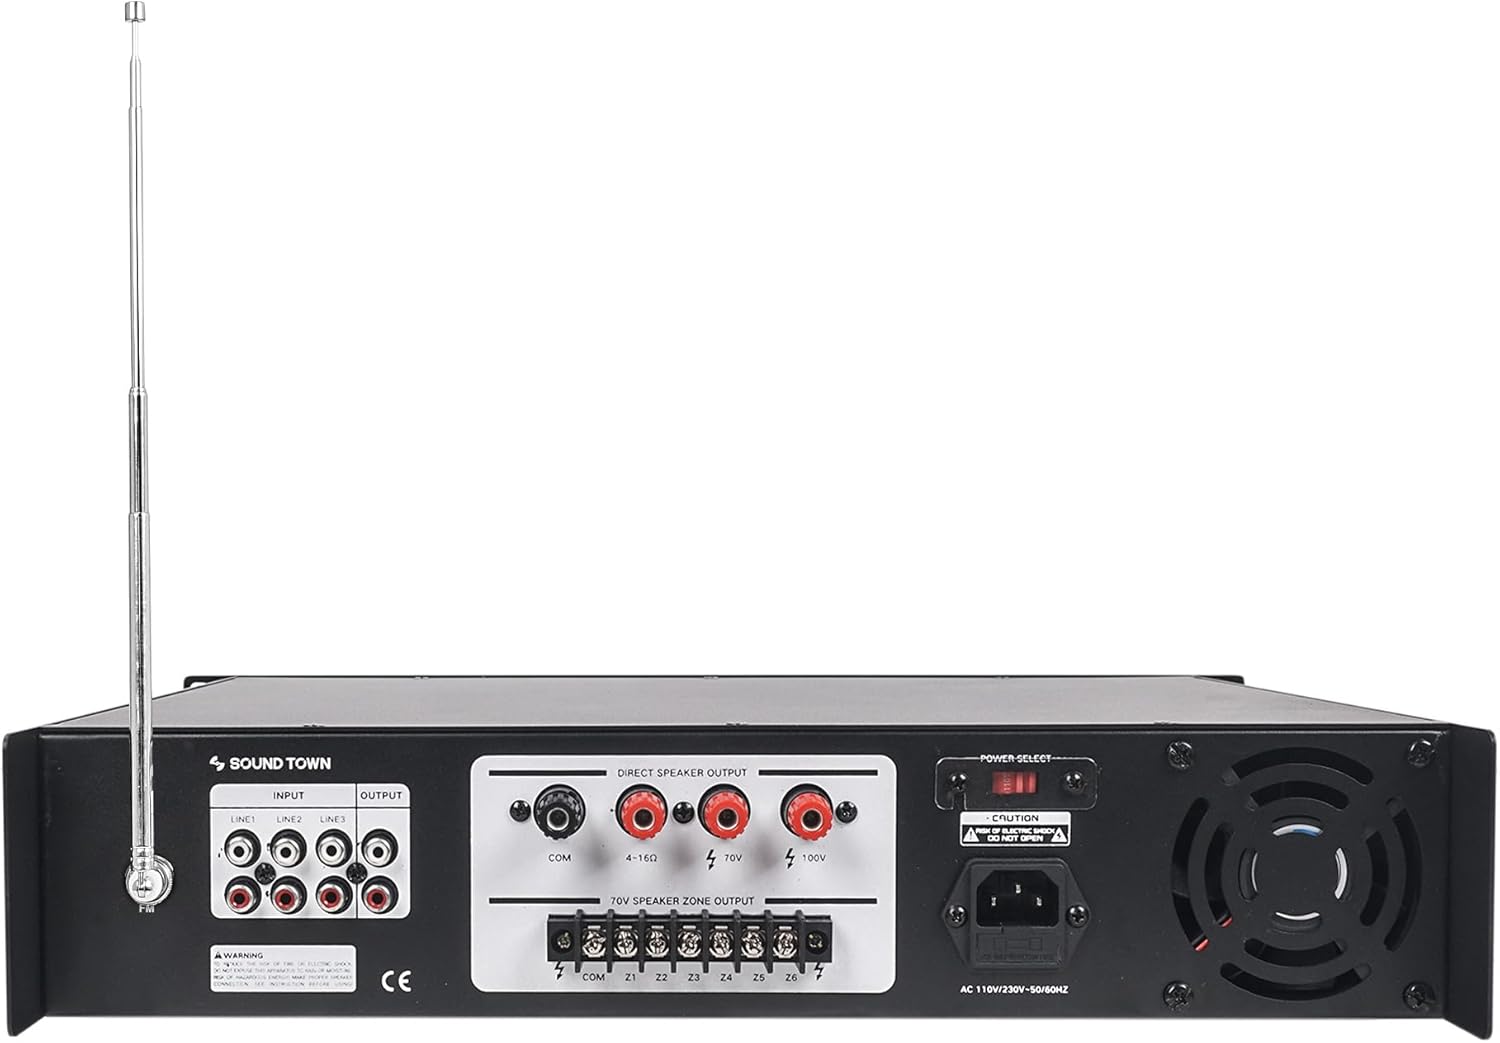
Image: Rear view of the Sound Town PAC360-6 amplifier, showing all input and output terminals.

Image: Detailed view of the rear panel connections, including RCA inputs, speaker outputs, and power input.
- INPUT (LINE 1, LINE 2, LINE 3): RCA stereo input jacks for connecting external audio sources (e.g., CD player, mixer).
- OUTPUT (LINE 1, LINE 2, LINE 3): RCA stereo output jacks for connecting to other amplifiers or recording devices.
- DIRECT SPEAKER OUTPUT (COM, 4-16 Ohm, 70V, 100V): Terminals for connecting speakers. Use COM with 4-16 Ohm for low impedance speakers, or COM with 70V/100V for constant voltage systems.
- 70V SPEAKER ZONE OUTPUT (COM, Z1-Z6): Screw terminals for connecting 70V speakers to individual zones.
- POWER SELECT (110V/230V): Voltage selector switch. Ensure this matches your local power supply before connecting.
- AC IN: Power cord inlet.
- FM ANTENNA: Connection for the included FM antenna.
5. Setup
5.1 Placement
Place the amplifier on a stable, flat surface or mount it in a standard equipment rack. Ensure there is adequate ventilation around the unit to prevent overheating. Avoid placing it near heat sources or in direct sunlight.
5.2 Power Connection
- Verify the POWER SELECT switch on the rear panel matches your local power voltage (110V or 230V). Incorrect selection can damage the unit.
- Connect the provided power cable to the AC IN port on the rear panel and then to a suitable wall outlet.
5.3 Speaker Connections
The PAC360-6 supports both low impedance (4-16 Ohm) and constant voltage (70V/100V) speaker systems. Do not mix these types of connections on the same output terminals.

Image: Diagram illustrating speaker output connections for both direct 4-16 Ohm and 70V/100V multi-zone setups.

Image: Visual representation of how the PAC360-6 amplifier can distribute audio to six independent zones.
5.3.1 70V/100V Speaker Zone Output
This method is ideal for multi-room applications using multiple speakers. Ensure all speakers have a 70V or 100V transformer.
- Connect the negative ends of your speakers to the 'COM' terminal on the 70V SPEAKER ZONE OUTPUT block.
- Connect the positive ends of each speaker to the designated zone terminals (Z1, Z2, Z3, Z4, Z5, Z6) to create independent zones.
- The total wattage of all connected speakers in a 70V/100V system should not exceed the amplifier's rated power (360W).
5.3.2 Direct Speaker Output (4-16 Ohm / 70V / 100V)
Use these terminals for direct connection to a single speaker or a series of speakers. Note that the 4-16 Ohm output does not have separate zone volume control.
- For 4-16 Ohm speakers: Connect the negative speaker wire to the 'COM' terminal and the positive speaker wire to the '4-16 Ohm' terminal.
- For 70V speakers: Connect the negative speaker wire to the 'COM' terminal and the positive speaker wire to the '70V' terminal.
- For 100V speakers: Connect the negative speaker wire to the 'COM' terminal and the positive speaker wire to the '100V' terminal.
5.4 Input Connections
- RCA Line Inputs: Connect external audio sources (e.g., media players, mixers) to the LINE 1, LINE 2, or LINE 3 RCA input jacks on the rear panel.
- Microphone Inputs: Connect microphones to the MIC 1 or MIC 2 1/4-inch jacks on the front panel. MIC 1 has priority over other inputs.
- FM Antenna: Connect the included FM antenna to the FM ANTENNA terminal on the rear panel for radio reception.
6. Operating Instructions
6.1 Power On/Off
Press the POWER switch on the front panel to turn the amplifier on or off. The power indicator will illuminate when the unit is on.
6.2 Input Source Selection
Press the MODE button on the front panel or the remote control to cycle through available input sources: Bluetooth, USB, FM Radio, LINE 1, LINE 2, LINE 3.
6.3 Bluetooth Pairing
- Select 'Bluetooth' mode using the MODE button. The display will show 'BT'.
- On your Bluetooth-enabled device (e.g., smartphone, tablet), search for available devices and select 'Sound Town'.
- Once paired, you can stream audio wirelessly to the amplifier.
6.4 Microphone Usage
- Connect your microphone(s) to the MIC 1 or MIC 2 inputs.
- Adjust the MIC VOL knob to control the microphone volume.
- Use the ECHO and DELAY knobs to add effects to the microphone signal.
- Note that MIC 1 is a priority input, meaning it will automatically lower the volume of other audio sources when used.
6.5 Zone Volume Control
Each of the six zones (Z1-Z6) has an independent volume control knob on the front panel. Adjust these knobs to set the desired audio level for each specific zone.
6.6 Master Volume, Bass, and Treble
- MASTER VOL: Adjust this knob to control the overall output volume of the amplifier.
- BASS/TREBLE: Use these knobs to fine-tune the low and high frequencies of the audio output to suit your preference or room acoustics.
6.7 FM Radio Operation
- Ensure the FM antenna is connected.
- Select 'FM' mode using the MODE button.
- Use the Previous/Next track buttons (or remote) to scan for radio stations.
7. Maintenance
- Cleaning: Disconnect power before cleaning. Use a soft, dry cloth to wipe the exterior of the unit. Do not use liquid cleaners or aerosols.
- Ventilation: Regularly check that the ventilation openings are clear of dust and debris.
- Storage: If storing the unit for an extended period, ensure it is powered off, unplugged, and stored in a cool, dry place away from direct sunlight.
8. Troubleshooting
| Problem | Possible Cause | Solution |
|---|---|---|
| No power | Power cable not connected; Power switch off; Incorrect voltage selection; Blown fuse. | Check power cable connection; Turn power switch on; Verify 110V/230V selector; Replace fuse if necessary (refer to qualified technician). |
| No sound output | Incorrect input selected; Speaker connections loose/incorrect; Volume levels too low; Amplifier in protection mode. | Select correct input source; Check all speaker wiring; Increase Master/Zone/Input volumes; Power cycle the amplifier. |
| Bluetooth not connecting | Not in Bluetooth mode; Device too far; Bluetooth already paired to another device. | Ensure amplifier is in Bluetooth mode; Move device closer; Disconnect from other devices and try again. |
| Loud fan noise | Normal operation under load; Restricted airflow; Dust accumulation. | Ensure adequate ventilation space; Clean vents if dusty. Fan noise may be noticeable during operation. |
| Bluetooth/FM audio only plays on one channel (mono) | Design characteristic of the unit for these specific inputs. | This is an inherent characteristic for Bluetooth and FM inputs on this model. Consider using line inputs for stereo sources. |
| FM tuner does not save presets | Design characteristic of the unit. | The FM tuner does not retain station presets or last tuned frequency after power off. Manual tuning is required each time. |
9. Specifications
| Feature | Specification |
|---|---|
| Model | PAC360-6 |
| Power Output (RMS) | 360W |
| Speaker Outputs | 6-Zone 70V/100V, Direct 4-16 Ohm / 70V / 100V |
| Inputs | 3 x RCA Line, 2 x 1/4" Mic (1 priority), USB, FM Radio, Bluetooth |
| Controls | Master Volume, Zone Volume (x6), Mic Volume, MP3 Volume, Line Volume, Bass, Treble, Echo, Delay |
| Connectivity | Bluetooth |
| Dimensions | 21.75 x 18.5 x 7.88 inches |
| Item Weight | 30.8 pounds |
| Manufacturer | Sound Town |
10. Warranty and Support
Sound Town products are designed for reliability and performance. For specific warranty information and technical support, please refer to the warranty card included with your product or visit the official Sound Town website. Keep your purchase receipt as proof of purchase for any warranty claims.


