1. Introduction
The PULUZ 80cm/32 inch Portable Photo Studio Light Box is a versatile and easy-to-use solution for high-quality product photography. This folding photography lighting kit is designed to provide consistent and professional illumination for objects of various sizes. Its reflective interior, dimmable LED lights, and multiple shooting angles ensure optimal results for your photographic needs.
Key Features:
- Generous Dimensions: 80cm x 80cm x 80cm (32''x32''x32'') provides ample space for small to large objects.
- Optimized Lighting: Composed of reflective fabric for even light distribution and brighter illumination.
- Dimmable LED Lights: Double 156pcs 5500K 9050LM LED light beads with 10%-100% brightness control and no strobe for high-quality images.
- High Color Rendering Index (CRI 92): Ensures natural and vivid shooting effects.
- Multi-angle Shooting: Features small front, middle front, front opening, and top holes for diverse photographic perspectives.
- Easy Assembly: Convenient joint-based frame setup requires no additional tools.
- Versatile Backdrops: Includes three different color backgrounds (white, black, orange) to suit various shooting requirements.

Image 1.1: The PULUZ 80cm/32 inch Photo Studio Light Box in use, highlighting its spacious dimensions suitable for various product sizes.
2. What's in the Box
Please verify that all components listed below are included in your package:

Image 2.1: Visual representation of all items included in the package.
- 1 x Main Studio Box (Photo Box)
- 1 x Carry Bag
- 8 x Corner Pieces (Connectors)
- 12 x Frame Tubes (Support Bars)
- 3 x Backgrounds (Black, White, Orange)
- 3 x LED Lighting Bands (Lamps)
- 1 x Brightness Dimmer (integrated with Power Supply)
- 1 x Soft Cloth
- 1 x Power Adapter
- 1 x User Manual
3. Setup Instructions
Follow these steps to assemble your PULUZ Photo Studio Light Box:
- Unpack Components: Carefully remove all support rods, connectors, and the main studio box from the carry bag.
- Assemble the Frame: Connect the support rods using the corner pieces to form the cubic frame of the light box. Ensure all connections are secure.
- Insert Frame into Shed: Place the assembled frame into the unfolded main studio box. Secure the frame to the internal velcro straps or loops within the shed.
- Install LED Lighting: Attach the LED lighting bands to the designated hooks or clips on the support rods inside the top of the light box.
- Connect Power: Connect the LED lighting bands to the brightness dimmer, then connect the dimmer to the power adapter. Plug the power adapter into a suitable electrical outlet.
- Install Diffuser (Optional): If desired, attach the soft cloth diffuser to the top interior of the light box to further soften the light.
- Place Background: Select one of the three provided backgrounds (black, white, or orange) and secure it inside the light box using the integrated clips or velcro.
Video 3.1: A detailed video demonstrating the assembly process of the PULUZ Photo Studio Light Box, including frame setup, light installation, and background placement.

Image 3.2: Visual steps for the installation process, from unpacking to final setup.
4. Operating Instructions
Once assembled, your light box is ready for use. Follow these guidelines for optimal operation:
Adjusting Brightness:
Use the integrated brightness dimmer to control the intensity of the LED lights. Rotate the knob to adjust the brightness from 10% to 100% to achieve your desired lighting effect. The stepless dimming feature allows for precise control without flickering.

Image 4.1: Illustration of the brightness dimmer and its range of adjustment, from 10% to 100%.
Utilizing Multi-angle Shooting:
The light box is designed with multiple access points to allow for diverse shooting angles:
- Front Openings: Use the small, middle, or large front openings for direct front shots.
- Top Hole: Ideal for overhead shots, capturing the top view of your product.

Image 4.2: Demonstrates how to use the different windows and top hole for varied shooting angles.
Customizing LED Light Panels:
The three LED light panels can be moved and rotated to achieve specific lighting effects, enhancing the three-dimensionality of your photos. Experiment with different positions to highlight product features.

Image 4.3: Illustrates the flexibility of the movable and rotating light bars for customized lighting setups.
Changing Backdrops:
Easily switch between the white, black, and orange backgrounds to create different moods and emphasize product colors. Simply unclip the current background and replace it with another.
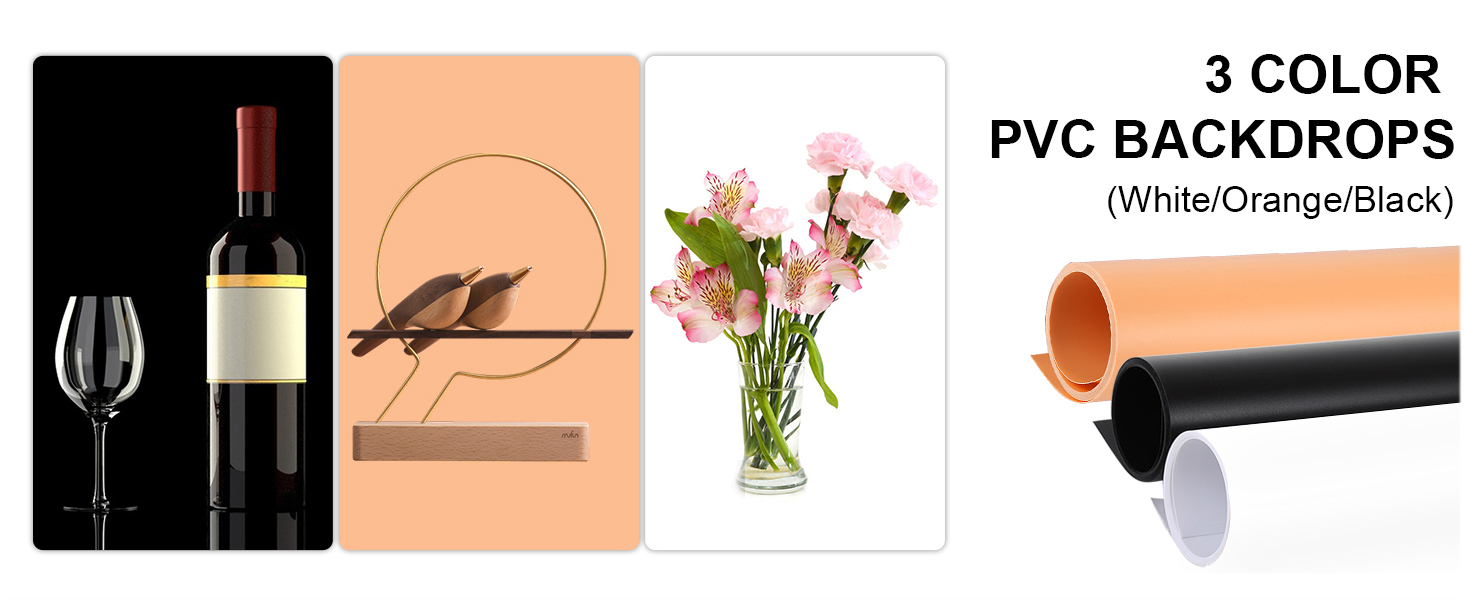
Image 4.4: Shows the three available PVC backdrops (orange, white, black) and their application in product photography.
5. Maintenance
To ensure the longevity and optimal performance of your PULUZ Photo Studio Light Box, follow these maintenance tips:
- Cleaning: Use a soft, dry cloth to wipe down the exterior and interior surfaces of the light box. For stubborn spots on the reflective interior or PVC backdrops, a slightly damp cloth with mild soap can be used, followed by a dry wipe. Ensure all surfaces are completely dry before folding or storing.
- Storage: When not in use, disassemble the light box and store all components in the provided carry bag. Store in a cool, dry place away from direct sunlight and extreme temperatures.
- Handle with Care: Avoid applying excessive force when assembling or disassembling the frame and connecting components.
- Power Cord Inspection: Periodically check the power cord and adapter for any signs of damage. Discontinue use if any damage is found and contact customer service for assistance.
6. Troubleshooting
If you encounter any issues with your PULUZ Photo Studio Light Box, refer to the following common troubleshooting steps:
- Lights Not Turning On:
- Ensure the power adapter is securely plugged into both the wall outlet and the dimmer/LED strips.
- Check if the wall outlet is functional by plugging in another device.
- Verify that the dimmer knob is turned up and the power button is pressed.
- Uneven Lighting:
- Confirm that all LED lighting bands are properly installed and functioning.
- Adjust the position of the movable LED light panels to achieve more uniform illumination.
- Ensure the soft cloth diffuser is correctly installed to soften harsh shadows.
- Frame Instability:
- Check all support rod connections to ensure they are firmly seated in the corner pieces.
- Verify that the internal velcro straps or loops are securing the frame within the main studio box.
- Wrinkled Backdrops:
- The PVC backdrops are wrinkle-resistant. If minor creases occur from storage, gently roll them in the opposite direction or lay them flat under a light weight for a short period. Avoid using heat.
If these steps do not resolve your issue, please contact customer support.
7. Specifications
| Feature | Detail |
|---|---|
| Product Dimensions | 32 x 32 x 32 inches (80cm x 80cm x 80cm) |
| Item Weight | 13.17 pounds |
| Model Number | WBTD-US-5080 |
| Brand | PULUZ |
| Color | Black |
| Material | Nylon |
| Style | Portable |
| LED Lights | Double 156pcs 5500K 9050LM LED light beads |
| Color Rendering Index (CRI) | 92 |
| Brightness Control | Dimmable (10%-100%) |
| Backdrops Included | 3 (Black, White, Orange) |
8. Warranty and Support
The PULUZ 80cm/32 inch Portable Photo Studio Light Box comes with a 12-month warranty from the date of purchase. This warranty covers manufacturing defects and ensures the product is free from defects in material and workmanship under normal use.
Additionally, PULUZ offers life-time customer service. If you have any questions, concerns, or require assistance with your product beyond the warranty period, please do not hesitate to contact our support team. We are committed to providing ongoing support to ensure your satisfaction.
Contact Information:
For warranty claims, technical support, or general inquiries, please refer to the contact details provided on the PULUZ official website or your purchase documentation.


