
1. Introduction
Thank you for choosing the DL-pro Flexible Siphon. This product is designed to provide a versatile and reliable drainage solution for your kitchen or bathroom sink. Its flexible and extendable design allows for easy installation in various configurations, adapting to different sink and wall connections. Please read this manual carefully before installation and use to ensure proper function and longevity of your siphon.
2. Safety Instructions
- Always turn off the main water supply before beginning any plumbing work.
- Wear appropriate personal protective equipment, such as gloves and eye protection, during installation.
- Ensure all connections are securely tightened by hand to prevent leaks. Do not overtighten, as this can damage the plastic components.
- Keep small parts out of reach of children.
- If you are unsure about any step, consult a qualified plumber.
3. Package Contents
The package should contain the following item:
- 1 x DL-pro Flexible Siphon (1 1/2 and 1 1/4 inch x 40/50 mm)
4. Setup and Installation
Follow these steps for proper installation of your DL-pro Flexible Siphon:
- Prepare the Area: Clear the area under the sink. Place a bucket or towel to catch any residual water from the old siphon or pipes.
- Remove Old Siphon (if applicable): Carefully disconnect and remove the existing siphon.
- Identify Connections: The DL-pro siphon is designed for 1 1/2 inch and 1 1/4 inch sink connections, and 40/50 mm wall pipe connections.
- Adjust Siphon Length: The siphon is extendable from 39 cm to 85 cm. Adjust the length as needed to fit the distance between your sink drain and the wall pipe.
- Connect to Sink Drain: Attach the larger end of the siphon to the sink drain. Use the provided reducer if your sink drain is 1 1/4 inch. Ensure the rubber seal is correctly seated to prevent leaks. Hand-tighten the nut.
- Connect to Wall Pipe: Attach the other end of the siphon to the wall pipe. The wall connector can be reduced from 50 mm to 40 mm by carefully cutting along the marked line if necessary. Ensure a proper seal and hand-tighten the nut.
- Final Check: Double-check all connections to ensure they are secure and the seals are properly seated.
- Test for Leaks: Slowly turn on the water supply and allow water to run through the sink. Carefully inspect all connections for any signs of leakage. If leaks occur, tighten the connections slightly or re-seat the seals.
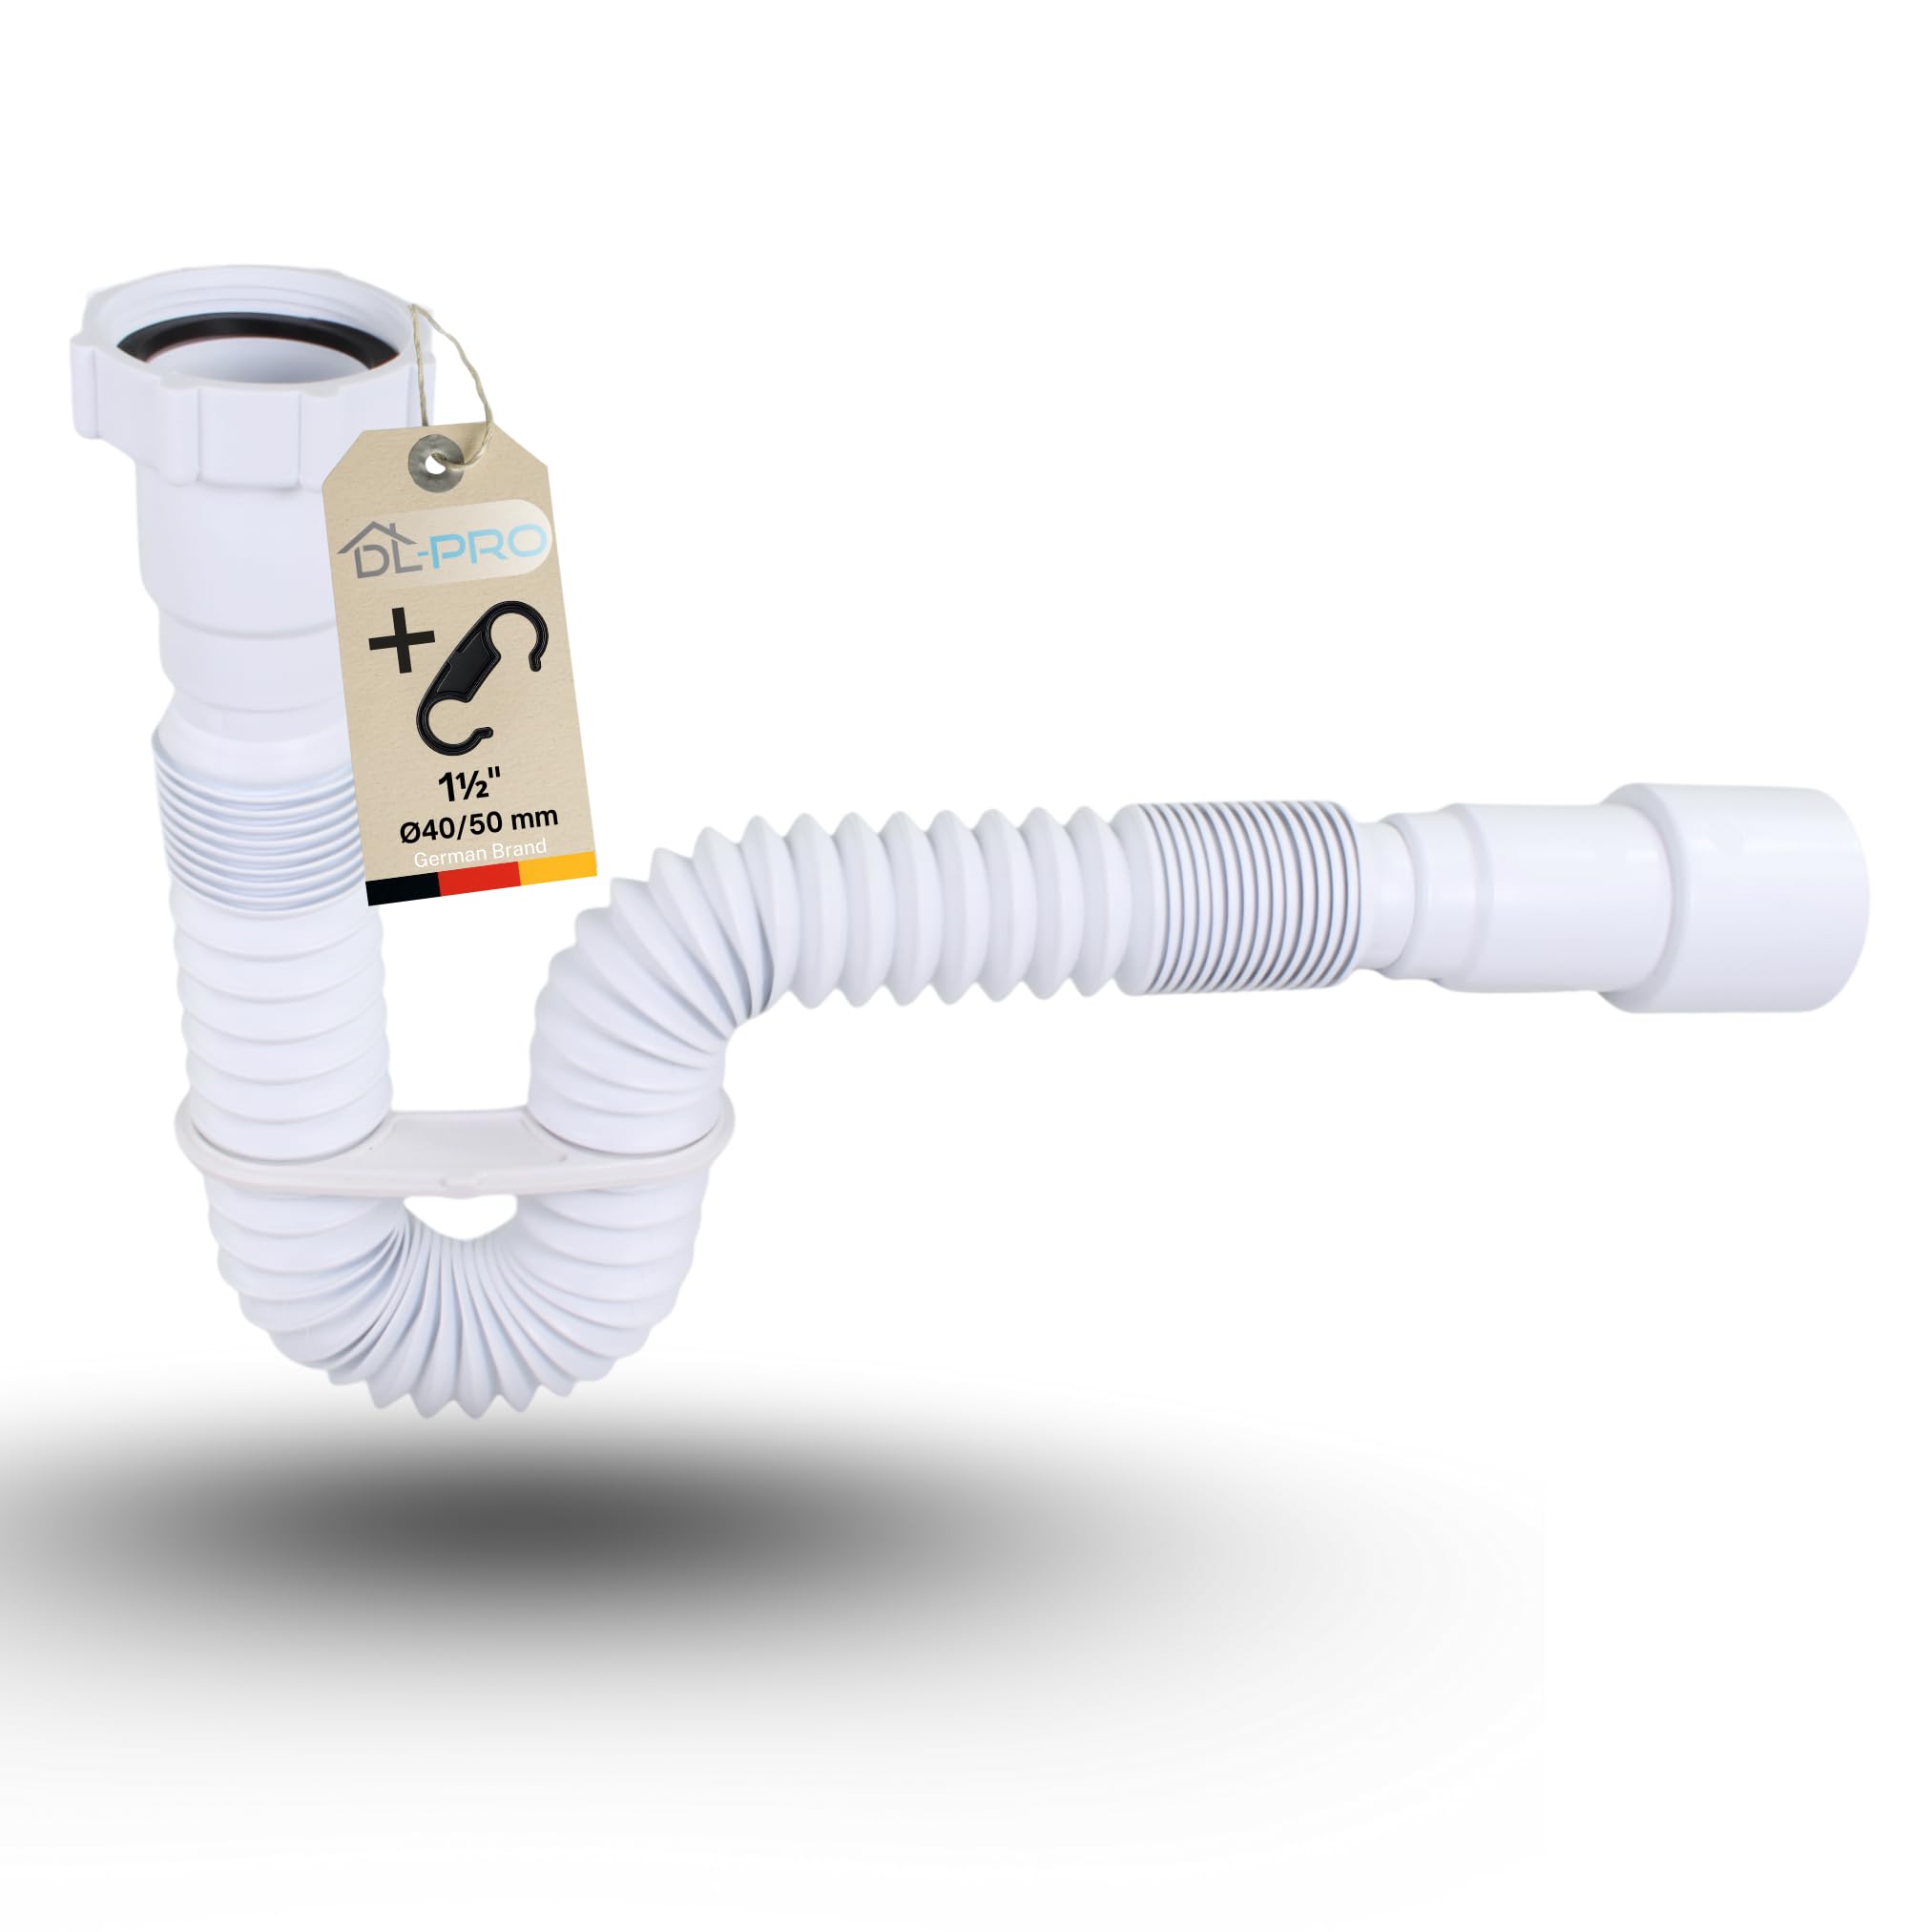
Image: The DL-pro flexible siphon demonstrating its extendable nature and adaptable connection points for sink and wall pipes, including G 1 1/2" (G6/4") and Ø40/50 mm.

Image: Examples of different sink and lavabo types that are compatible with the DL-pro flexible siphon, highlighting its versatility.
5. Operating Instructions
Once correctly installed, the DL-pro Flexible Siphon operates automatically as part of your drainage system. Ensure that water flows freely through the sink and into the drain without any obstructions or leaks. The siphon's design helps prevent sewer gases from entering your living space while allowing wastewater to pass through efficiently.
6. Maintenance
- Regular Inspection: Periodically check all connections for any signs of leaks or drips. Address any issues promptly to prevent water damage.
- Cleaning: If drainage becomes slow, the siphon may need cleaning. Disconnect the siphon and rinse it thoroughly with warm water. Avoid using harsh chemical drain cleaners, as they can damage plastic components.
- Seal Check: Inspect the rubber seals for wear, cracking, or deformation. Replace any damaged seals to maintain a watertight connection.
- Avoid Obstructions: Be mindful of what goes down the drain to prevent blockages.
7. Troubleshooting
- Leaks at Connections:
- Ensure nuts are hand-tightened securely.
- Verify that rubber seals are correctly seated and not twisted or damaged.
- If seals are worn, replace them.
- Slow Drainage or Blockage:
- Disconnect the siphon and check for any physical obstructions inside.
- Clean the siphon thoroughly.
- Ensure the siphon has a proper slope to allow water to drain effectively.
- Unpleasant Odors:
- Ensure the siphon is filled with water, as this creates a seal against sewer gases.
- Check for proper installation and sealing to prevent gas leaks.
8. Specifications
| Overall Length: | 390 mm to 850 mm (39 cm to 85 cm) |
| Sink Connection: | 1 1/2 inch (with reducer for 1 1/4 inch) |
| Wall Pipe Connection: | 40 mm / 50 mm diameter (adjustable by cutting) |
| Color: | White |
| Material: | Plastic |
| Weight: | 110 g |
| Package Dimensions: | 39.5 x 5.4 x 5.4 cm |
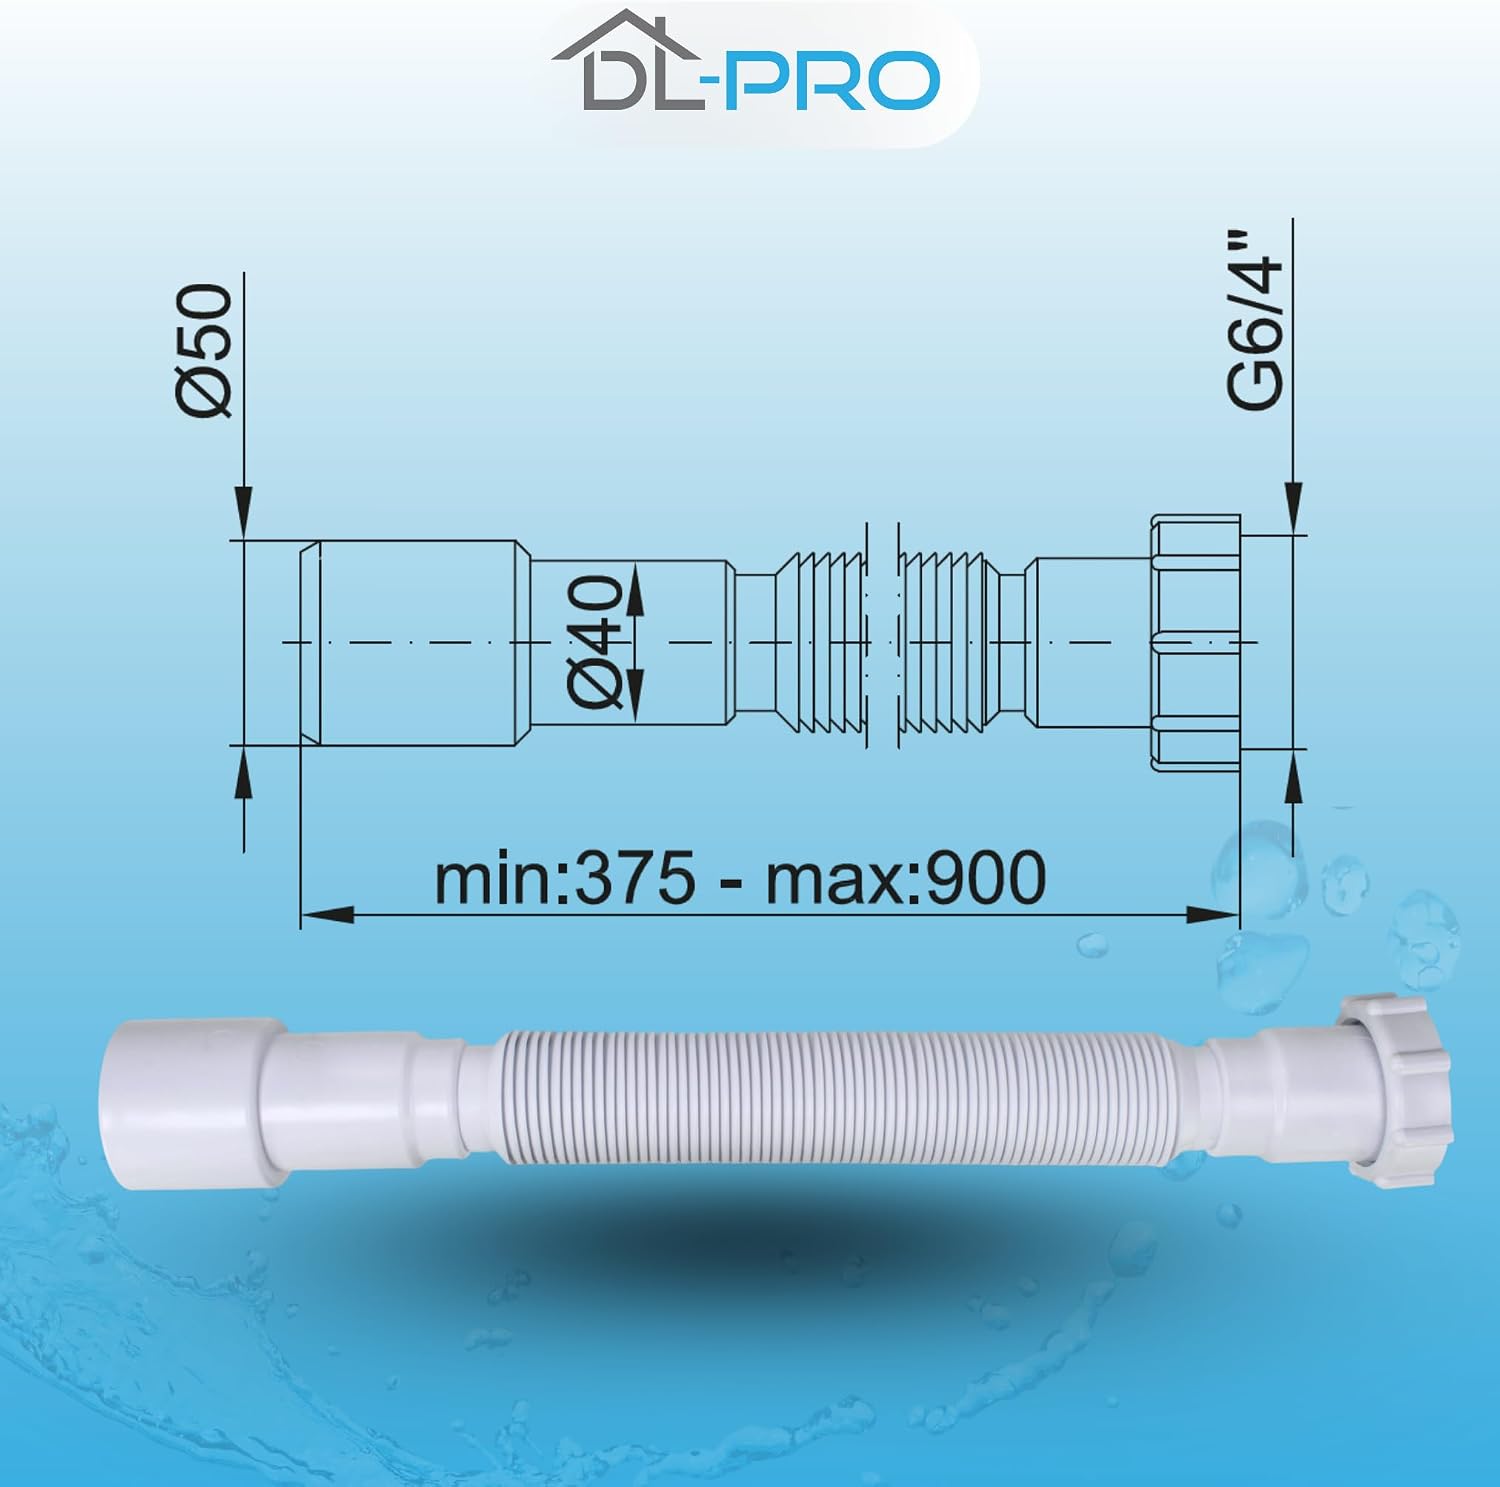
Image: Technical drawing illustrating the minimum (375mm) and maximum (900mm) length, and the 40mm/50mm diameter options of the DL-pro flexible siphon.
9. Warranty Information
Specific warranty details are not provided with this product. Please refer to the retailer or manufacturer's website for any available warranty information or terms and conditions of sale.
10. Support
For technical assistance or further inquiries regarding your DL-pro Flexible Siphon, please contact the retailer from whom you purchased the product. Manufacturer contact information may also be available on the product packaging or the DL-pro official website.