1. Introduction
This manual provides detailed instructions for the safe and effective operation of your FOXSUR 12V 24V 10A Smart Lead Pulse Repair Charger. This advanced charger is designed for a wide range of 12V and 24V lead-acid batteries, including Calcium, Gel, AGM, LiFePO4, Wet, and other common types. It features a 7-stage automatic charging process and intelligent microprocessor control to ensure optimal battery health and longevity.

Figure 1: Front view of the FOXSUR Smart Battery Charger, showing the display and control buttons.
2. Important Safety Instructions
Always read and understand all safety warnings and instructions before using the charger. Failure to follow these instructions may result in electric shock, fire, or serious injury.
- Ventilation: Ensure adequate ventilation during charging. Do not operate the charger in a confined area or restrict ventilation.
- Battery Type: This charger is designed for 12V and 24V lead-acid batteries (Calcium, Gel, AGM, LiFePO4, Wet). Do not attempt to charge dry-cell batteries that are commonly used with home appliances.
- Polarity: Always connect the red (+) clamp to the positive battery terminal and the black (-) clamp to the negative battery terminal. Ensure correct polarity before connecting to AC power.
- Sparks: Avoid creating sparks when connecting or disconnecting the clamps. Connect the output clamps to the battery and then connect the charger to the AC power supply. Disconnect AC power first, then remove the battery clamps.
- Water Exposure: Do not expose the charger to rain or excessive moisture.
- Damage: Do not operate the charger if it has been dropped, damaged, or if the power cord or clamps are damaged. Contact customer support for assistance.
- Children: Keep the charger out of reach of children. The button will lock automatically after approximately 2 seconds of charging to prevent accidental touching.
- Temperature: The charger automatically adjusts charging voltage based on ambient temperature. Avoid extreme temperatures.

Figure 2: The charger incorporates multiple safety protections including over current, overcharge, overheat, short circuit, reverse polarity, fire materials, cooling system, and high voltage protection.
3. Product Features
The FOXSUR Smart Battery Charger is equipped with advanced features for efficient and safe battery charging:
- Microprocessor Control (CPU): Ensures precise and optimized charging.
- 7-Stage Automatic Charging: A comprehensive charging process that protects against overcharging and can help restore drained and sulfated batteries.
- Wide Battery Compatibility: Suitable for 12V and 24V lead-acid batteries including Calcium, Gel, AGM, LiFePO4, Wet, and EFB.
- Automatic Temperature Compensation: Adjusts charging voltage based on ambient temperature (winter mode below 10°C, summer mode above 28°C) for optimal charging in all seasons.
- Intelligent Digital Display: Shows real-time charging status including temperature, charging voltage, current, and battery power.
- Advanced Repair Mode: High-frequency and low-frequency pulse technology helps recover old or idle batteries and extend battery life. Note: This mode cannot activate completely dead batteries or repair severely damaged ones.
- Multiple Safety Protections: Includes protection against reverse polarity, sparks, overcharging, over-current, open-circuits, short-circuits, and overheating.
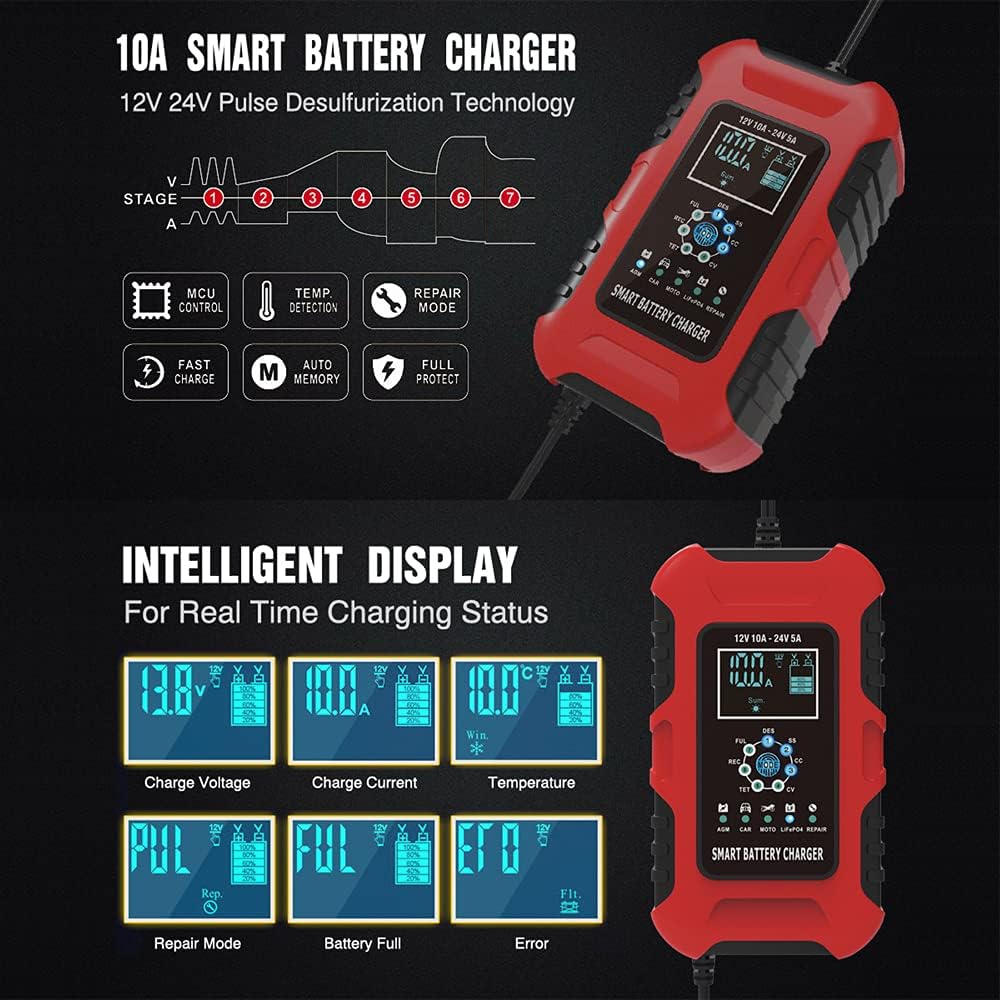
Figure 3: The intelligent display provides real-time charging status, and the diagram illustrates the 7-stage automatic charging process.

Figure 4: The charger automatically adjusts charging parameters based on ambient temperature, entering winter mode below 10°C and summer mode above 28°C.
4. Setup and Connection
Follow these steps to safely connect the charger to your battery:
- Identify Battery Terminals: Locate the positive (+) and negative (-) terminals on your battery. The positive terminal is usually marked with a plus sign and is larger in diameter.
- Connect Red Clamp: Connect the red (+) charger clamp to the positive (+) terminal of the battery.
- Connect Black Clamp: Connect the black (-) charger clamp to the negative (-) terminal of the battery.
- Connect to AC Power: Plug the charger's AC power cord into a standard 100-240V AC, 50-60Hz electrical outlet.
- Verify Connection: The charger's display will illuminate, indicating a successful connection and beginning the charging process.
Important: Always connect the clamps to the battery first, then plug the charger into the AC outlet. When disconnecting, unplug the charger from the AC outlet first, then remove the clamps from the battery.

Figure 5: Step-by-step guide for connecting the charger: 1. Connect red clip to positive, black clip to negative. 2. Connect AC power.
5. Operating Modes
The charger automatically detects the battery voltage (12V or 24V) and offers various charging modes. Use the "MODE" button to select the appropriate charging mode for your battery type:
| Mode Icon | Mode Name | Description |
|---|---|---|
| AGM | AGM Batteries Mode | For AGM batteries. |
| CAR | CAR Batteries Mode | For GEL, SLA, WET, DEEP CYCLE, EFB, and Calcium batteries. |
| MOTO | Motorcycle Batteries Mode | For Motorcycle batteries. |
| LiFePO4 | LiFePO4 Batteries Mode | For LiFePO4 batteries. |
| REPAIR | Repair Mode (16 hours) | An advanced battery recovery mode for repaired and old, idle, damaged, or sulfated batteries. Select this mode before connecting the battery; otherwise, the mode button will be locked. |
Once the appropriate mode is selected, the charger will automatically proceed through its 7-stage charging process. The display will show the current charging status.

Figure 6: The charger supports various battery types and offers specific charging modes for AGM, Car (GEL, SLA, WET, DEEP CYCLE, EFB, Calcium), Motorcycle, LiFePO4, and a dedicated Repair mode.
6. Maintenance
Proper maintenance ensures the longevity and optimal performance of your charger:
- Cleaning: Disconnect the charger from AC power and the battery before cleaning. Wipe the exterior with a soft, damp cloth. Do not use harsh chemicals or abrasive cleaners.
- Storage: Store the charger in a cool, dry place when not in use. Ensure the cables are neatly coiled and not kinked.
- Cable Inspection: Periodically inspect the power cord and battery clamps for any signs of damage, fraying, or corrosion. Replace if necessary.
- Ventilation: Ensure the cooling fan and vents are free from dust and debris to maintain proper airflow.
7. Troubleshooting
If you encounter issues with your charger, refer to the following common problems and solutions:
- Charger Not Turning On:
- Check if the AC power cord is securely plugged into a live outlet.
- Ensure the battery clamps are correctly connected to the battery terminals (red to positive, black to negative).
- Verify the AC outlet is functioning by plugging in another device.
- "FUL" or "Battery Full" Displayed Immediately:
- The battery may already be fully charged.
- Ensure the battery voltage is within the charger's operating range (6-180Ah).
- "ERR" or Error Code Displayed:
- Indicates a fault. Check for reverse polarity connection, short circuit, or an open circuit (non-battery link).
- The battery might be severely damaged or completely dead, which the repair mode cannot fix.
- Charger Overheating:
- Ensure the charger's ventilation fan and vents are not blocked.
- Operate the charger in a well-ventilated area.
If the problem persists after attempting these solutions, please contact customer support.
8. Technical Specifications
| Specification | Value |
|---|---|
| Input Voltage | 100-240V AC, 50-60Hz |
| Rated Output | 12V 10A, 24V 5A |
| Minimum Start Voltage | 8.0V |
| Battery Range | 6-180Ah |
| Thermal Protection | 65°C +/- 5°C |
| Efficiency | App. 85% |
| Dimensions (L×W×H) | 170×110×65mm (6.69 x 4.33 x 2.56 inches) |
| Weight | 605g (1.33 pounds) |
| Compliant Standards | CE, IEC60335, EN61000, EN55014 |
| Switchmode Technology | Yes |
| Cooling | Fan |
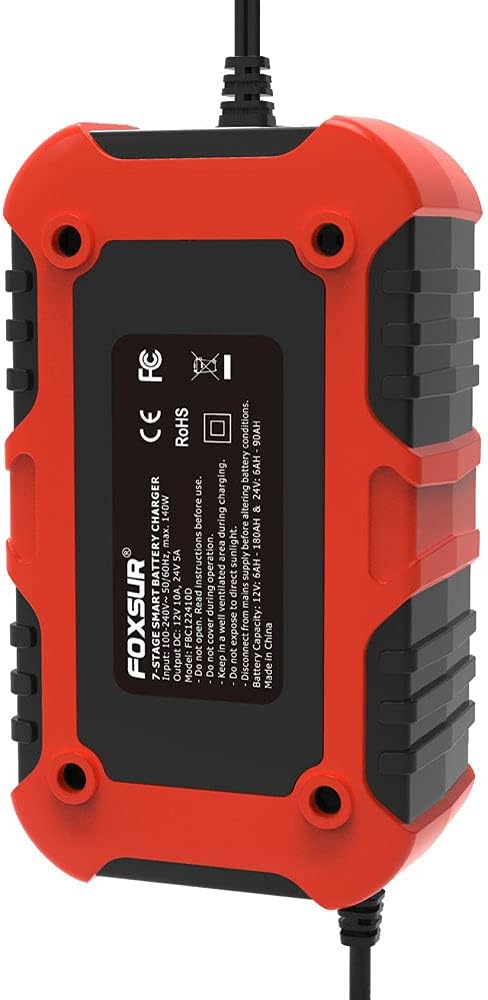
Figure 7: Back view of the charger, displaying model number FBC122410D and key specifications.
9. Warranty and Support
For warranty information or technical support, please refer to the documentation included with your purchase or contact FOXSUR customer service through the retailer where the product was purchased. Please have your model number (FBC122410D) and purchase date available when contacting support.


