
1. Introduction
Thank you for choosing the Mars Gaming MC300 Micro ATX PC Case. This manual provides essential information for the proper installation, operation, and maintenance of your new PC case. Please read these instructions carefully before beginning assembly to ensure optimal performance and longevity of your components.

Figure 1.1: Overview of the Mars Gaming MC300 PC Case.
2. Key Features
The Mars Gaming MC300 PC Case is designed to accommodate high-performance Micro-ATX and Mini-ITX gaming configurations, offering a balance of aesthetics and functionality.
- Gaming Design: Features a tempered glass side window, three pre-installed FRGB front fans, a TOTAL-MESH front grille, and conveniently located top-mounted controls and connections.
- Maximum Cooling Capacity: Equipped with a triple front/rear ventilation system and a TOTAL-MESH front grille for efficient airflow. Supports 120mm liquid coolers.
- Internal Capacity: Compatible with Micro-ATX and Mini-ITX motherboards. Provides support for up to four 2.5-inch SSDs and two 3.5-inch HDDs.
- Advanced Gaming RGB Lighting: The three front fans feature a Fixed RGB lighting system, providing consistent color illumination to your setup.
2.1 Visual Features

Figure 2.1: Fixed RGB illumination from the front fans.
The MC300 case incorporates three front-mounted fans with Fixed RGB lighting, enhancing the visual appeal of your system. The lighting provides a constant flow of color, visible through the mesh front panel and the tempered glass side panel.
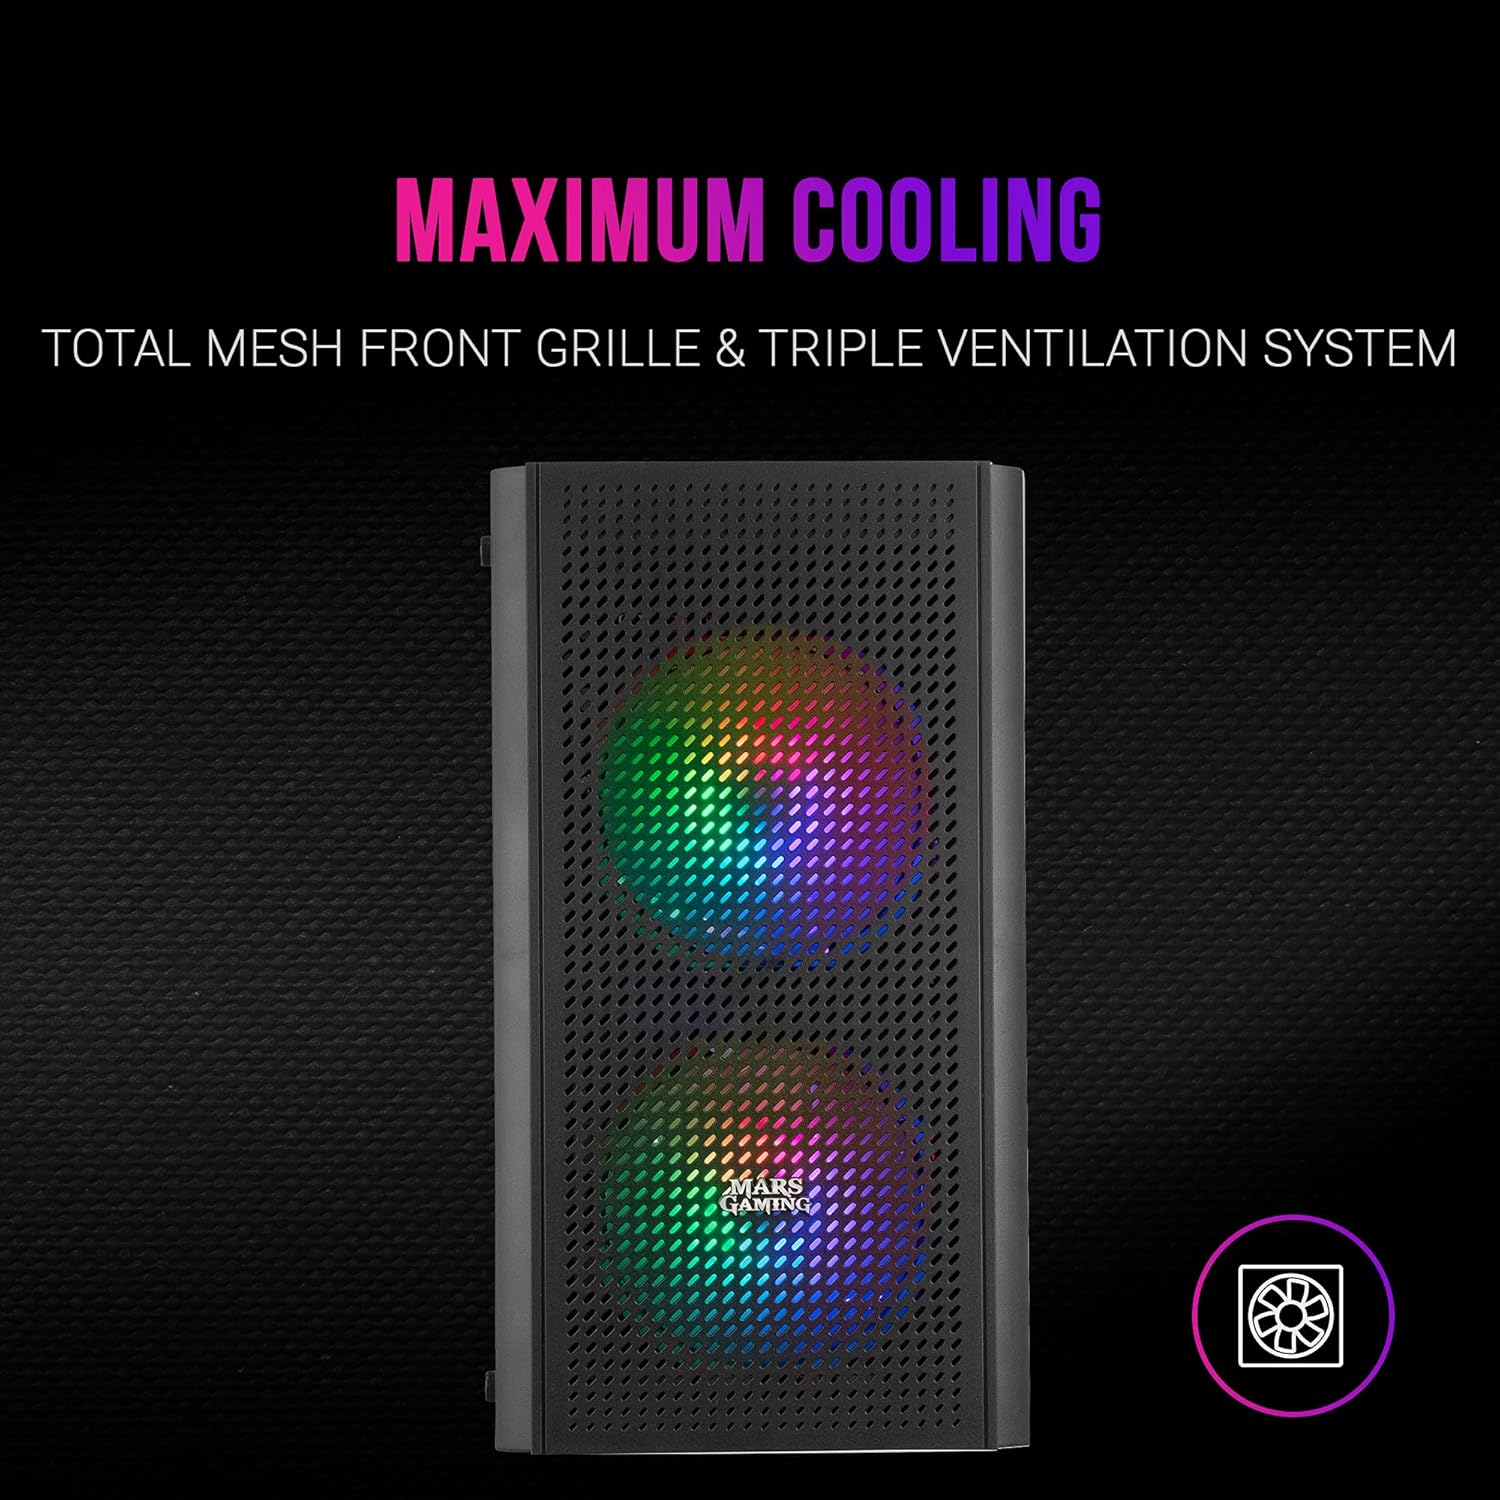
Figure 2.2: TOTAL-MESH front grille for enhanced cooling.
The TOTAL-MESH front grille is designed to maximize airflow, contributing to the case's excellent cooling capabilities. This design allows for efficient intake of cool air, crucial for maintaining optimal component temperatures.

Figure 2.3: Tempered glass side window.
A tempered glass side window provides a clear view of your internal components, allowing you to showcase your build and the integrated RGB lighting.

Figure 2.4: Top-mounted controls and connections.
For user convenience, all essential controls and connections, including USB ports and audio jacks, are located on the top panel of the case.
3. Setup and Installation
3.1 Safety Precautions
- Always disconnect the power supply from the wall outlet before installing or removing any components.
- Wear an anti-static wrist strap or frequently touch a grounded metal object to prevent electrostatic discharge (ESD) damage to components.
- Handle components carefully to avoid physical damage.
3.2 Component Compatibility
The MC300 case supports the following:
- Motherboards: Micro-ATX, Mini-ITX
- CPU Cooler Height: Maximum 160mm
- Graphics Card Length: Maximum 260mm
- Storage: Up to 4 x 2.5" SSDs and 2 x 3.5" HDDs
- Radiator Support: 120mm (x1) included, 120mm (x2) optional, 140mm (x2) optional
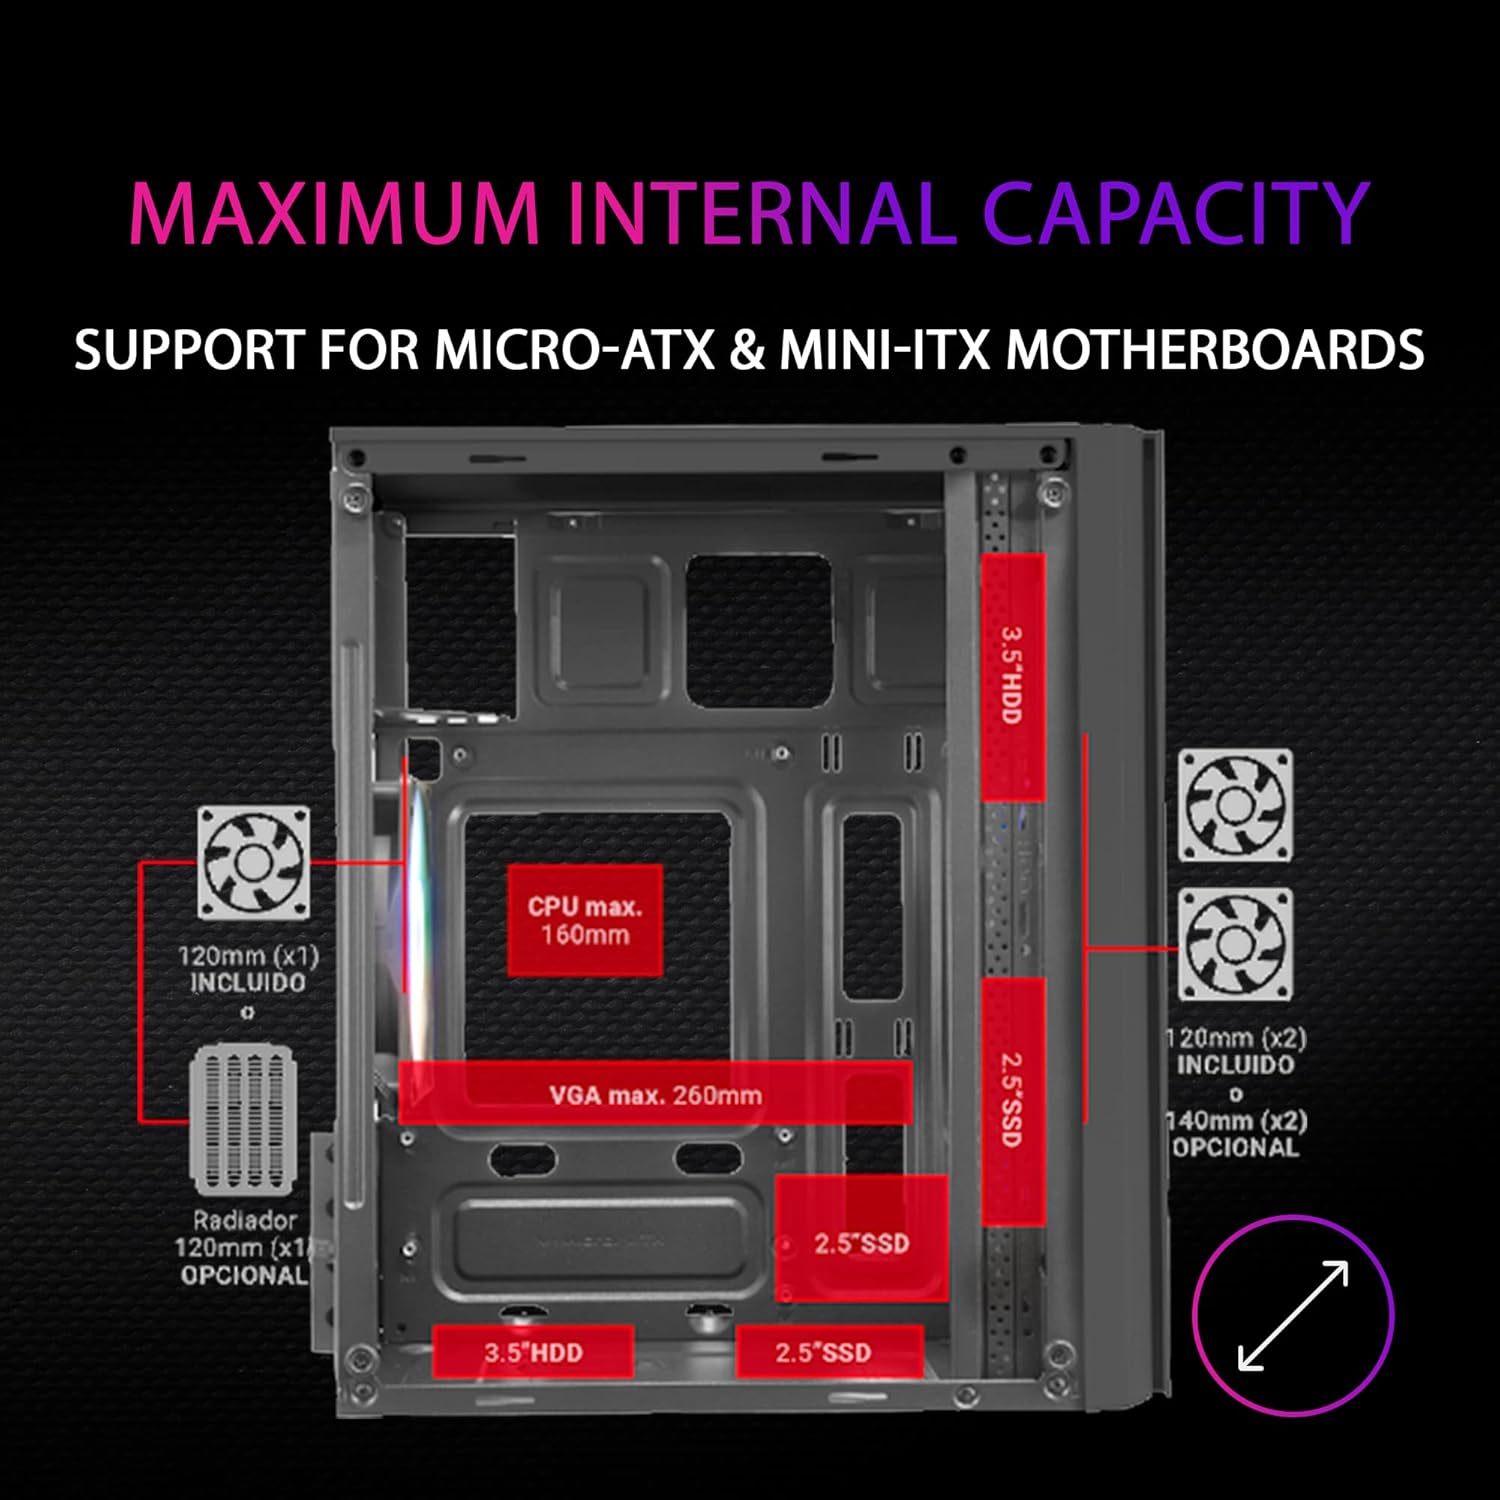
Figure 3.1: Internal capacity and component clearance.
3.3 Installation Steps
- Open the Case: Unscrew the thumbscrews on the tempered glass side panel and carefully remove it.
- Install Motherboard: Align your Micro-ATX or Mini-ITX motherboard with the standoffs inside the case. Secure it with screws.
- Install Power Supply: Mount your power supply unit (PSU) in its designated bay, typically at the front of this case. Secure it with screws.
- Install Storage Drives: Mount your 2.5" SSDs and 3.5" HDDs into the available drive bays. Secure them with screws.
- Install Graphics Card: Insert your graphics card into the appropriate PCIe slot on the motherboard and secure it with a screw or latch. Ensure it does not exceed the maximum length of 260mm.
- Connect Cables: Connect all necessary power cables from the PSU to the motherboard, graphics card, and storage drives. Connect front panel cables (USB, audio, power switch, reset switch, LED indicators) to the motherboard headers according to your motherboard manual.
- Cable Management: Route cables behind the motherboard tray where possible to improve airflow and aesthetics.
- Close the Case: Reattach the tempered glass side panel and secure it with the thumbscrews.
4. Operating Instructions
4.1 Powering On
After completing the installation and connecting all external peripherals, press the power button located on the top panel of the case to start your computer.
4.2 FRGB Fan Operation
The three front fans come with pre-set Fixed RGB lighting. These fans will illuminate automatically when the system is powered on. The lighting pattern is fixed and does not offer user-adjustable modes directly from the case controls.
4.3 Front Panel Connections
The top panel provides convenient access to:
- USB 3.0 Port: For high-speed data transfer with compatible devices.
- USB 2.0 Ports: For connecting various USB devices.
- Audio Jacks: For connecting headphones and microphones.
5. Maintenance
Regular maintenance helps ensure optimal performance and extends the lifespan of your PC components.
- Dust Cleaning: Periodically clean the dust filters (if present) and the interior of the case using compressed air or a soft brush. Dust accumulation can hinder airflow and lead to overheating.
- Exterior Cleaning: Wipe the exterior surfaces with a soft, damp cloth. Avoid using harsh chemicals or abrasive materials that could damage the finish or tempered glass.
- Fan Cleaning: Gently clean the fan blades to remove dust. Ensure fans are not obstructed.
6. Troubleshooting
If you encounter issues with your PC case, consider the following common troubleshooting steps:
- No Power: Ensure the power supply is properly connected to the wall outlet and the motherboard. Check all power cables are securely seated. Verify the power button cable is correctly connected to the motherboard.
- Fans Not Spinning/RGB Not Working: Check that the fan power cables and RGB cables (if separate) are correctly connected to the motherboard or fan controller. Ensure the power supply is providing adequate power.
- Overheating: Verify that all case fans are spinning correctly and are oriented to provide proper airflow (intake at front, exhaust at rear/top). Ensure no cables are obstructing airflow. Clean any dust buildup.
- Front Panel Ports Not Working: Confirm that the USB and audio cables from the front panel are correctly connected to the corresponding headers on your motherboard.
7. Specifications
| Feature | Specification |
|---|---|
| Model Name | MC300 |
| Brand | Mars Gaming |
| Case Type | Mid Tower |
| Motherboard Compatibility | Micro ATX, Mini ITX |
| Material | Glass (Tempered Glass Side Panel) |
| Color | Black |
| Item Dimensions (LxWxH) | 11.81 x 7.48 x 13.9 inches |
| Item Weight | 6.29 pounds |
| Pre-installed Fans | 3x 120mm FRGB Front Fans |
| Fan Size | 120 Millimeters |
| Cooling Method | Air |
| Liquid Cooler Support | 120mm |
| Number of USB 3.0 Ports | 1 |
| Power Supply Mounting Type | Front Mount |
| Recommended Uses For Product | Gaming |
8. Warranty and Support
Mars Gaming products are manufactured to high-quality standards. For information regarding warranty coverage, terms, and conditions, please refer to the warranty card included with your product or visit the official Mars Gaming website. For technical support or further assistance, please contact Mars Gaming customer service through their official channels.


