1. Introduction
Thank you for choosing the WASJOYE Security Safe Box. This safe is designed to provide secure storage for your valuables, firearms, and important documents. It features multiple access methods including high-precision fingerprint identification, a digital keypad, and emergency override keys. Constructed from heavy-duty alloy steel with a durable finish, this safe offers robust protection and convenient access.
Please read this manual thoroughly before operating the safe to ensure proper setup and usage.
2. Safety Information
- Emergency Keys: Always keep the emergency override keys outside the safe. Do not store them inside the safe, as this will prevent access if batteries fail or you forget your code/fingerprint.
- Battery Safety: Use only specified AA batteries. Do not mix old and new batteries, or different types of batteries. Remove batteries if the safe will not be used for an extended period.
- Placement: Ensure the safe is placed on a stable, level surface or securely mounted to prevent tipping.
- Children: Keep the safe and its contents out of reach of children.
3. Package Contents
Verify that all items are present in the package:
- WASJOYE Security Safe Box
- USB Cable (for external power)
- Anti-theft Wirerope
- Instruction Manual (this document)
- Two Emergency Override Keys
4. Product Overview
Familiarize yourself with the main components of your WASJOYE Security Safe Box.

Figure 4.1: Safe Components
This image illustrates the key components of the safe: the fingerprint sensor, backup keypad, override keyhole, USB cable port, reset button, and battery case. The interior shows space for items like a pistol.

Figure 4.2: Digital Panel and Access Methods
This image highlights the digital panel with LED indicator lights and the three primary ways to open the safe: digital passwords, fingerprint, and emergency keys. It also details the robust construction materials and soft interior lining.
- Fingerprint Sensor: High-precision semiconductor sensor for quick access.
- Digital Keypad: For entering a numerical password.
- Override Keyhole: For emergency access using the provided keys.
- USB Port: For external power supply if internal batteries are depleted.
- Reset Button: Used for programming new passwords and fingerprints.
- Battery Case: Located on the underside for 4 AA batteries.
- Padded Foam Interior: Protects contents from scratches and impacts.
- Anti-theft Wirerope: Allows securing the safe to a fixed object.
5. Setup
5.1 Battery Installation
- Locate the battery compartment on the underside of the safe.
- Open the battery cover.
- Insert 4 AA batteries, ensuring correct polarity (+/-).
- Close the battery cover. The safe will emit a beep, indicating it is powered on.
5.2 Setting a Digital Password
The safe comes with a default password. It is highly recommended to change this immediately.
- Open the safe using the emergency key or default password.
- Press the Reset Button (usually located inside the safe, near the battery compartment or hinge).
- Within 5 seconds, enter your desired 4-8 digit password on the keypad.
- Press the # key to confirm. The LED indicator will flash green.
- Re-enter the same password and press # again to confirm. A successful confirmation will be indicated by a green light and a beep.
5.3 Registering Fingerprints
The safe can store more than 32 fingerprints.
- Open the safe.
- Press the Reset Button.
- Place your finger on the fingerprint sensor. The sensor will scan your finger multiple times. Lift and place your finger slightly differently each time until the safe indicates successful registration (e.g., a green light and a series of beeps).
- Repeat for additional fingers or users as needed.
5.4 Silent Mode Activation
To activate silent mode and disable keypad beeps:
- With the safe closed, enter your password or use a registered fingerprint to open it.
- While the safe is open, press and hold the Reset Button until you hear a confirmation sound or see a specific light pattern (refer to the quick start guide for exact indication).
- Test by closing and attempting to open the safe. If successful, the beeps should be suppressed.
Note: Some units may revert from silent mode to noisy mode after a period. If this occurs, repeat the activation steps.
5.5 Securing the Safe
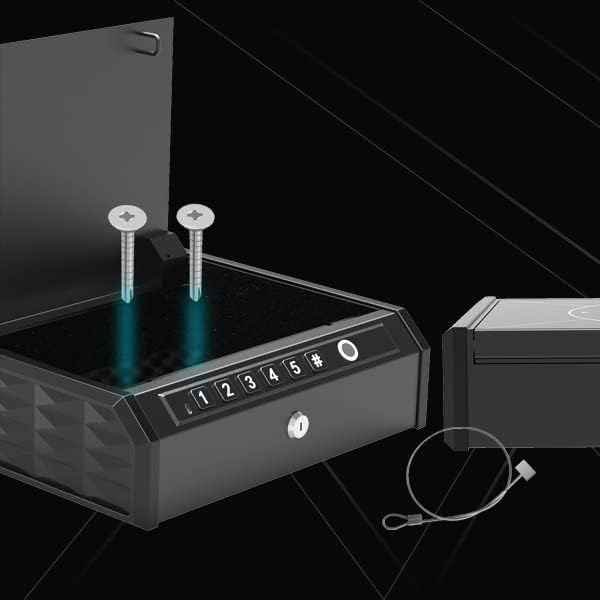
Figure 5.1: Mounting Options
This image displays the safe with mounting screws and the anti-theft cable, illustrating options for securing the unit.
- Anti-theft Wirerope: Loop the wirerope around a secure, heavy object (e.g., a car seat frame, desk leg) and attach it to the designated point on the safe.
- Wall/Surface Mounting: The safe can be mounted to a wall or other surface using appropriate screws (not included, as the included screws may be insufficient for all mounting types). Ensure the mounting surface is strong enough to support the safe and its contents.
6. Operating the Safe
6.1 Opening with Fingerprint
Place a registered finger flat on the fingerprint sensor. The safe will unlock with a motor drive and open automatically if the fingerprint is recognized.
6.2 Opening with Digital Password
Enter your 4-8 digit password on the keypad, then press the # key. The safe will unlock and open automatically.
6.3 Opening with Emergency Key
Insert one of the emergency override keys into the keyhole and turn it to unlock the safe. This method bypasses the electronic locking system.
6.4 External Power Supply (USB)
If the internal batteries are completely depleted, you can power the safe externally using the provided USB cable. Connect the USB cable to the safe's USB port and to a power source (e.g., a power bank or USB wall adapter). This will provide temporary power to use the fingerprint or digital password access methods.
7. Maintenance
- Battery Replacement: Replace all 4 AA batteries when the low battery alarm sounds or if the safe becomes unresponsive. Always replace all batteries at once with new ones.
- Cleaning: Wipe the exterior of the safe with a soft, damp cloth. Avoid abrasive cleaners or solvents that could damage the finish or electronic components.
- Fingerprint Sensor: Keep the fingerprint sensor clean and dry for optimal performance.
8. Troubleshooting
| Problem | Possible Cause | Solution |
|---|---|---|
| Safe does not open with fingerprint. | Finger not registered; dirty/wet sensor; incorrect placement; low battery. | Ensure finger is clean and dry. Re-register fingerprint if necessary. Place finger flat and centered. Replace batteries. |
| Safe does not open with digital password. | Incorrect password entered; low battery. | Verify password. Re-enter carefully. Replace batteries. Use emergency key if locked out. |
| Safe makes beeping sounds even after setting silent mode. | Silent mode may have reset or not been properly activated. | Re-activate silent mode as per Section 5.4. If the issue persists, this may be a characteristic of the unit. |
| Safe does not power on. | Dead or incorrectly installed batteries. | Check battery polarity. Replace all 4 AA batteries with new ones. Use USB external power if needed. |
| Low battery alarm sounds. | Batteries are low. | Replace all 4 AA batteries immediately. |
9. Specifications

Figure 9.1: Product Dimensions
This image provides a visual representation of the safe's external dimensions.
| Feature | Detail |
|---|---|
| Brand | WASJOYE |
| Model Number | B09GY2ZT5W |
| Product Dimensions (D x W x H) | 11.02" x 14.17" x 3.94" (28cm x 36cm x 10cm) |
| Lock Type | Fingerprint, Keypad, Emergency Key |
| Material | Alloy Steel |
| Color | Black |
| Special Features | Fingerprint Sensor, Portable, Alarm (incorrect password/low battery) |
| Mounting Type | Wall Mount (optional), Anti-theft Cable |
| Power Source | 4 AA Batteries (not included), USB External Power |
| Fingerprint Capacity | More than 32 fingerprints |
| Error-recognition rate | ≤0.001% |
10. Warranty and Support
For quality problems or technical assistance, please contact WASJOYE customer support.
Email: xinfuanus@outlook.com
Please have your model number (B09GY2ZT5W) and purchase information ready when contacting support.